Easy Embroidery Hoop Lace Pumpkins Craft
Home » CREATE » Crafts » Pumpkin Crafts »This Embroidery Hoop Lace Pumpkins Craft is the perfect project to add a whimsical touch to your fall decor.

As the air turns crisp and the leaves change colors, the fall season is the perfect time to get crafty and cozy up your home!
So grab your hot glue gun and a few other supplies; let’s dive into this step-by-step tutorial.
Don’t have time for this craft now? Tap the share icon in the bottom right of the screen, then tap the heart icon ♥ to save it for later!

Affiliate Disclosure
We have included affiliate links to products and services related to this post.
We may earn a commission if you purchase after clicking on those links.
As an Amazon Associate, I earn from qualifying purchases.
Read Our Full Disclosure Policy and Privacy Policy
The full list of materials, tools, and instructions is in the printable tutorial card at the end of this post. I highly recommend reading the blog post all the way through before starting this project to ensure that you have everything required and understand the steps and timings involved.
Embroidery Hoop Lace Pumpkins Craft
This fun project involves two of our favorite things: pumpkins and the vibrant hues of autumn. Not only are these pumpkins adorable and eye-catching, but they are also super easy to make!
The first step is real simple—gather the materials for the charming embroidery hoop pumpkins.
The full supply list is below, but it includes mini embroidery hoops in different sizes, cotton lace doilies, recycled wine corks, and some craft paint.
Don’t forget a pair of scissors, fabric glue, ribbon, and your trusty hot glue gun!
The lace hoop pumpkins are a little too small to hang on your front door, but if you have a piece of lace fabric big enough to fit a 12″/30cm wooden hoop, you can use the method in this DIY to make a large pumpkin.
But their mini size makes them great for adding to your fall home decor, from sitting on tiered trays or mantles to hostess gifts or place cards for Thanksgiving dinner.
And if you’re looking for more autumn craft ideas, we have great ideas in our 23+ Best Fall Crafts for Seniors post.
For our fellow pumpkin fanatics, take a look at these 26 Amazing Pumpkin Crafts.
Materials & Tools Used in This Craft
The materials and tools needed for this project are linked on Amazon below for your convenience. The quantities are on the craft tutorial card at the end of this post.
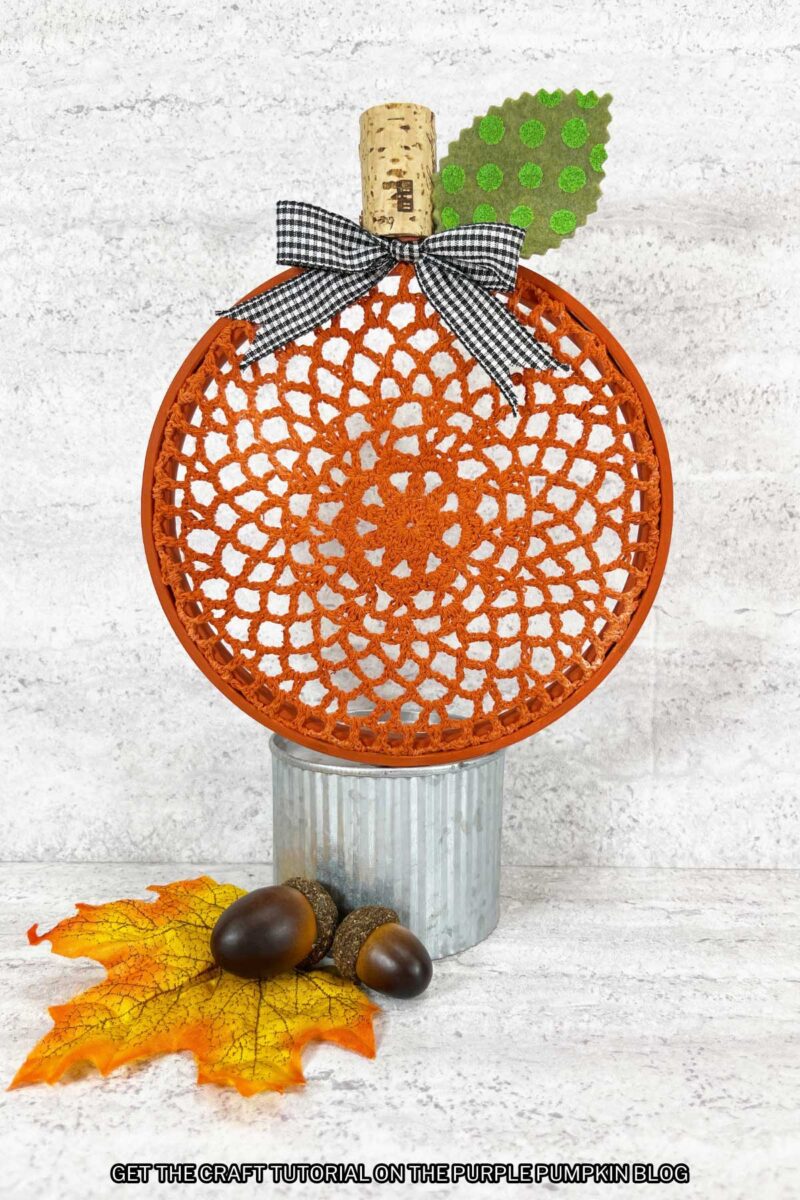
- Wooden Embroidery Hoops – We used two sizes: 4″/10cm and 6″/15cm in diameter. You can use any size you like, but ensure that your lace doilies are 2″/5cm larger in diameter.
- Cotton Lace Doilies – We use 6″/15cm and 8″/20cm in diameter. Make sure the doilies are cotton.
- Wine Corks – To make the stem of the pumpkin. Recycle one if you’re a wine drinker, but if you’re not, you can buy one!
- Green Craft Felt
- Acrylic Craft Paints – You will need Bright Orange, Burnt Orange, and Bright Green.
- Scissors – To trim excess fabric and cut leaf shapes from felt.
- Fabric Glue
- Ribbon – We used black and white gingham ribbon, but you can use any color/pattern you like.
- Hot Glue Gun and Glue Sticks
- Plastic Spray Bottles – You will need two.
- Paintbrush – This set of paintbrushes has various sizes and types for different types of paint and glue.
No time to read now? Tap the buttons below to save the craft to your Pinterest boards or Facebook page for later!
Where Can I Get Cheap Craft Supplies?
This budget-friendly craft uses supplies you may already have or can purchase cheaply at a dollar store (or local equivalent).
Check out your local dollar stores like Dollar Tree if you’re in the USA. If you’re in the UK, the Poundshop, The Range, Wilko, and Baker Ross are great places to shop for cheap and inexpensive craft supplies. To the rest of the world reading this—we’re sorry we don’t know every cheap store out there, but please do hunt the ones out in your location for crafting bargains!

How Do I Make Embroidery Hoop Lace Pumpkins?
The printable tutorial card with the full supplies list and instructions can be found at the end of this post.
This quick and easy pair of Lace Hoop Pumpkins comes together in just about 30 minutes (not including drying time).
Step 1 – Prepare Paint: Squeeze 1 oz (30ml) of bright orange paint into a 3-ounce (100ml) spray bottle. Add 2 oz ( 60ml) of water to the bottle, replace the cap, and shake well to combine. Repeat with the burnt orange paint and a second spray bottle.
Step 2 – Spray Paint Doilies: Remove any labels from the doilies, then place them on top of some scrap cardboard.
Spray the larger doily with burnt orange and the smaller one with bright orange paint. Set aside to dry.
Flip the doilies over and apply a second coat. Set aside to dry completely.
TIP! Mix the colors slightly by lightly spraying one color on the other.
Step 3 – Paint Hoops: Remove any labels from the embroidery hoops. Loosen the screw at the top of the hoop and separate the outer ring from the inner ring.
Basecoat the 6-inch hoop with burnt orange acrylic craft paint, and then paint the 4-inch hoop with bright orange acrylic craft paint. Set aside to dry.
Step 4 – Fit the Doilies: When the doilies and embroidery hoops are completely dry, fit the lace doilies loosely into the hoops. Pull gently from the back to ensure the lace is taught, then tighten the screw at the top of the hoop.
Trim the excess lace from the back of the embroidery hoop with scissors.
Apply a thin line of fabric glue to the cut edge of the lace to secure it. Set aside to dry.
NOTE! Adding glue will prevent the chunky lace from slipping out or coming loose from the hoop.
Step 5 – Make Leaves and Stem: Cut leaf shapes from the green craft felt with scissors.
Use bright green acrylic craft paint and a new pencil eraser to create polka dots on one leaf. Create a plaid pattern on the second leaf by dabbing vertical and horizontal lines with a flat paintbrush.
Carefully cut a recycled wine cork in half vertically with a craft knife.
Step 6 – Attach Stem and Leaves: Attach the cork stems to the metal screw on the embroidery hoop pumpkins with a glue gun and glue sticks.
Once the paint on the leaves is dry, glue them to the side of each stem.
Step 7 – Attach Ribbon Bow: Tie two bows with black and white gingham ribbon. Attach to the front of the cork stems with a glue gun and glue sticks. Trim any long ribbon ends with scissors.
TIP! If you wish to hang your lace hoop pumpkins, form a length of ribbon into a loop and hot glue to the back. Alternatively, you can tie some embroidery thread to the screw at the top of the pumpkin to hang it. You could also try a small wreath hook.
More Pumpkin Crafts
Looking for more pumpkin crafts? Try these next:
- Upcycled Thread Ball Pumpkin Craft – uses the same spraying technique as the lace pumpkins.
- Pencil Cup Pumpkin Craft
- Upcycled Mini Cake Pan Pumpkins Craft
- Mini Pumpkin Topiary Craft
- Easy No Sew Denim Pumpkin Craft
- Golf Ball Pumpkins Craft
We’ve shared over 500+ crafts for all seasons and holidays—why not take a look at them next?
Printable Embroidery Hoop Lace Pumpkins Craft Tutorial Card
The printable tutorial card is below—please leave a star rating and quick review to share your experience with others!
Embroidery Hoop Lace Pumpkins
Materials
- 2 Wooden Embroidery Hoops 4″/10cm and 6″/15cm in diameter.
- 2 Cotton Lace Doilies 6″/15cm and 8″/20cm in diameter.
- 1 Wine Cork
- Scrap of Green Craft Felt
- Black and White Gingham Ribbon
- Acrylic Craft Paints – Bright Orange Burnt Orange, and Bright Green.
TOOLS
- 2 Plastic Spray Bottles
- Fabric Glue
- Hot Glue Gun and Glue Sticks
Instructions
- Squeeze 1 oz (30ml) of bright orange paint into a 3-ounce (100ml) spray bottle. Add 2 oz ( 60ml) of water to the bottle, replace the cap, and shake well to combine. Repeat with the burnt orange paint and a second spray bottle.
- Remove any labels from the doilies, then place them on top of some scrap cardboard. Spray the larger doily with burnt orange and the smaller one with bright orange paint. Set aside to dry. Flip the doilies over and apply a second coat. Set aside to dry completely. TIP! Mix the colors slightly by lightly spraying one color on the other.
- Remove any labels from the embroidery hoops. Loosen the screw at the top of the hoop and separate the inside hoop from the outside hoop. Basecoat the 6"/10cm hoop with burnt orange acrylic craft paint, and then paint the 4" hoop with bright orange acrylic craft paint. Set aside to dry.
- When the doilies and embroidery hoops are completely dry, fit the lace doilies loosely into the hoops. Pull gently from the back to ensure the lace is taught, then tighten the screw at the top of the hoop. Trim the excess lace from the back of the embroidery hoop with scissors. Apply a thin line of fabric glue to the cut edge of the lace to secure it. Set aside to dry. NOTE!Adding glue will prevent the chunky lace from slipping out or coming loose from the hoop.
- Cut leaf shapes from the green craft felt with scissors. Use bright green acrylic craft paint and a new pencil eraser to create polka dots on one leaf. Create a plaid pattern on the second leaf by dabbing vertical and horizontal lines with a flat paintbrush. Carefully cut a recycled wine cork in half vertically with a craft knife.
- Attach the cork stems to the metal screw on the embroidery hoop pumpkins with a glue gun and glue sticks. Once the paint on the leaves is dry, glue them to the side of each stem.
- Tie two black and white gingham ribbon bows. Attach to the front of the cork stems with a glue gun and glue sticks. Trim any long ribbon ends with scissors.
So there you have it! A fun craft like this is a great way to dip your toes into the world of DIY projects. Remember, it’s not just about the end result but also the joy of crafting.
Now that you know how easy the technique is, the next step is to expand your knowledge! Why not craft some DIY embroidery hoop Christmas ornaments? Use white paint to make snowflakes, and add a sprinkle of glitter to make it sparkle.
We hope this embroidery hoop lace pumpkins craft brings you as much delight in making as it does in displaying. Happy crafting!
This post is part of my long-running Crafty October series on The Purple Pumpkin Blog. Since 2012, I’ve shared Halloween recipes, printables, and crafts every October. While I don’t officially run the series anymore, all my new Halloween posts are still part of this decades-long celebration of spooky fun! Browse past Crafty October years for even more inspiration: 2024, 2023, 2022, 2021, 2020, 2019, 2018, 2017, 2016, 2015, 2014, 2013, and 2012.