Mini Pumpkin Topiary Craft
Home » CREATE » Crafts » Pumpkin Crafts »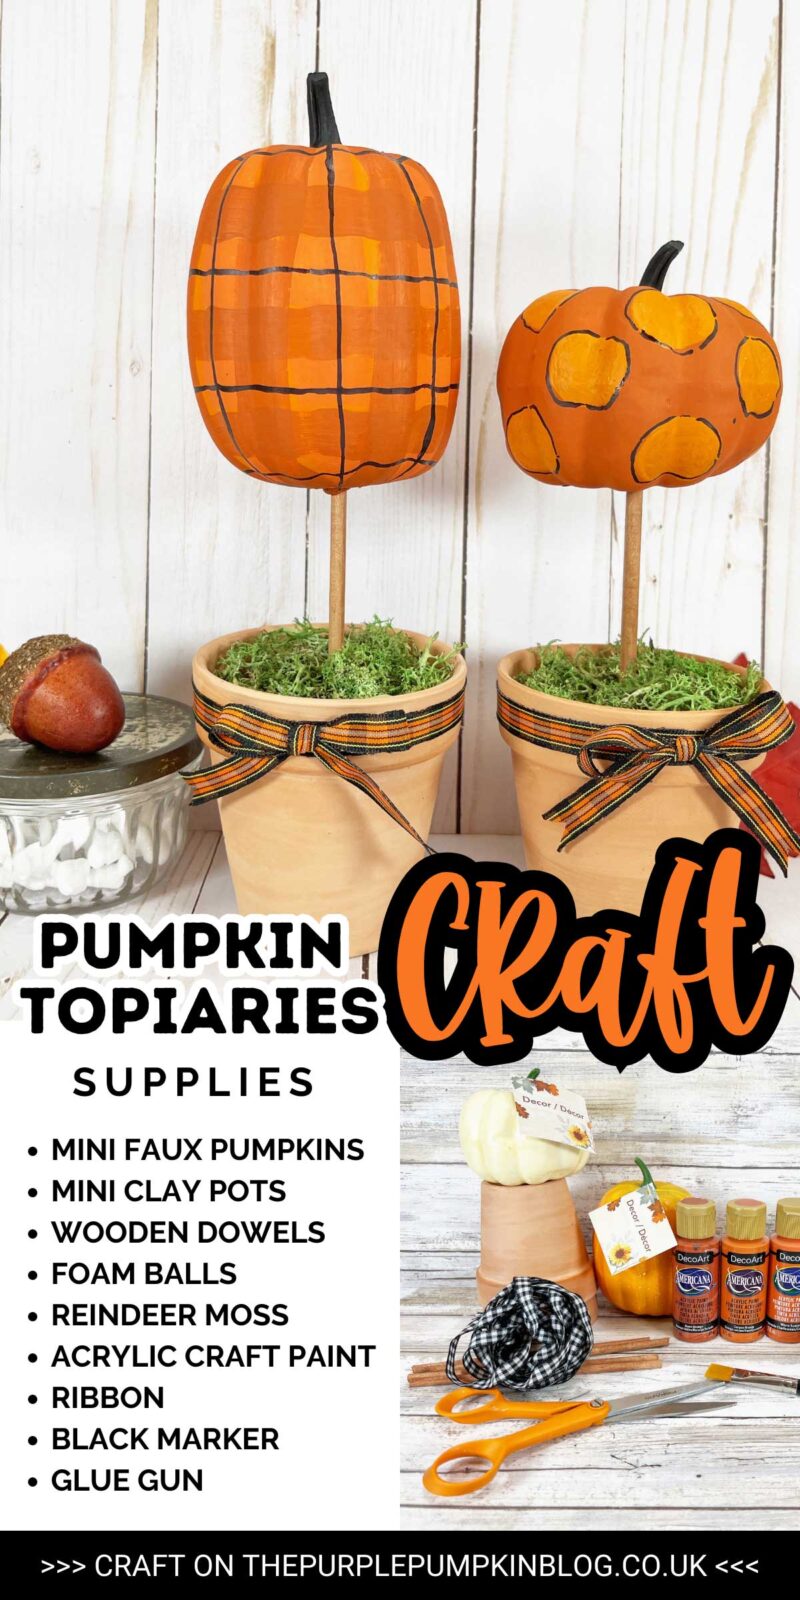
This Mini Pumpkin Topiary Craft is the epitome of fall, bringing together adorable mini pumpkins and DIY flair.

This craft is a perfect seasonal decor piece that will turn heads whether on your front porch or gracing a side table indoors.
What’s the best part? It combines faux pumpkins with other materials easily found at craft stores or your local dollar store.
Whether you’re a DIY pro or your first time delving into the world of crafts, this project has something for everyone.
Don’t have time for this craft now? Tap the heart icon ♥ in the bottom right of the screen to save it for later!
Affiliate Disclosure
We have included affiliate links to products and services related to this post.
We may earn a commission if you purchase after clicking on those links.
As an Amazon Associate, I earn from qualifying purchases.
Read Our Full Disclosure Policy and Privacy Policy
The list of materials, tools, and instructions is in the printable tutorial card at the end of this post. We recommend reading the blog post thoroughly before starting this project to ensure you have everything required and understand the steps and timings involved.
Mini Pumpkin Topiary Craft
You can transform craft pumpkins into mini pumpkin topiaries using shades of orange acrylic craft paint, wooden dowels, clay pots, moss, and ribbon.
Once your mini pumpkin topiary craft is assembled, the next step is deciding where to display your masterpiece!
We’ve shared 500+ crafts on The Purple Pumpkin Blog over the years, so for more fall projects, look at our Autumn Crafts and Fall Crafts For Seniors.
And, of course, we have Pumpkin Crafts aplenty!
Use orange pumpkins to make a Mickey Mouse pumpkin topiary, sew a cute Little Pumpkin using felt, turn an old book into a Paperback Pumpkin, or transform plastic golf balls into a whole bushel of Golf Ball Pumpkins!
DIY Fall Pumpkin Topiary
The topiaries are an easy way to upgrade your seasonal and holiday decor, and they’re versatile enough to sit pretty anywhere!
When autumn is your favorite season, these mini pumpkin topiaries are the ideal size for your tiered trays.
You could make a large pumpkin to add to your yard decor or adorn your front porch next to a pile of fall leaves and string lights.
Why not create several topiaries for a fabulous fall centerpiece on your dining table, perhaps for Thanksgiving.
You could paint them to look like Jack-o’-lanterns, and they become instant Halloween decorations!
The great thing about this DIY pumpkin topiary is that it’s not just another fall project; it’s a testament to your creativity and the joy of the autumn season.
Materials & Tools Used in This Craft
The materials and tools needed for this project are linked on Amazon below for your convenience. The quantities are on the craft tutorial card at the end of this post.
- Mini Pumpkins – We used plastic pumpkins in our craft, but you could use foam pumpkins instead.
- Mini Clay Pots – approximately 2.5″/6cm
- Wooden Dowels – approximately 6″/15cm long
- Foam Balls – approximately 1.25″/3cm
- Green Reindeer Moss – Use Spanish moss for an aged look.
- Acrylic Craft Paints in the following colors:
- Bright Orange
- Medium Orange
- Dark Orange
- Brown
- Black
- Black Gingham Ribbon
- Permanent Black Marker
- Round Sponge Dabber
- Hot Glue Gun and Glue Sticks
- Scissors
- Paintbrush – This set of paintbrushes has various sizes and types for different types of paint and glue.
- Baby Wipes
No time to read now? Tap the buttons below to save the craft to your Pinterest boards or Facebook page for later!
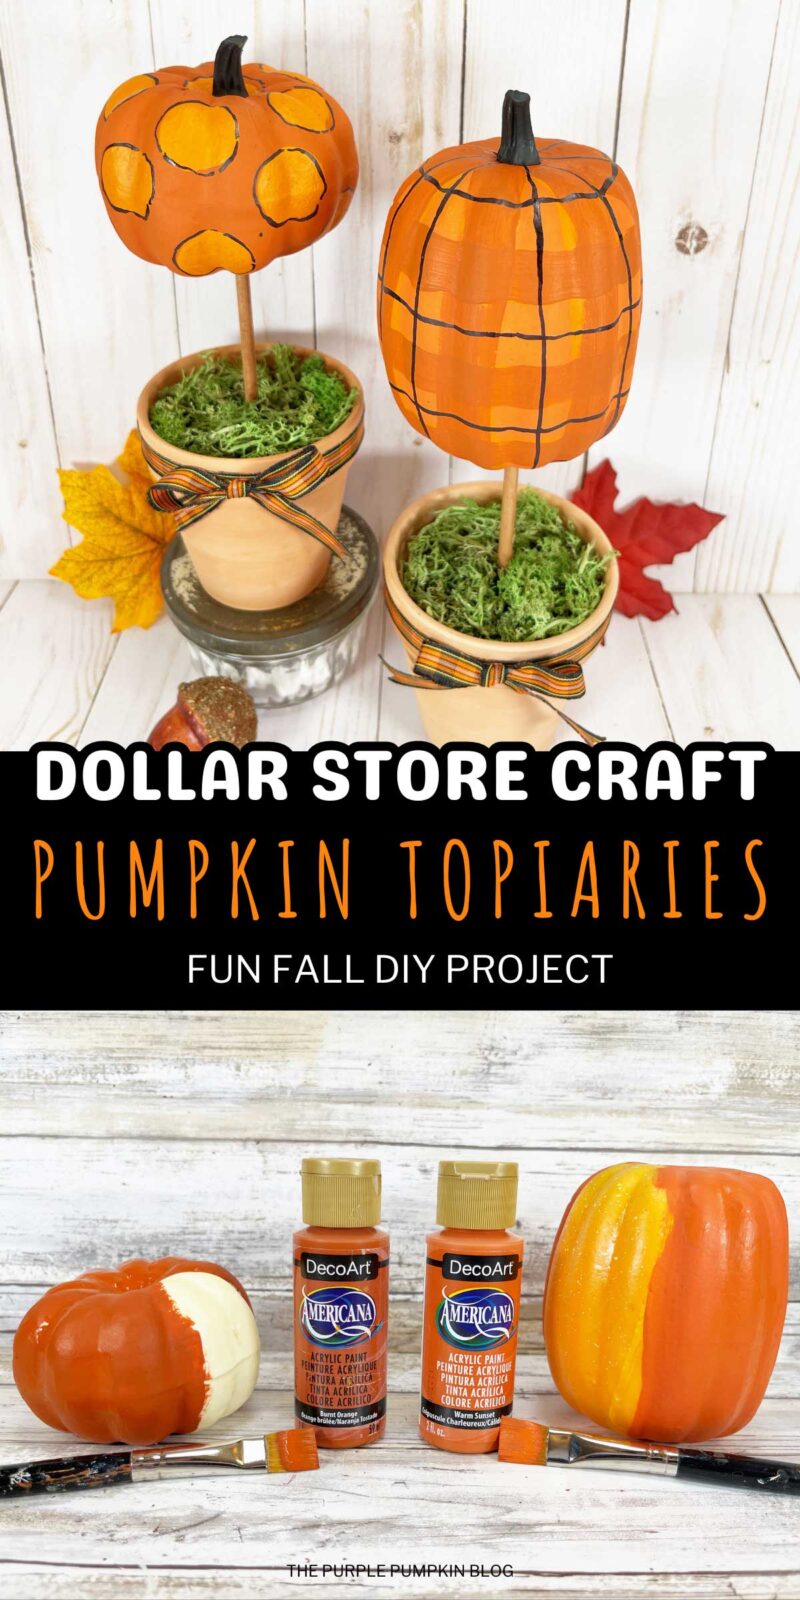
Cheap Craft Supplies
This can be a budget-friendly craft using supplies you may already have or that can be purchased cheaply in stores:
If you’re in the USA, check out your local Dollar Tree or Dollar Store; and if you’re in the UK, the Poundshop, The Range, Wilko, and Baker Ross are great places to shop for cheap and inexpensive craft supplies.
To the rest of the world reading this – I don’t know every cheap store out there – sorry! But please do hunt the ones out in your location for crafting bargains!
How Do I Make Mini Pumpkin Topiaries?
The printable tutorial card with the full supplies list and instructions can be found at the end of this post.
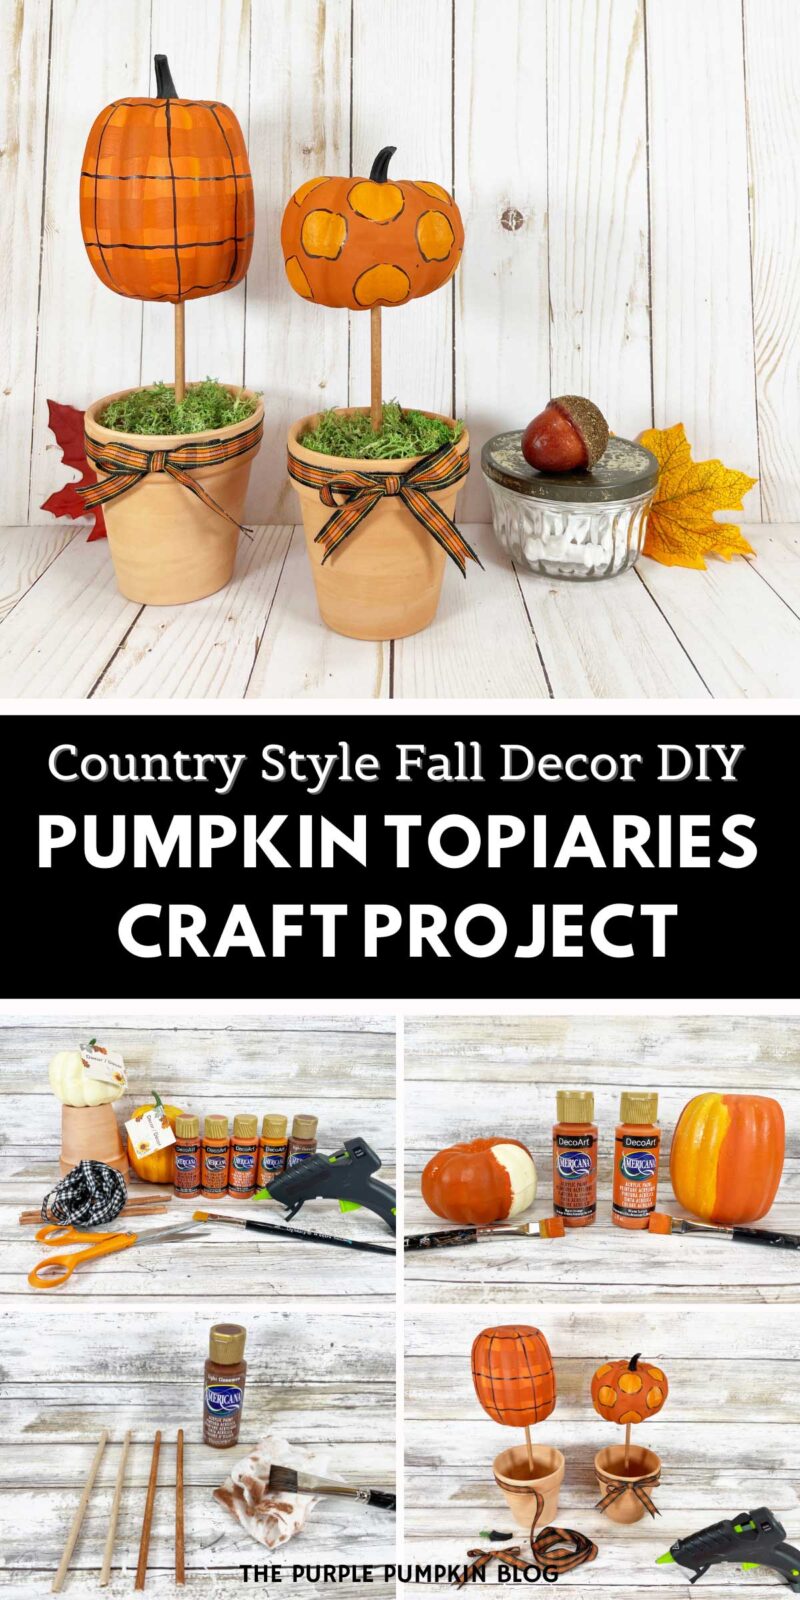
Step 1 – Paint Pumpkins: The first thing to do is to remove the tags and stems from the pumpkins (set stems aside for later).
Paint one pumpkin with dark orange acrylic craft paint and the second pumpkin with medium orange acrylic craft paint.
Set aside to dry and apply a second coat if required.
Step 2 – Paint Dowels: Paint each wood dowel rod with brown craft paint and then remove some of the paint with a baby wipe to give them an aged look. Set aside to dry.
Step 3 – Attach Dowels: Attach a foam ball to the bottom of each clay pot using a glue gun and glue sticks.
Insert the wooden dowel into the center of the foam ball, securing it with glue.
Insert the wooden dowels into the bottom of the pumpkins to create a small hole.
Remove the pumpkin from the dowel, apply glue to the top of the dowel, and secure it into the pumpkins.
Step 4 – Paint Stems: Basecoat the pumpkin stems with black paint and set them aside to dry. Add a second coat if required.
Step 5 – Paint Patterns: On the dark orange pumpkin, use a round foam applicator to create a polka dot pattern with bright orange acrylic craft paint and set it aside to dry.
On the other pumpkin, paint a plaid pattern with a flat paintbrush and dark orange paint and set it aside to dry.
Step 6 – Add Details: Draw an outline around the polka dots using a black marker, making the lines sketchy and loose.
Add a thin plaid pattern using a black marker, making the lines sketchy and loose.
Step 7 – Attach Stems: Glue the black stems back into the top of each pumpkin.
Step 8 – Attach Ribbon: Attach some ribbon around the rim of the clay pots with a glue gun.
Tie additional ribbon into a bow and glue it to the front of the pot. Trim the ends with scissors.
Step 9 – Add Moss: To finish, fill the clay pots with reindeer moss and display where desired.
For lots of fall inspiration, read our Autumn Bucket List—101 Things To Do In Autumn, which also has a free printable to download!
Printable Mini Pumpkin Topiary Craft Tutorial Card
The printable tutorial card is below—please leave a star rating and quick review to share your experience with others!
Pumpkin Topiary Craft
Materials
- 2 mini pumpkins
- 2 2.5″/6cm mini clay pots
- 2 6″/15cm wooden dowels
- 2 1.25″/3cm foam balls
- Green reindeer moss
- Acrylic craft paint in the colors Bright Orange Medium Orange, Dark Orange, Brown, Black
- Black gingham ribbon
TOOLS
- Round sponge applicator
- Paintbrushes
- Baby wipes
Instructions
- Remove the tags and stems from the pumpkins (set stems aside for later). Paint one pumpkin with dark orange paint and the other with medium orange paint. Set aside to dry and apply a second coat if required.
- Paint the wooden dowels with brown paint and then remove some of the paint with a baby wipe. Set aside to dry.
- Attach a foam ball to the bottom of each clay pot using a glue gun and glue sticks. Insert the wooden dowel into the center of the foam ball, securing it with glue. Insert the wooden dowels into the bottom of the pumpkins to create a hole. Remove the pumpkin from the dowel, apply glue to the top of the dowel, and secure it into the pumpkins.
- Basecoat the pumpkin stems with black paint and set them aside to dry. Add a second coat if required.
- On the dark orange pumpkin, use a round foam applicator to create a polka dot pattern with bright orange paint and set it aside to dry. On the other pumpkin, paint a plaid pattern with a flat paintbrush and dark orange paint and set it aside to dry.
- Draw an outline around the polka dots using a black marker, making the lines sketchy and loose. Add a thin plaid pattern using a black marker, making the lines sketchy and loose.
- Glue the black stems back into the top of each pumpkin.
- Attach some ribbon around the rim of the clay pots with a glue gun. Tie additional ribbon into a bow and glue it to the front of the pot. Trim the ends with scissors.
- To finish, fill the clay pots with reindeer moss and display them where desired.
This post is part of my long-running Crafty October series on The Purple Pumpkin Blog. Since 2012, I’ve shared Halloween recipes, printables, and crafts every October. While I don’t officially run the series anymore, all my new Halloween posts are still part of this decades-long celebration of spooky fun! Browse past Crafty October years for even more inspiration: 2024, 2023, 2022, 2021, 2020, 2019, 2018, 2017, 2016, 2015, 2014, 2013, and 2012.