Upcycled Thread Ball Pumpkin Craft
Home » CREATE » Crafts » Pumpkin Crafts »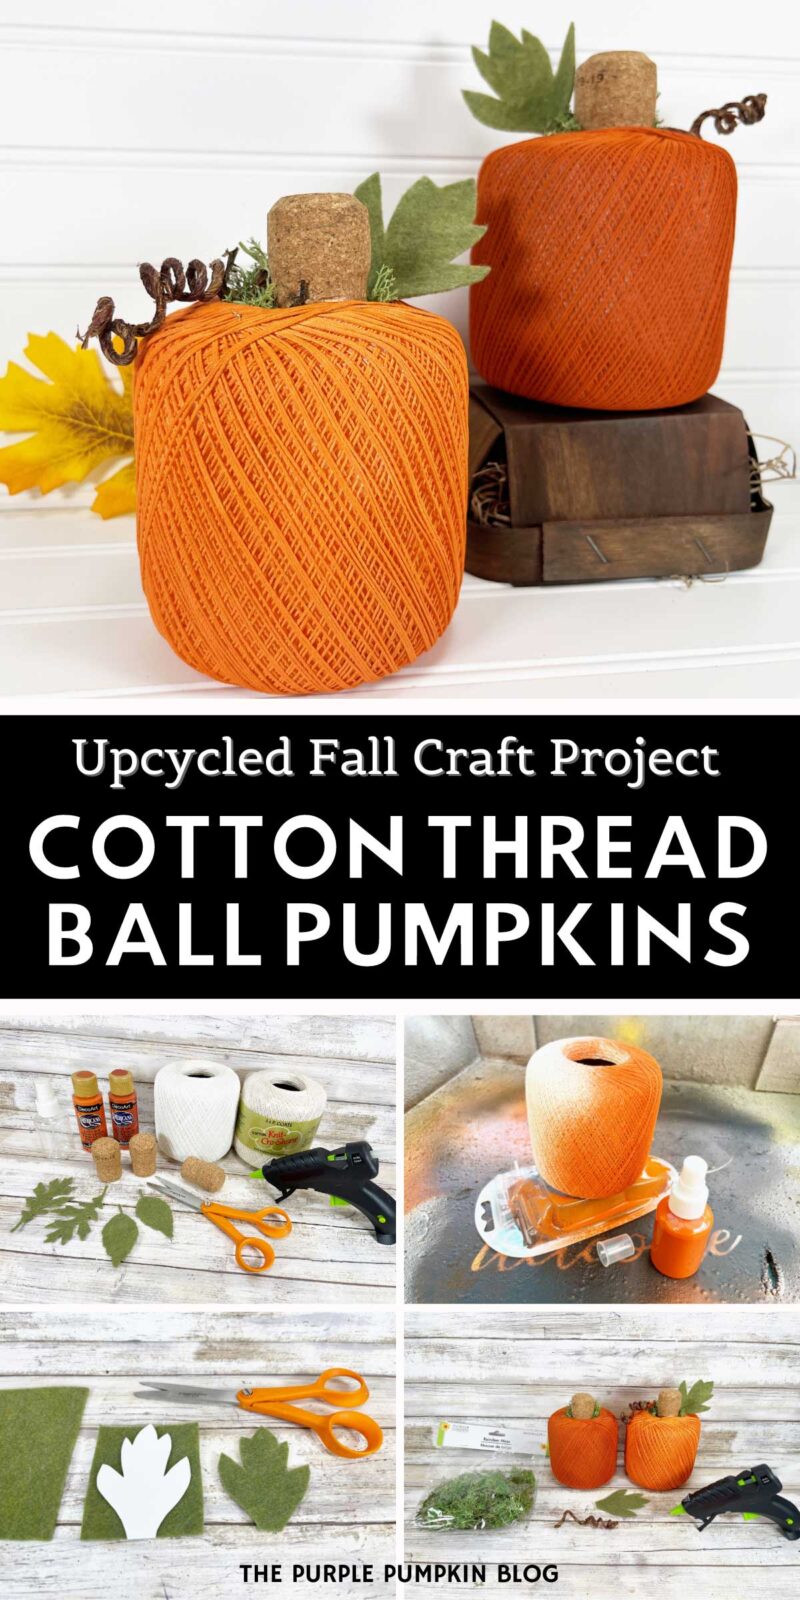

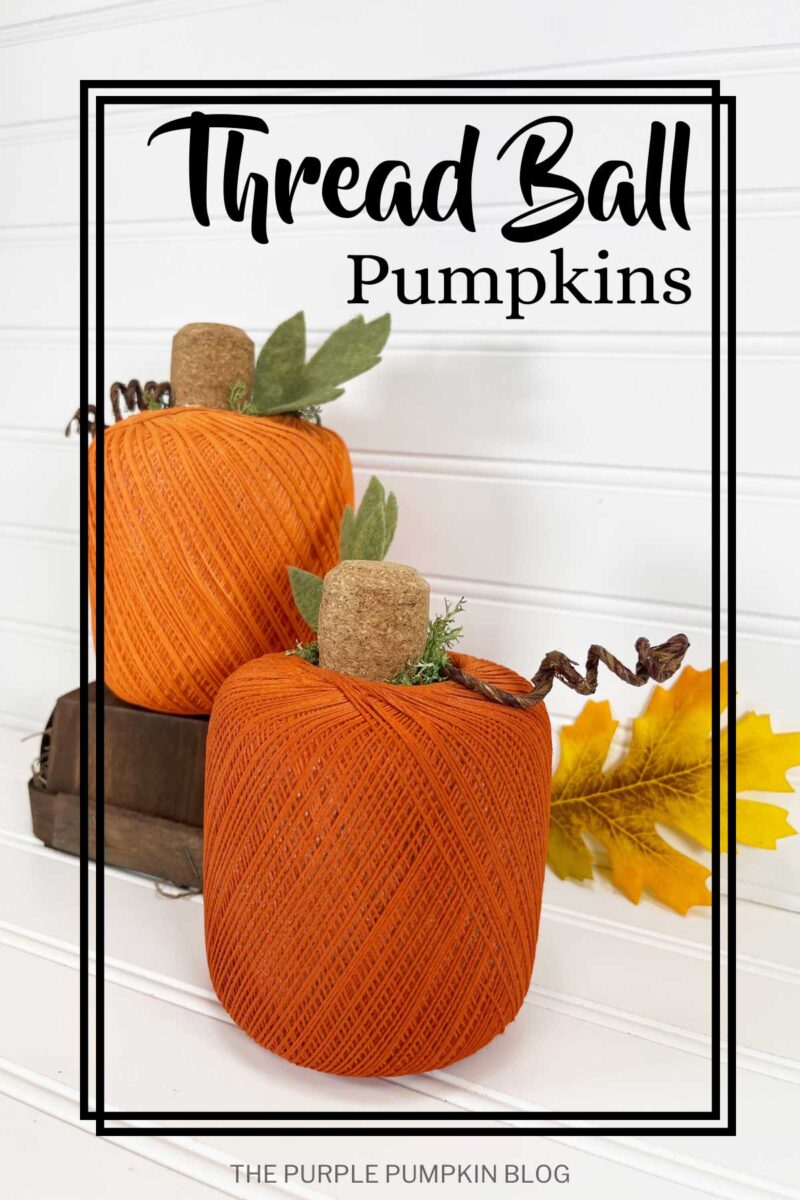
This Thread Ball Pumpkins Craft is the perfect DIY project to usher in autumn.

You can transform ordinary thread balls into delightful pumpkin decorations with just a few simple materials and a sprinkle of creativity.
Whether you’re a seasoned crafter or just starting out, this craft is sure to add a touch of fall magic to your home.
Don’t have time for this craft now? Tap the share icon in the bottom right of the screen, then tap the heart icon ♥ to save it for later!
Affiliate Disclosure
We have included affiliate links to products and services related to this post.
We may earn a commission if you purchase after clicking on those links.
As an Amazon Associate, I earn from qualifying purchases.
Read Our Full Disclosure Policy and Privacy Policy
The list of materials, tools, and instructions is in the printable tutorial card at the end of this post. We recommend reading the blog post thoroughly before starting this project to ensure you have everything required and understand the steps and timings involved.
Thread Ball Pumpkins Craft
Crafting with thread balls offers a unique texture and look, making your pumpkins stand out from the usual store-bought decorations.
You can find vintage balls of thread at thrift stores, which makes this a fantastic upcycling project. But if you struggle, you can buy new thread balls cheaply online.
Using bright and burnt orange paints gives these pumpkins a vibrant and realistic hue. The spray bottle technique ensures an even coat and a fun, less messy painting experience.
The addition of champagne corks as stems is a genius touch, adding a rustic charm to your chunky pumpkins.
Olive green felt leaves and brown wired twine vines further enhance the natural appearance. The green reindeer moss fills in any gaps, ensuring your pumpkin looks full and festive.
Pumpkin Home Décor
Once you’ve made your thread ball pumpkins, they can be used in your home in a myriad of different ways.
Add them to your tiered tray display for fall, or place them on your dining table as a centerpiece—perhaps for Halloween or Thanksgiving dinner?
Line them up on a windowsill or mantle, or attach them to fall sweet treats as a cozy hostess gift.
The beauty of this pumpkin craft lies in its adaptability.
While the tutorial provides a specific look, feel free to experiment with different paint shades or add embellishments like ribbons and beads.
Every pumpkin you create can be a reflection of your personal style.
So gather your supplies, call over some friends or family, and make this autumn unforgettable with your handmade pumpkin decorations!
For more great autumn crafting ideas, check out our Best Fall Crafts For Seniors and our other Pumpkin Crafts.
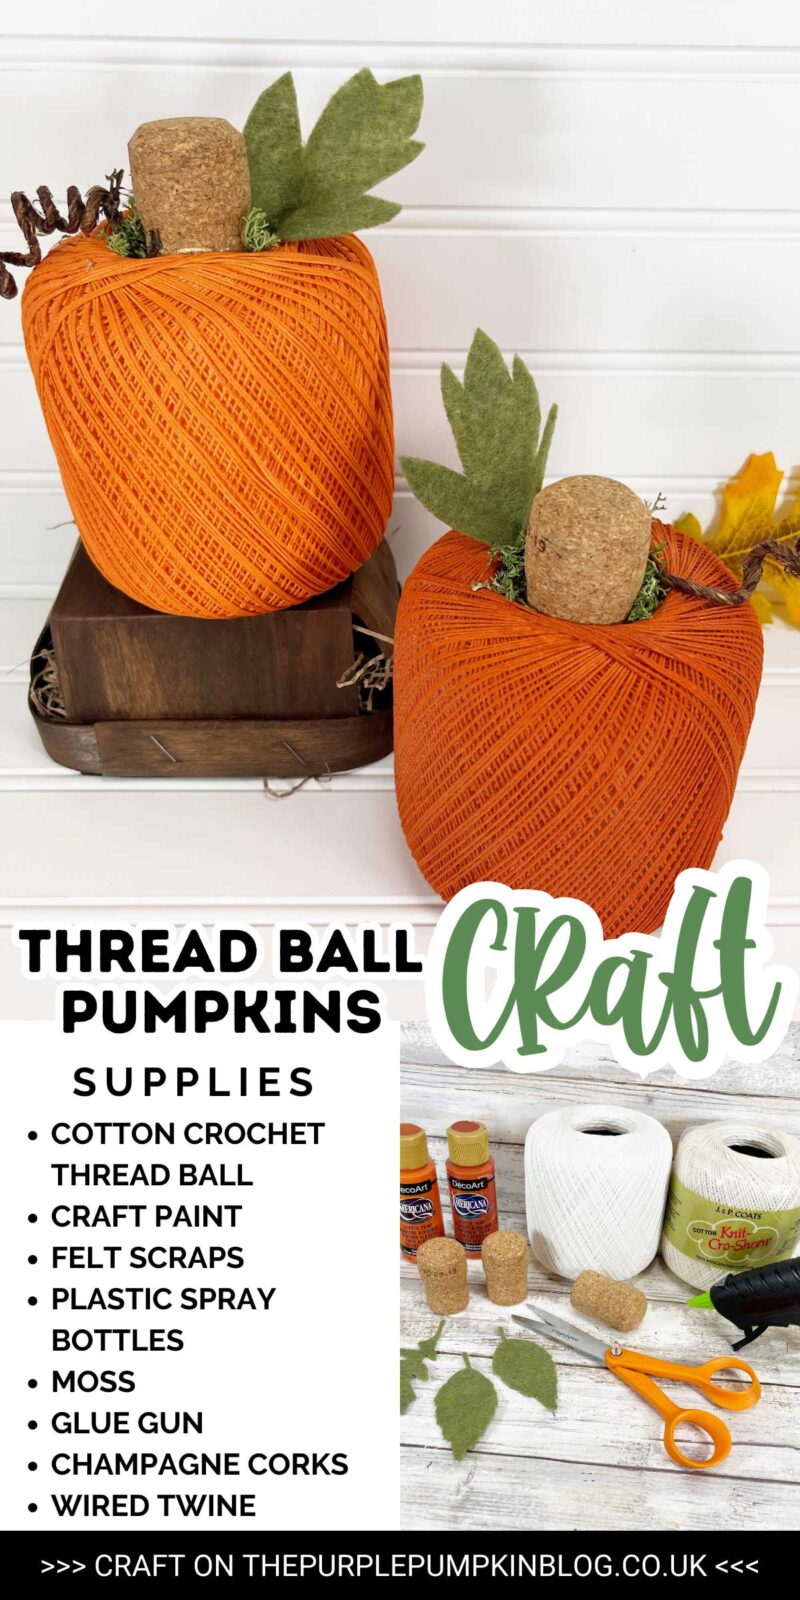
Materials & Tools Used in This Craft
The materials and tools needed for this project are linked on Amazon below for your convenience. The quantities are on the craft tutorial card at the end of this post.
- Cotton Crochet Thread Balls – You may also find these in thrift stores or garage sales. Make sure they are 100% cotton so that they can be spray-painted.
- Acrylic Craft Paints – in the following colors:
- Bright Orange
- Burnt Orange
- Olive Green Felt Scraps
- Plastic Spray Bottles – You will need two.
- Craft Moss
- Hot Glue Gun and Glue Sticks
- Champagne Corks
- Wired Twine – This will hold its shape when wrapped to form pumpkin tendrils.
- Wire Cutters
- Pencil
- Scissors
- Ruler
- Thread Ball Pumpkin Leaf Pattern – Click to download the PDF, which you can print on either US Letter or A4 paper sizes. Opens in a new tab.
No time to read now? Tap the buttons below to save the craft to your Pinterest boards or Facebook page for later!
How Do I Make Thread Ball Pumpkins?
The printable tutorial card with the full supplies list and instructions can be found at the end of this post.
Step 1 – Prepare Paint: Squeeze 1 ounce of bright orange paint into a 3-ounce spray bottle. Add 2 ounces of water to the bottle, replace the cap, and shake well to combine. Repeat with the burnt orange paint and a second spray bottle.
Step 2 – Paint Thread Balls: Remove any labels from the thread balls. In a well-ventilated area or outside, spray the outside of the thread balls with bright orange and burnt orange paint. Set aside to dry. Apply a second coat if required.
TIP! Mix the colors slightly by lightly spraying one color on the other.
Step 3 – Create Vines: Measure and cut two 12″/30cm lengths of wired twine with wire cutters. Wrap around a pencil, and then slide off to create a vine. Stretch and bend the wire to create pumpkin vines.
Step 4 – Cut Felt Leaves: Download, print, and cut the leaf pattern. Trace onto felt with a marker. Cut out the leaves with scissors, cutting inside the traced lines for a clean, finished project. To create dimension, apply a dot of glue at the base of the leaf and fold it in half.
Step 5 – Attach Cork Stem: Attach a champagne cork to the hole at the top of the thread ball with a glue gun and glue sticks. Hold the cork in place until the glue dries completely. Fill in the rest of the hole with small amounts of moss. Glue the wired twine vine and the leaf to the back of the cork stem. When dry, display where desired.
More Pumpkin Crafts
Looking for more pumpkin crafts? Try these next:
We’ve shared over 500+ crafts for all seasons and holidays—why not take a look at them next?
Printable Thread Ball Pumpkins Craft Tutorial Card
The printable tutorial card is below—please leave a star rating and quick review to share your experience with others!
Upcycled Thread Ball Pumpkin Craft
Materials
- 2 cotton crochet thread balls
- Craft paint in the colors Bright Orange and Burnt Orange
- Olive green felt scraps
- 2 3-oz plastic spray bottles
- Green reindeer moss
- 2 Champagne Corks
- Brown wired twine
- Pumpkin leaf pattern
TOOLS
- Wire Cutters
Instructions
- Squeeze 1 ounce of bright orange paint into a 3-ounce spray bottle. Add 2 ounces of water to the bottle, replace the cap, and shake well to combine. Repeat with the burnt orange paint and a second spray bottle.
- Remove any labels from the thread balls. In a well-ventilated area or outside, spray the outside of the thread balls with bright orange and burnt orange paint. Set aside to dry. Apply a second coat if required. TIP! Mix the colors slightly by lightly spraying one color on the other.
- Measure and cut two 12"/30cm lengths of wired twine with wire cutters. Wrap around a pencil, and then slide off to create a vine. Stretch and bend the wire to create pumpkin vines.
- Download, print, and cut the leaf pattern. Trace onto felt with a marker. Cut out the leaves with scissors, cutting inside the traced lines for a clean finished project. To create dimension, apply a dot of glue at the base of the leaf and fold it in half.
- Attach a champagne cork to the hole at the top of the thread ball with a glue gun and glue sticks. Hold the cork in place until the glue dries completely.
- Fill in the rest of the hole with small amounts of moss. Glue the wired twine vine and the leaf to the back of the cork stem. When dry, display where desired.
This post is part of my long-running Crafty October series on The Purple Pumpkin Blog. Since 2012, I’ve shared Halloween recipes, printables, and crafts every October. While I don’t officially run the series anymore, all my new Halloween posts are still part of this decades-long celebration of spooky fun! Browse past Crafty October years for even more inspiration: 2024, 2023, 2022, 2021, 2020, 2019, 2018, 2017, 2016, 2015, 2014, 2013, and 2012.