Oogie Boogie Cupcakes
Home » COOK » Recipes » Holiday Recipes » Halloween Recipes »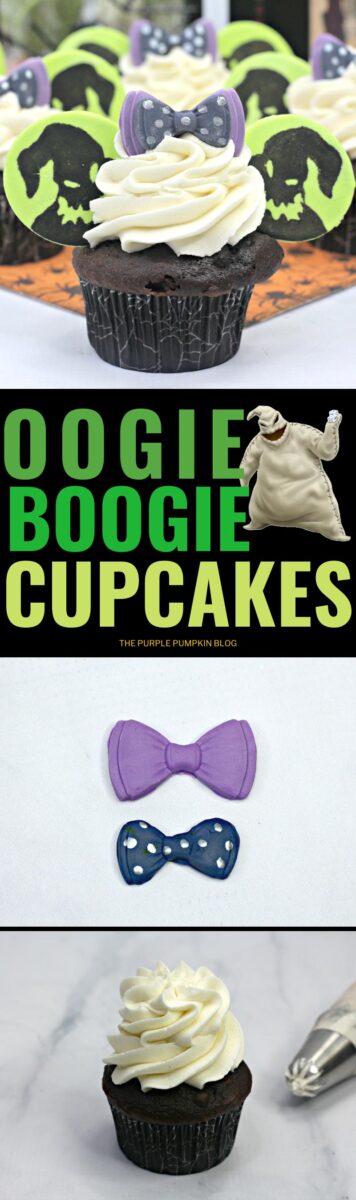
Don’t be scared of these Oogie Boogie Cupcakes – they’re not going to catch you – you and your guests are going to be gobbling them up! Whether you make these Nightmare Before Christmas cupcakes for Halloween, Christmas, or an NBC party, they are sure to be a hit!

I’ve got 50+ freakishly good Halloween Recipes for you to try out – right-click and open these other recipes in a new tab so that you can read them after this one!
Affiliate Disclosure
We have included affiliate links to products and services related to this post.
We may earn a commission if you purchase after clicking on those links.
As an Amazon Associate, I earn from qualifying purchases.
Read Our Full Disclosure Policy and Privacy Policy
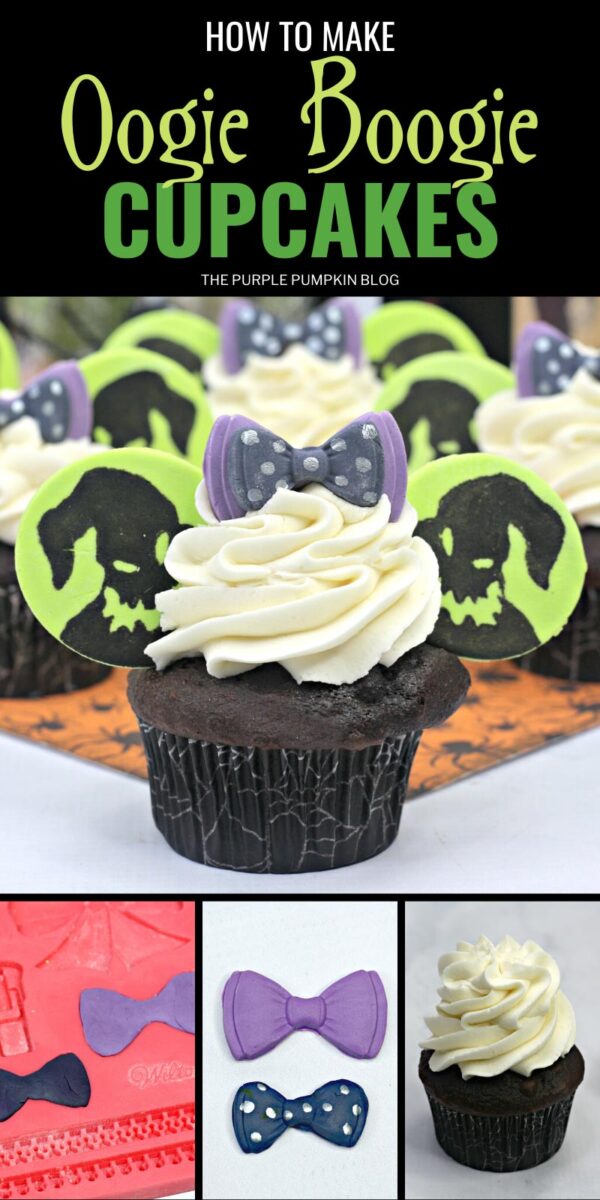
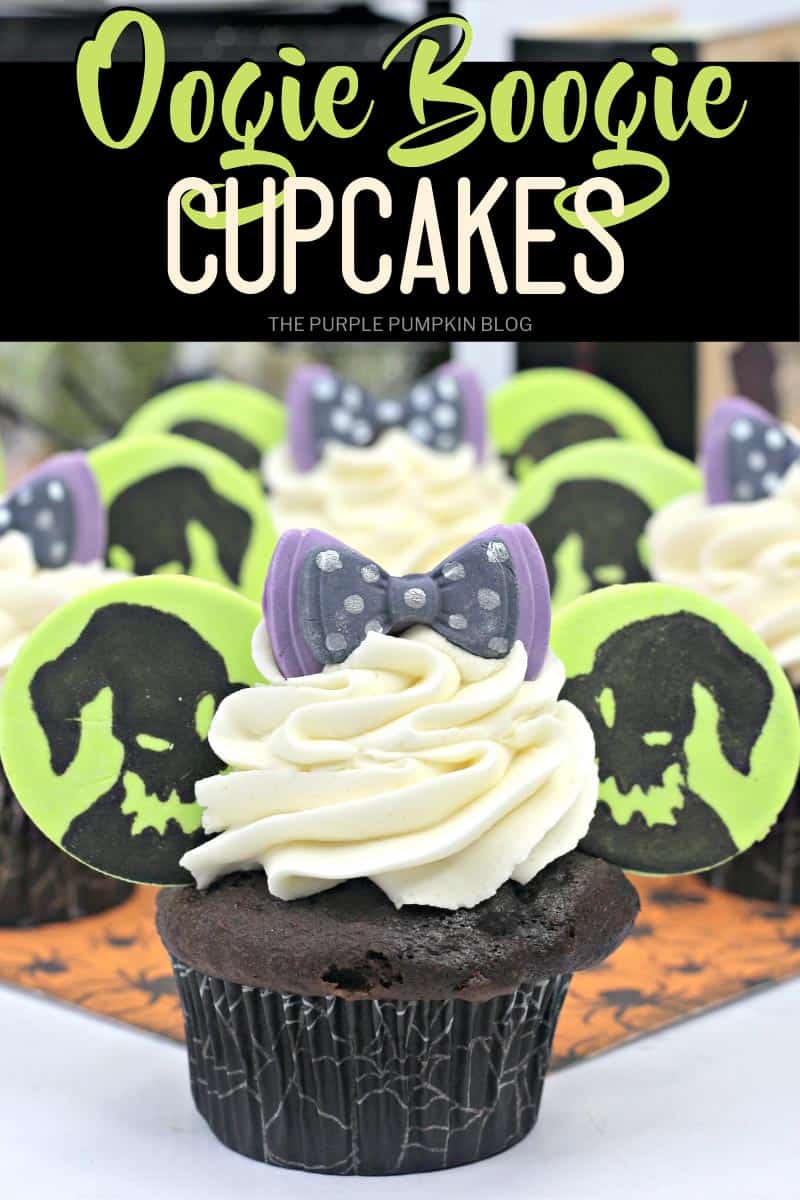
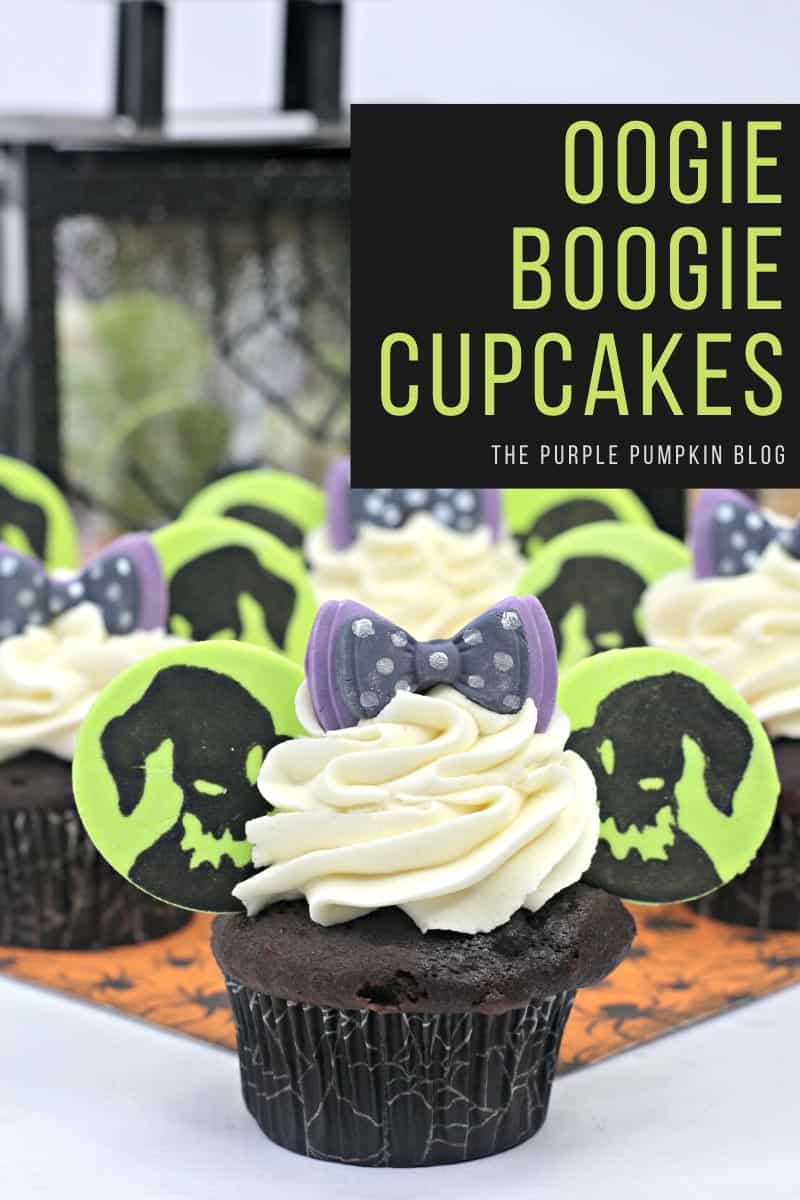
Oogie Boogie Cupcakes
This Nightmare Before Christmas cupcake featuring Oogie Boogie is the third in a set of awesome NBC cupcakes which have included Jack Skellington Cupcakes and Sally Cupcakes.
Inspired by the iconic Mickey (or Minnie!) Ears and bow headbands that you see all around the Disney Parks, the Oogie Boogie cupcakes have got green fondant ears with his likeness drawn on with edible marker, and a purple and black bow.
Make one, two, or all three sets of cupcakes for your NBC celebrations or movie night. With a little bit of planning, you could easily pull off all of these cupcake creations for one event!
Ingredients used in this recipe
The full ingredients list and instructions are found in the printable recipe card at the end of this post, but here is a brief outline so you know what to expect from the recipe. I highly recommend always reading a recipe all the way through before starting.
- Fondant (Sugarpaste) in the following colors:
- Edible Marker Pen in the following colors:
- Powdered Sugar (Icing Sugar) – for dusting and in the frosting
- Triple Chocolate Cake Mix – the usual box ingredients are replaced with whole milk, eggs, and butter.
- Heavy Whipping Cream (Double Cream)
- Vanilla Extract
Equipment used in this recipe
You are likely to have many of these cooking tools in your kitchen already, but I’ve added some Amazon links for your convenience should you need to purchase anything for this recipe.
- Measuring Cups
- Measuring Spoons
- Wilton Bow Mold (from Michaels in the US) or a silicone bow mold from Amazon
- 4″ round cutter
- Fondant Rolling Pin
- Cupcake pan
- Cupcake liners
- Piping Bag
- Large Star Tip – Wilton 1M
- Wire Cooling Rack
- Ice Cream Scoop – this helps to scoop cupcake batter evenly. Get one with a trigger mechanism.
- Electric Mixer – stand or handheld
Oogie Boogie Cupcake Recipe Tips
Using Fondant
If you have never worked with fondant before, don’t panic – it is really easy to use, follow my tips and you’ll be just fine!
- Dust your work surface with powdered sugar so that the fondant doesn’t stick. Think of it like the way you use flour when rolling out dough.
- Rub a little powdered sugar into your hands and knead a handful of the fondant to make it more pliable before rolling, rather than using straight from the package.
- Dust your rolling pin too, and roll fondant to about ¼” thick. Some fondant rolling pins have guides you can use. You don’t want it too thick as it will take ages to dry, and you don’t want it too thin as it will become more tricky to work with.
- Cutting the Ears: Pour a little pile of powdered sugar onto your surface and dip the cookie cutter into it before cutting the ears – again, this is to prevent sticking. Place on a cookie sheet to dry for at least 6 hours – overnight and up to 24 hours is best.
- Molding the Bows: Using about a tablespoon of purple fondant and press it into the large bow mold. Carefully pop out the bow and set aside. Then make black bows with the smaller mold. Pop those out too and attach the black bow to the purple bow by rubbing or brushing some water to the back of the black bow and sticking on top. Place on a cookie sheet to dry for at least 6 hours – overnight and up to 24 hours is best. When dried, paint some silver dots onto the black bow with an edible marker.
- If there is excess powdered sugar on the pieces, you can gently brush away with a pastry brush, or an unused, clean paintbrush.
- Alternatively, you can use a vodka spray. Pour some vodka into a mini spray bottle and gently mist the fondant wings. Vodka dries quicker than water which is why it is usually used when handling fondant.
- Always make extra pieces – that way if some break or you have another mishap, you have got backups that you can use.
- Leave the cut fondant pieces to harden in a cool, dry place – do not place in the fridge.
- The fondant pieces should be solid enough to handle and insert into the cupcakes after 3 – 6 hours. I personally leave fondant pieces to dry for around 24 hours. How long this takes, however, is based on the size and thickness of the fondant, and how humid your house is, so judge best if they will hold up as they need to in the cupcakes.
- When making cakes or cupcakes that use fondant decorations I like to make them a few days ahead of time which allows for drying without the stress. Fondant that isn’t dry enough can mean disappointing end results.
- After using fondant the surface will be super sticky (it always is in my experience!) so you will probably have to wipe away the sugar first, then give it a soapy hot wash over and then another clean over! You can always by a fondant rolling mat for easier cleanup!
Oogie Boogie’s Face
- Overall, these cupcakes are easy to make, however, you need a little bit of skill to draw Oogie Boogie’s face onto the Mickey ears.
- Practice on a scrap piece of paper first. I’ve included a picture of Oogie Boogie below, but you could use another expression if you prefer – just search online.
- Make sure that the fondant ears are well dried before you draw Oogie Boogies’ face on them with an edible marker pen.
Cupcakes & Frosting
- Use your favorite brand of chocolate cake mix, or you could make your own from scratch if you prefer. You could even buy ready-made cupcakes to decorate, I won’t tell!
- Instead of the extra ingredients required to make the cake as directed on the box, this recipe replaces them with whole milk and unsalted butter (plus eggs as usual) which will enrich the cake further.
- Use a trigger ice cream scoop to transfer the cupcake mixture to the liners. This ensures you get even cupcakes.
- If you are not confident with your piping skills you can practice on some parchment paper first and scoop the frosting back into the bag.
- If your piped swirl doesn’t turn out how you want it on the cupcake, you should be able to wipe it off and try again!
Make It A Spooky Meal!
You’ve made the dessert, but what about the rest of the courses? Here are some recipes to take a look at to make a complete spooky meal for Halloween!
- Appetizer: Baked Hot Dog Mummies
- Main Dish: Toxic Mac ‘n’ Cheese Recipe for Halloween!
- Side Dish: Cheesy Chilli Cornbread
- Cocktail: Zombie Apocalypse Cocktail
- Mocktail: Oogie Boogie Mocktail
There are 500+ Recipes on The Purple Pumpkin Blog for you to enjoy! Please feel free to check them out too.
More Halloween Dessert Recipes
If you’re throwing a party and need some more dessert recipes, here are some to consider:
More Cupcakes Recipes
Want to make more cupcakes? Try these recipes:
I’ve got lots of fun and easy Cupcake Recipes for Parties and celebrations (and for everyday treats!) for you to try out – right-click and open these other recipes in a new tab so that you can read them after this one!
Oogie Boogie Cupcakes Recipe
Ingredients
For the Cupcake Decorations
- 1 package 4.4oz/124g bright green fondant
- 1 package 4.4oz/124g purple fondant
- 1 package 4.4oz/124g black fondant
- Powdered Sugar Icing Sugar
- Black edible marker
- Silver edible marker
For the Cupcakes
- 1 box triple chocolate cake mix
- 1 cup whole milk
- 3 large eggs
- ½ cup unsalted butter softened
For the Frosting
- 2 cups unsalted butter softened
- 5 cup powdered sugar (icing sugar
- 10 Tbsp heavy whipping cream double cream
- 2 tsp vanilla extract
Instructions
- To make the fondant Oogie Boogie Mickey ears, dust your surface and rolling pin with powdered sugar and roll out the bright green fondant to ¼" thick. Cut out 24 x 4" circles with a round cutter. Place onto a cookie sheet lined with parchment paper and leave to dry for at least 6 hours and up to 24 hours if possible. When fully dried, draw Oogie Boogie’s face onto the ears with a black edible marker.
- To make the bows, use about a tablespoon of purple fondant and press it into a large bow mold. Make 12 total. Carefully remove and place on a cookie sheet lined with parchment paper.
- Make smaller bows with black fondant and pop out of the mold – make 12 total. Stick the black bows to the front of the purple bows by rubbing or brushing some water to the back of the smaller black bow and placing it in the middle of the purple bow. Leave to dry for a few hours – up to 24 if possible. When dried, draw on silver dots with an edible marker.
- Make a few extra fondant decorations as backup, just in case any break!
- Preheat oven to 180C/350F/Gas 4 degrees and line cupcake pan with cupcake liners.
- Using an electric mixer, mix the cake mix with the milk, eggs, and softened butter until combined.
- Use an ice cream scoop to evenly distribue the cake batter between the liners.
- Bake for 20 minutes or until a toothpick inserted into the center of the cupcakes comes out clean.
- Allow to cool in pan for 5 minutes before transferring to a wire rack to cool completely.
- To make the frosting, use an electric mixer to combine the butter, powdered sugar, heavy whipping cream, and vanilla on medium speed until combined and smooth.
- Scoop the frosting into a piping bag fitted with a large star tip.
- Pipe frosting swirls onto the cooled cupcakes.
- Place the bow in the middle of the frosting.
- Place the Oogie Boogie Mickey ears on either side of the bow.
Notes
- silicone bow mold – with a large and small bow
- 4" round cookie cutter
- Large piping bag
- Large star tip (Wilton 1M)
Nutrition
Nutritional information is always approximate and will depend on the quality of ingredients used and serving sizes. If you need exact calories and macros, please do your own calculations.
This post is part of my long-running Crafty October series on The Purple Pumpkin Blog. Since 2012, I’ve shared Halloween recipes, printables, and crafts every October. While I don’t officially run the series anymore, all my new Halloween posts are still part of this decades-long celebration of spooky fun! Browse past Crafty October years for even more inspiration: 2024, 2023, 2022, 2021, 2020, 2019, 2018, 2017, 2016, 2015, 2014, 2013, and 2012.