How To Make a Paperback Book Pumpkin – Fall Decor Craft!
Home » CREATE » Crafts » Pumpkin Crafts »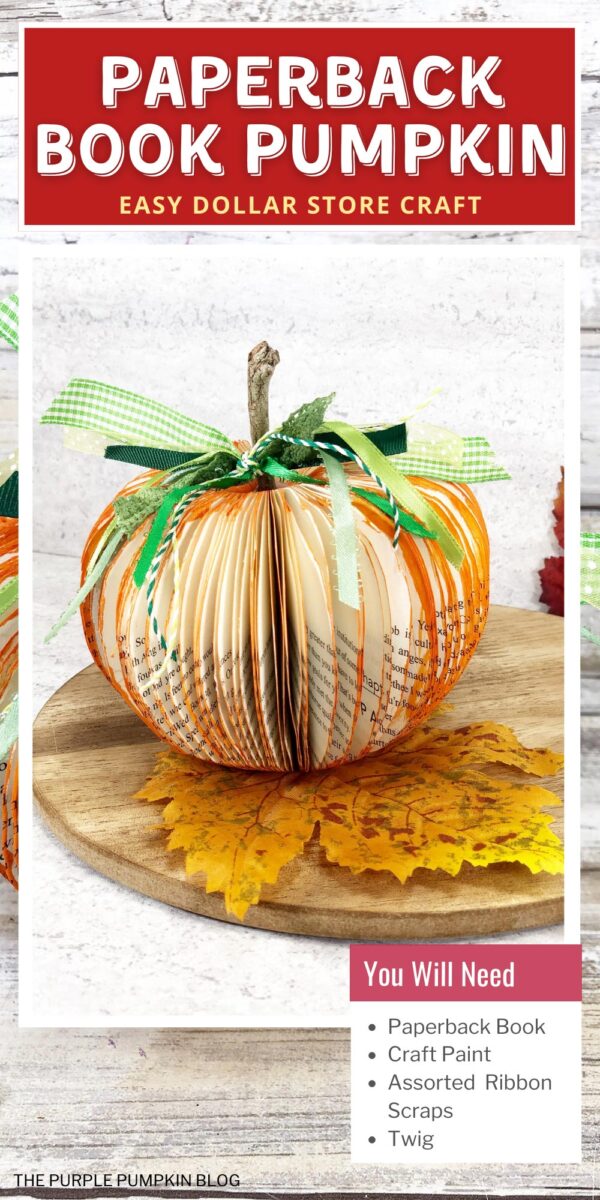


It’s autumn, so it’s time to start thinking about pumpkin crafts! Learn how to make an elegant Paperback Book Pumpkin, using an old book and some craft paint. It’s a fun upcycle project that becomes a pretty piece of farmhouse-style home decor.

Affiliate Disclosure
We have included affiliate links to products and services related to this post.
We may earn a commission if you purchase after clicking on those links.
As an Amazon Associate, I earn from qualifying purchases.
Read Our Full Disclosure Policy and Privacy Policy
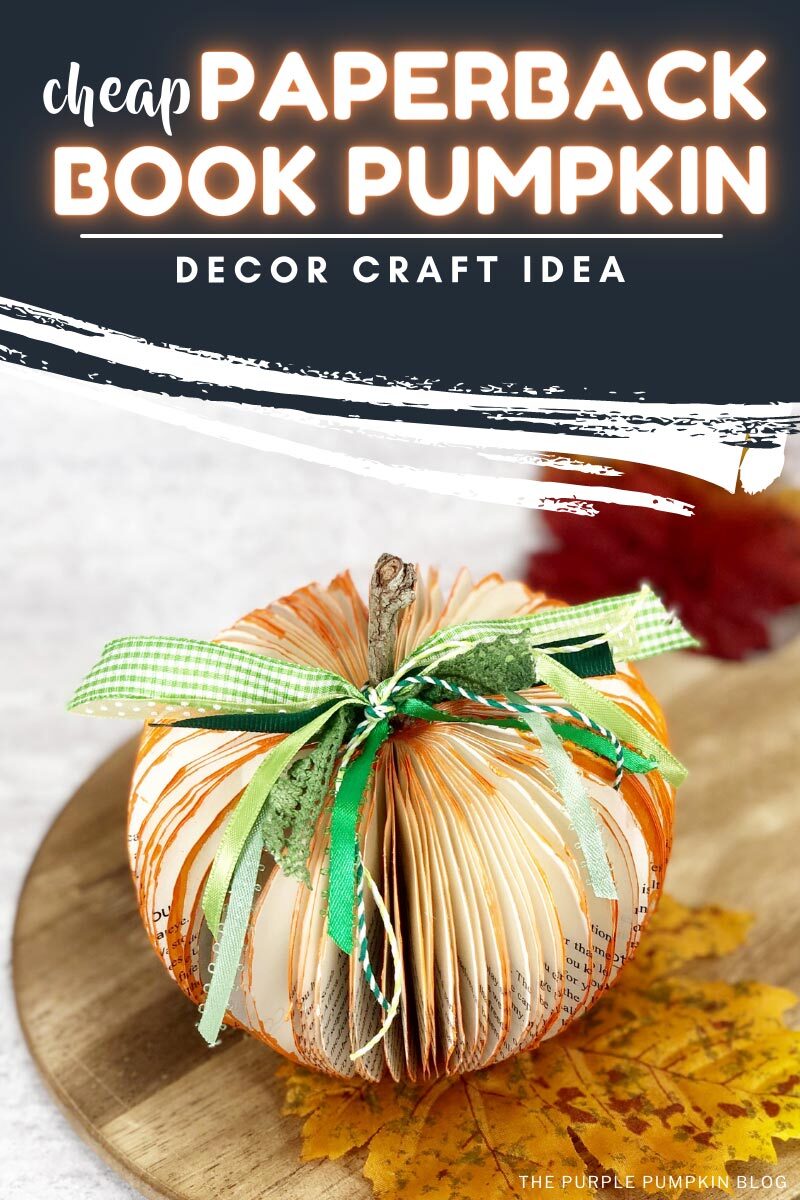
Paperback Book Pumpkin
The full list of materials, tools, and instructions is found in the printable tutorial card at the end of this post. I highly recommend reading the blog post all the way through before starting this project to ensure that you have everything required and understand the steps and timings involved.
Fall is the perfect time to decorate your house with all things pumpkin! This DIY will show you how to make a pretty pumpkin that is both functional and festive.
Just a few simple craft supplies and our printable pattern download are all that is needed to turn an old, unloved (or cheap) paperback book into a pumpkin!
You could make them in different sizes for visual interest, and you could even use red paint instead of orange to make paperback book apples!
While this is not strictly a Halloween decoration, I associate pumpkins with the spooky season (even if they’re not carved or look creepy!) and so I’ve included it in this year’s Crafty October…
The post is part of the Crafty October series on The Purple Pumpkin Blog is filled with free printables, crafts, recipes, and more for Halloween! You can check out Crafty October from 2020, 2019, 2018, 2017, 2016, 2015, 2014, 2013, and 2012 for tons of awesome Halloween ideas and inspiration!
Materials & Tools Used in This Craft
The complete list of supplies, which may include basic crafting items that you already have can be found in the tutorial card at the end of this post. For your convenience, I’ve linked any notable materials and tools needed for this project to Amazon below.
- Paperback Book – an old one you no longer read, or a cheap one from a store.
- Orange Craft Paint
- Assorted Green Ribbon Scraps
- Twig – grab one from your back yard/garden or local park
- Pencil or Marker
- Craft Knife and Self-Healing Mat
- Paintbrush
- Scissors
- Cutters – to cut the twig to size
- Glue Gun and Glue Sticks
- Binder Clip
- Book Pumpkin Pattern – click to download the free pattern
Cheap Craft Supplies
If you’re in the USA, check out your local Dollar Store or Dollar Tree; and if you’re in the UK, the Poundshop, The Range, Wilko, and Baker Ross are great places to shop for cheap and inexpensive craft supplies. The rest of the world reading this – I don’t know every cheap store – sorry! But hunt the ones out in your location for crafting bargains!
More Pumpkin Crafts
Looking for more pumpkin crafts? Here are some more for you to check out! Just right-click and open a new tab to read next!
- Framed Paper Quill Pumpkin Craft – An Easy Quilling Project for Beginners!
- Button Pumpkin Shadow Box
- How to Make Rustic Wooden Pumpkins
I’ve shared lots of great craft ideas on The Purple Pumpkin Blog over the years, in fact, there are 100+ crafts to make and do at home that you can try!
How Do I Make a Paperback Book Pumpkin?
Just check out the how-to card below with full materials, tools, and instructions. Any demonstration photos do not print out to save your ink.
Paperback Book Pumpkin
Materials
- Paperback Book
- Orange Craft Paint
- Assorted Green Ribbon Scraps
- Twig
TOOLS
- Pencil or Marker
- Craft Knife
- Self-Healing Mat
- Wire Cutters or Branch Cutter
- Binder Clip
- [Book Pumpkin Pattern]
Instructions
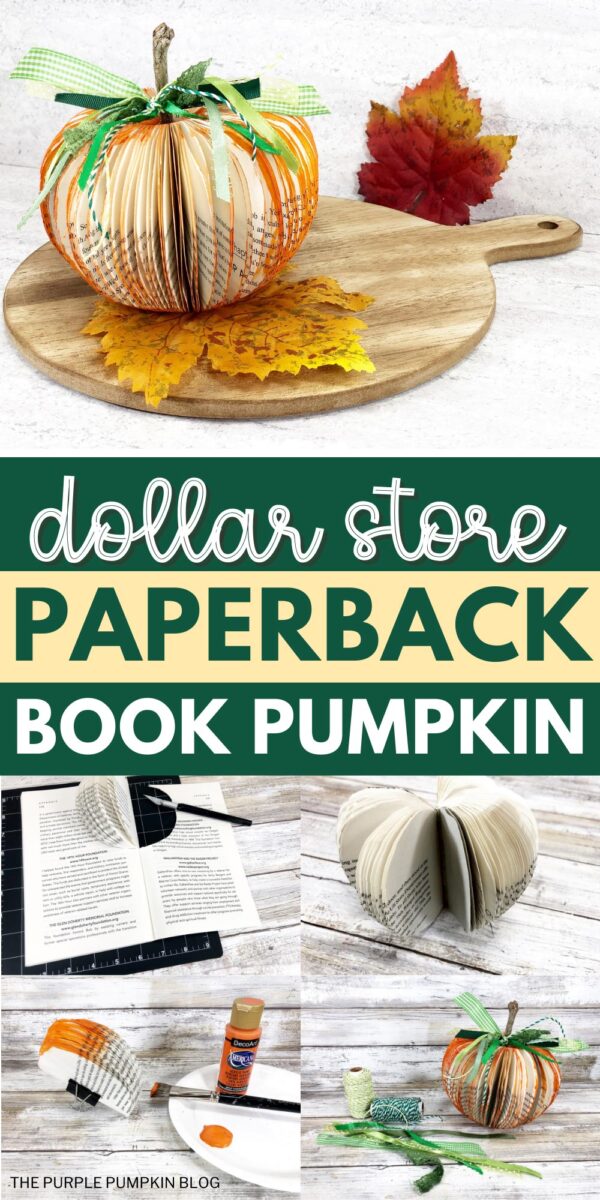
- Remove the front and back covers of the paperback book.
- Download and print the book pumpkin pattern or draw your own shape on the inside of the book covers with a pencil or marker. The pattern has two sizes to choose from.
- Cut out the book pumpkin patterns with scissors.
Open the book flat at the halfway point, trace the pumpkin pattern on the right half of the open book with a pencil or marker. Repeat by tracing the pumpkin pattern on the right half of the open book. - Using a new, sharp blade on a craft knife, carefully cut through the pages a few at a time. Insert a self-healing mat under the book and continue cutting pages until the pages are completely cut out. Repeat on the other side of the book.
- Remove the cut-out pumpkin and attach the exposed spine together with a line of hot glue from a glue gun.
- Fluff out the pumpkin by crinkling and crumpling each page individually. Bend and score the spine of the book as you fluff out the pumpkin shape.
- Fold book pumpkin in half and secure with a binder clip. Dry brush orange craft paint around the edges of the book pages. Carefully separate any pages that might stick together, then set aside to dry.
- Cut a suitable twig to size using cutters to create a pumpkin stem. Attach to the top center of the book pumpkin with a glue gun.
- Tie assorted green ribbon scraps around the stem of the book pumpkin to finish.
Handy Tips & More Ideas
This post is part of my long-running Crafty October series on The Purple Pumpkin Blog. Since 2012, I’ve shared Halloween recipes, printables, and crafts every October. While I don’t officially run the series anymore, all my new Halloween posts are still part of this decades-long celebration of spooky fun! Browse past Crafty October years for even more inspiration: 2024, 2023, 2022, 2021, 2020, 2019, 2018, 2017, 2016, 2015, 2014, 2013, and 2012.