Red Velvet Bleeding Skull Drip Cake for Halloween
Home » COOK » Recipes » Holiday Recipes » Halloween Recipes »Halloween is right around the corner, and what better way to celebrate this spooky season than with a show-stopping Red Velvet Bleeding Skull Drip Cake?

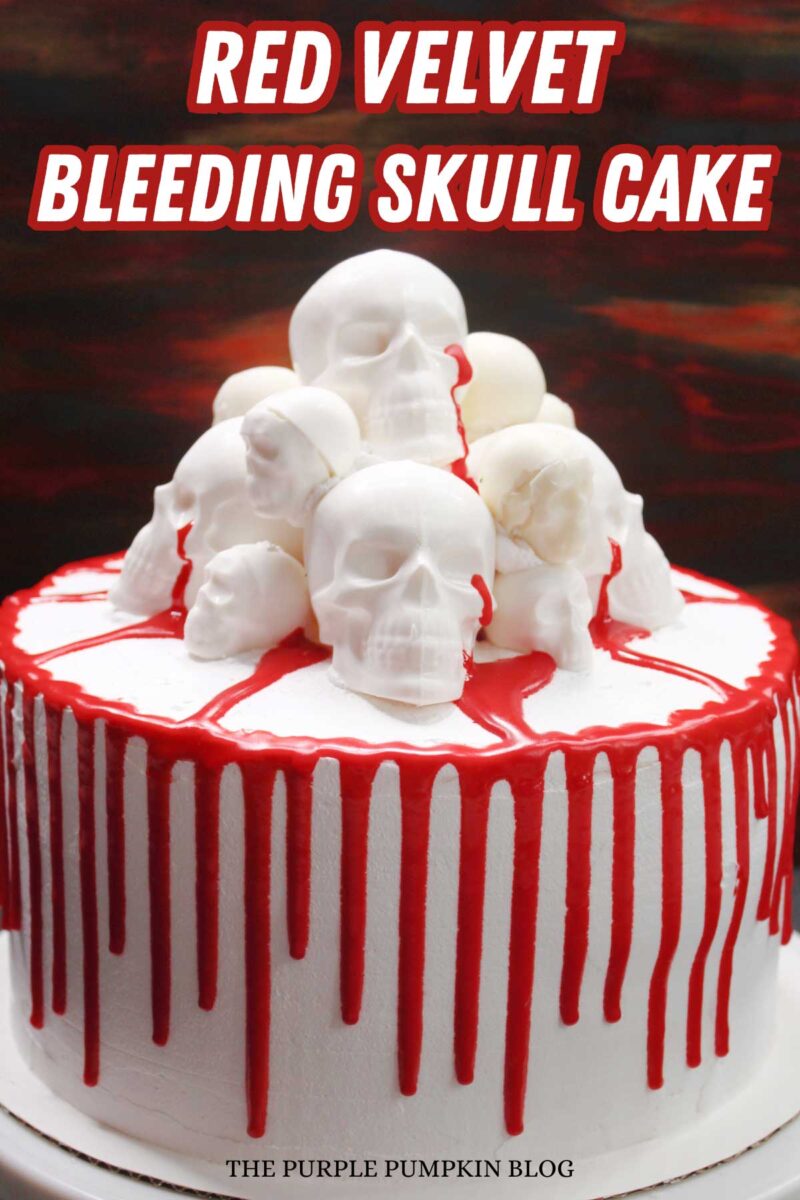
Imagine slicing into a rich, velvety cake covered with vanilla frosting, dripping in blood (red icing!), and piled with an eerie mound of white chocolate skulls—perfect for any Halloween party!
Don’t have time for this recipe now? Tap the heart icon ♥ in the bottom right of the screen to save it for later!
Affiliate Disclosure
We have included affiliate links to products and services related to this post.
We may earn a commission if you purchase after clicking on those links.
As an Amazon Associate, I earn from qualifying purchases.
Read Our Full Disclosure Policy and Privacy Policy
While you may prefer to skip to the recipe card, we recommend reading through the blog post to avoid missing valuable tips and substitution suggestions and to ensure you have the necessary ingredients, equipment, and understanding of the steps and timings.
Red Velvet Bleeding Skull Drip Cake
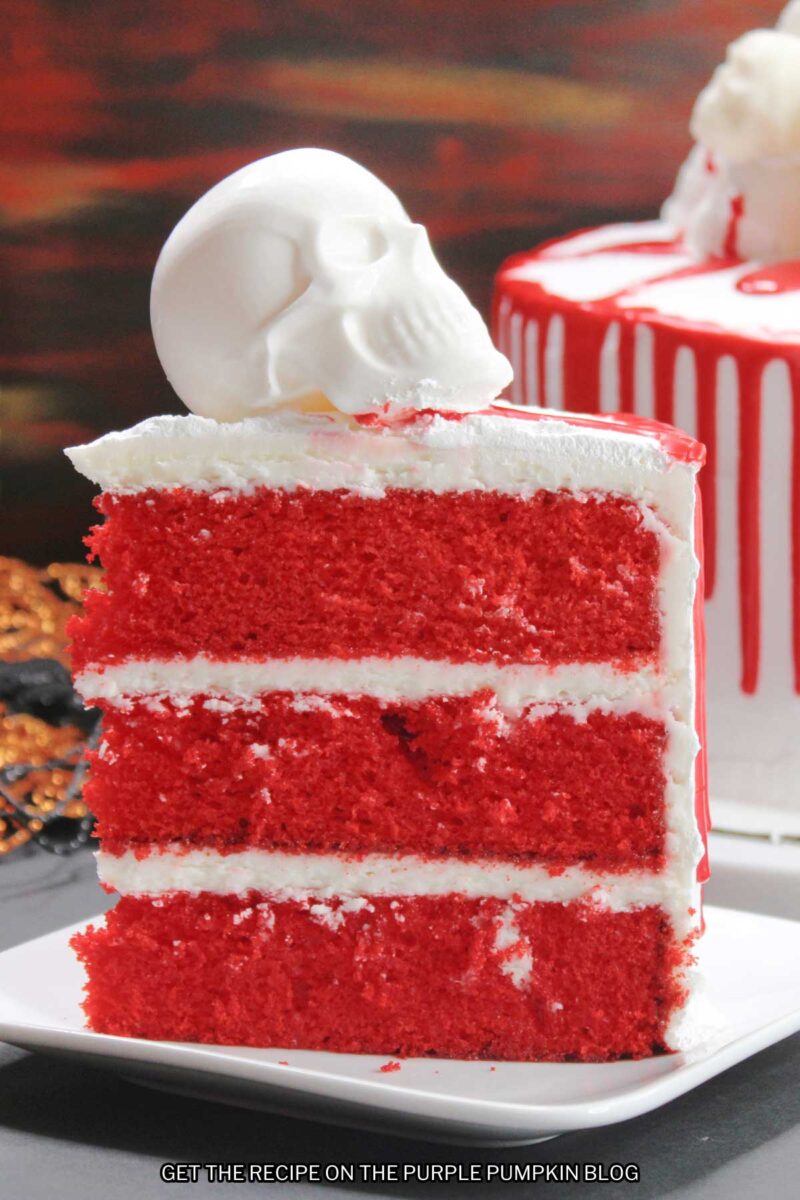
We love layer cake recipes, and we’re layering up with three tiers of luscious red velvet cake and vanilla frosting in our Red Velvet Bleeding Skull Drip Cake—perfect for this time of year!
Piled high with white chocolate skulls and finished with some dripping blood-red icing, it’s a showstopper that every Halloween lover should make.
If you think it looks too challenging to make, fear not, as we’ve ALL the tips and tricks to help you make this stunning cake for your Halloween celebrations!
Halloween Skull Cake
Pair a slice of the bloody skull cake with some festive Halloween Cocktails at a spooky cocktail party, or serve it as dessert at a Halloween Dinner Party (we’ve devised a menu at the bottom of the page).
If you’re a little adventurous, you could make this cake in different colors—how about making a black velvet cake, covering it in dark red frosting, and adding skulls brushed with silver or gold luster dust?
Or, for a funky color scheme, how about making a Tie-Dye Cake, covering it with black frosting, and topping it with brightly colored skulls?
However you decide to make and serve this cake, don’t forget to share it with us on Instagram!
Ingredients & Equipment Used In This Recipe
The ingredients and tools for this recipe are conveniently linked to online retailers, including Amazon, Amazon Fresh, Instacart, and Walmart. The quantities are in the recipe card.
Bleeding Skull Drip Cake Ingredients
- Chilled & Dairy – Large Eggs, Unsalted Butter, Whole Milk, Heavy Whipping Cream (Double Cream)
- TIP! Use room temperature eggs, milk, and softened butter for the best results.
- White Candy Melts – You will need 2 (18-oz/340g) bags.
- Red Velvet Cake Mix – You will need 3 (15.25-oz/432g) boxes.
- Powdered Sugar – Also known as Icing Sugar or Confectioners Sugar.
- Pure Vanilla Extract – Always buy good vanilla—it makes a flavor difference.
- Wilton Sparkle Red Gel Icing – You will need 3 (3.5-oz/99g) tubes.
The complete list of ingredients with measurements is on the recipe card at the end of this post.
No time to read now? Tap the buttons below to save the recipe to your Pinterest boards or Facebook page for later!
Equipment Needed For This Recipe
- Mixing Bowls
- Rubber/Silicone Spatula – or you could use a Wooden Spoon.
- Electric Mixer – either a handheld or standing mixer.
- Small 3D Chocolate Skull Mold
- Large 3D Chocolate Skull Mold
- Baking Spray
- 3 (9-inch) Round Cake Pans
- 1 (10-inch) Round Cake Board
- Wire Cooling Rack – Allowing the cakes to cool before decorating is essential, and using a cooling rack allows air to circulate around them.
- Cake Leveler – Or you could use a sharp knife.
- Cake Turntable – Optional.
- Icing Spatula
The complete ingredient list, along with their measurements, is provided on the recipe card. The Purple Pumpkin Blog uses both cups and weighted measurements in its recipes, making American cups and kitchen food scales valuable tools for trying all the recipes. We provide measurements in US customary, imperial, and metric units. Still, it’s essential to note that while you can combine cup measurements with weighted measures, never mix US customary/imperial units (pounds, ounces, pints, etc.) with metric units (kilograms, grams, liters, etc.).

Bloody Skull Cake Recipe Tips
- This red velvet skull cake is made using boxes of red velvet cake mix. The standard ingredients (oil, water, eggs) to make the mixture have been replaced with unsalted butter and whole milk to enrich the cake and give it more of a homemade taste. If you wish, you can use your red velvet cake recipe.
- Spray your cake pans with non-stick baking spray to ensure the cakes are easy to remove.
- If you have any leftover cake batter, place some cupcake liners into a pan and make some skull cupcakes to accompany your large Halloween cake!
- Before decorating, ensure the cakes have cooled completely (on a wire rack).
- When the cakes have cooled, you must level off the tops so they are flat. You can use a cake leveler, which is a convenient tool to get a nice even cut. Or you can use a sharp knife and a steady hand.
- Do NOT throw away the excess cake—use it to make cake pops or Blood and Bone Truffles! Simply crumble up the cake, mix it with some frosting, and roll it into balls. Insert a lollipop stick and dip it into melted chocolate or candy melts. Leave to set, and enjoy!
Tips for Making & Using Frosting
- When making the vanilla buttercream frosting, you can adjust the amount of cream to get the consistency you require. The recipe suggests 5-7 tablespoons of heavy whipping cream (double cream in the UK). Start with 5 tablespoons and add more if needed.
- Place a blob of frosting in the center of the cake board to hold the first layer of cake in place.
- No piping bag is required for this cake! Use an offset spatula/palette knife and/or a scraper to spread the frosting on each layer and make it smooth all the way around when frosting the whole cake.
- You can also use a cake turntable and scraper for professional-looking frosting results. Take your time to slather on the frosting, and use the scraper (or spatula/palette knife) to smooth it out, removing any excess back to the bowl.
- To prevent the frosting from getting onto your cake board or cake stand, a tip from Ina Garten (The Barefoot Contessa) is to slip squares of parchment paper just under the cake all the way around. Once the cake is frosted, you remove the paper and get a nice clean edge.
“Blood” Dripping Tips
- Ensure your frosted cake has been well chilled before adding the red, dripping blood effect.
- We used Wilton Sparkle Red Gel Icing tubes to create the dripping blood effect. If you can’t find that, you can also use Wilton Red Cookie Icing, which comes in squeeze bottles.
- If you can’t find either of these products, add red food coloring to white chocolate ganache to create a bloody look. Check out our Cherry Coke Layer Cake for how to make a ganache.
- Place the tip of the tube or bottle just above the top edge of the cake and gently squeeze the bottle to release the icing.
When you’ve added enough of a drip, release the pressure on the bottle, but leave a little bit to continue on and around the cake to your next drip, turning the cake around as you go.
The more pressure you have, the longer the drip will be down the sides of the cake.
TIP! Test your dripping pressure technique on the side of a glass or cup first so that you feel confident. - A cake turntable will make dripping icing “blood” onto the cake easier. You can turn the cake as you go around without breaking your flow.
- If you don’t have a cake turntable, what about that lazy Susan you have in the back of the kitchen cupboard? That would also work.
- Alternatively, place the cake on a cake stand which will be easier to turn around than a cake board sat on the counter.
- DON’T FORGET! Add some red icing into the eye sockets of the skulls and have it dripping over the top and the sides.
- As with all things cake decorating, practice makes perfect!
Melting Tips for Candy Melts
You can melt candy melts/wafers in the microwave or a double boiler, or if you plan on making lots of candy-covered treats in the future, we recommend investing in a Wilton candy melting pot as treat-making life is so much easier!
Try this PME one in the UK, as it is more affordable than Wilton Amazon.co.uk.
If you use the Wilton Candy Melting Pot, you can check out Wilton’s demo video on YouTube, which is helpful. They give tips on how to melt candy melts in the microwave and use the double boiler method.
The two most important things are
- Do not overheat – use an even melting temperature.
- Do not add water – it makes the candy seize up and become unusable. Ensure the equipment is completely dry, and avoid using utensils that retain moisture, like a wooden spoon.
If the candy is too thick, add vegetable shortening or (solid) coconut oil in 1 teaspoon increments, up to 1 tablespoon, and stir well.
Another reminder—do not add water. The first time we used candy melts, we got water in the bowl, which was ruined. Learn from our mistakes! Additionally, do not use vegetable oil, butter, milk, or other liquids, as this will make the candy seize.
If you use your microwave, test a small amount of candy melts first to see how it works. You may need to adjust the temperature and time to suit your machine.
Heat in 15-30 second increments, stirring the candy melts each time. They may not look melted, but they might have started melting from the inside. Stirring helps to distribute the heat.
Making Candy Skulls
To decorate this creepy cake, you must make a bunch of 3D skulls with melted candy melts or white chocolate.
Different molds have different ways to use them, so on the recipe card, we have instructed you to follow the directions with the type of mold you have.
You will want to make 5-6 large skulls and around 15 small ones, creating a fantastic mound of skulls to sit on top of the cake.
Imagine the photos below are filled with melted white chocolate (they’re actually pics from our Salted Caramel Gold Skull Hot Cocoa Bombs (with Spiced Rum) to demonstrate one of the ways they can be made.
Printable Red Velvet Bleeding Skull Drip Cake Recipe Card
The printable recipe card is below. Please leave a star rating and quick review to share your experience with others!
Red Velvet Bleeding Skull Drip Cake
Ingredients
For the Candy Skulls
- 2 12-oz/340g bags white candy melts
For the Layer Cake
- 3 15.25-oz/432g boxes red velvet cake mix
- 6 large eggs
- 1½ cups unsalted butter softened
- 3 cups whole milk
For the Frosting
- 2 cups unsalted butter softened
- 6 cups powdered sugar icing sugar
- 1 Tbsp pure vanilla extract
- 5-7 Tbsp heavy whipping cream double cream
For Decorating
- 3 3.5-oz/99g tubes Wilton Sparkle Red Gel Icing
SUGGESTED PRODUCTS
Instructions
- Melt the white candy melts as directed on the package.
- Follow the directions on the molds to learn how to create the skulls. You will need about 15 small skulls and 6 large skulls. Once you have your skulls made, set them aside until ready to decorate. Look at our Salted Caramel Gold Skull Cocoa Bombs for tips and tricks.
- Preheat the oven to 180C/350F/Gas 4 and spray three 9-inch cake pans with baking spray. Set them aside.
- Using an electric standing or hand mixer, beat the cake mix, eggs, butter, and milk until smooth.
- Divide batter into the three prepared cake pans and bake in the oven for 25-28 minutes or until a toothpick inserted into the center of the cakes comes out clean.
- Allow the cakes to cool for 5 minutes in the pans before turning out onto a wire rack to cool completely.
- When the cakes have cooled and before assembling the cake, level off the dome that may have formed during baking using a cake leveler or serrated knife.
- To make the frosting, use a handheld or stand mixer with a paddle attachment and combine butter, powdered sugar, vanilla, and heavy cream in the bowl. Beat on medium speed until creamy, smooth, and stiff peaks form. Reserve a couple of tablespoons as "glue" to hold skulls in place.
- To assemble the cake, place one (cooled) layer onto a 10-inch cake board (secure in place with some frosting on the bottom).
- Evenly spread 1 cup of frosting onto the cake layer using a spatula.
- Place the second cake layer on top and spread another cup of frosting into an even layer.
- Place the final top layer and add a thin layer of frosting to add a crumb coat layer around the cake. Place in the fridge for 1 hour to firm up.
- Use the remaining frosting to completely cover the sides and top of the cake. Smooth out with a spatula. Place in fridge for another hour to chill and firm up.
- Build a pile of skulls in the center of the cake using the reserved frosting.
- Use the red icing to create a drip effect around the top edge of the cake, as well as squeeze some into the eye sockets to drip from the skulls onto the cake. Enjoy, and Happy Halloween!
Nutrition
Nutritional information is always approximate and will depend on the quality of ingredients used and serving sizes. If you need exact calories and macros, please do your own calculations.
Dinner Party Menu Suggestions
You’ve made the dessert, but what about the rest of the courses?
Here are additional recipes to create a menu for a dinner party or special meal:
- Appetizer: Air Fryer Mummy Meatballs with Marinara Sauce
- Soup: Bloody Mary Soup
- Salad: Apple Salad with Toasted Hazelnuts
- Main Dish: Slow Cooker Sausage Chili
- Side Dish: Jalapeño Popper Baked Potatoes
- Beverage: Black Magic Halloween Cocktail
This post is part of my long-running Crafty October series on The Purple Pumpkin Blog. Since 2012, I’ve shared Halloween recipes, printables, and crafts every October. While I don’t officially run the series anymore, all my new Halloween posts are still part of this decades-long celebration of spooky fun! Browse past Crafty October years for even more inspiration: 2024, 2023, 2022, 2021, 2020, 2019, 2018, 2017, 2016, 2015, 2014, 2013, and 2012.