Chocolate Minnie & Mickey Disney Easter Doughnuts Recipe
Home » COOK » Recipes » Disney Recipes »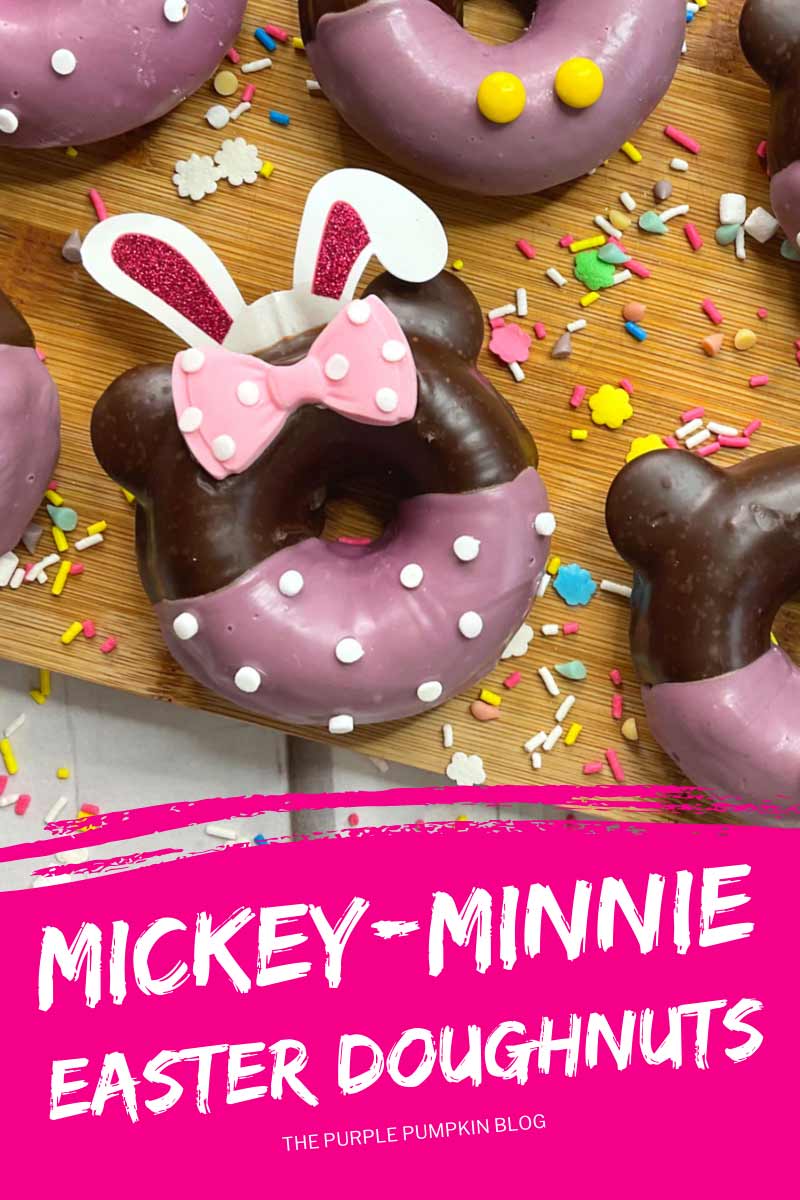
Are you ready to make your Easter even sweeter? These delightful Chocolate Minnie & Mickey Disney Easter Doughnuts will be the highlight of this year’s holiday! So, preheat your oven, grab your whisk, and let’s create some Disney magic!

Don’t have time for this recipe now? Tap the heart icon in the bottom right of the screen to save this post for later!
Affiliate Disclosure
We have included affiliate links to products and services related to this post.
We may earn a commission if you purchase after clicking on those links.
As an Amazon Associate, I earn from qualifying purchases.
Read Our Full Disclosure Policy and Privacy Policy
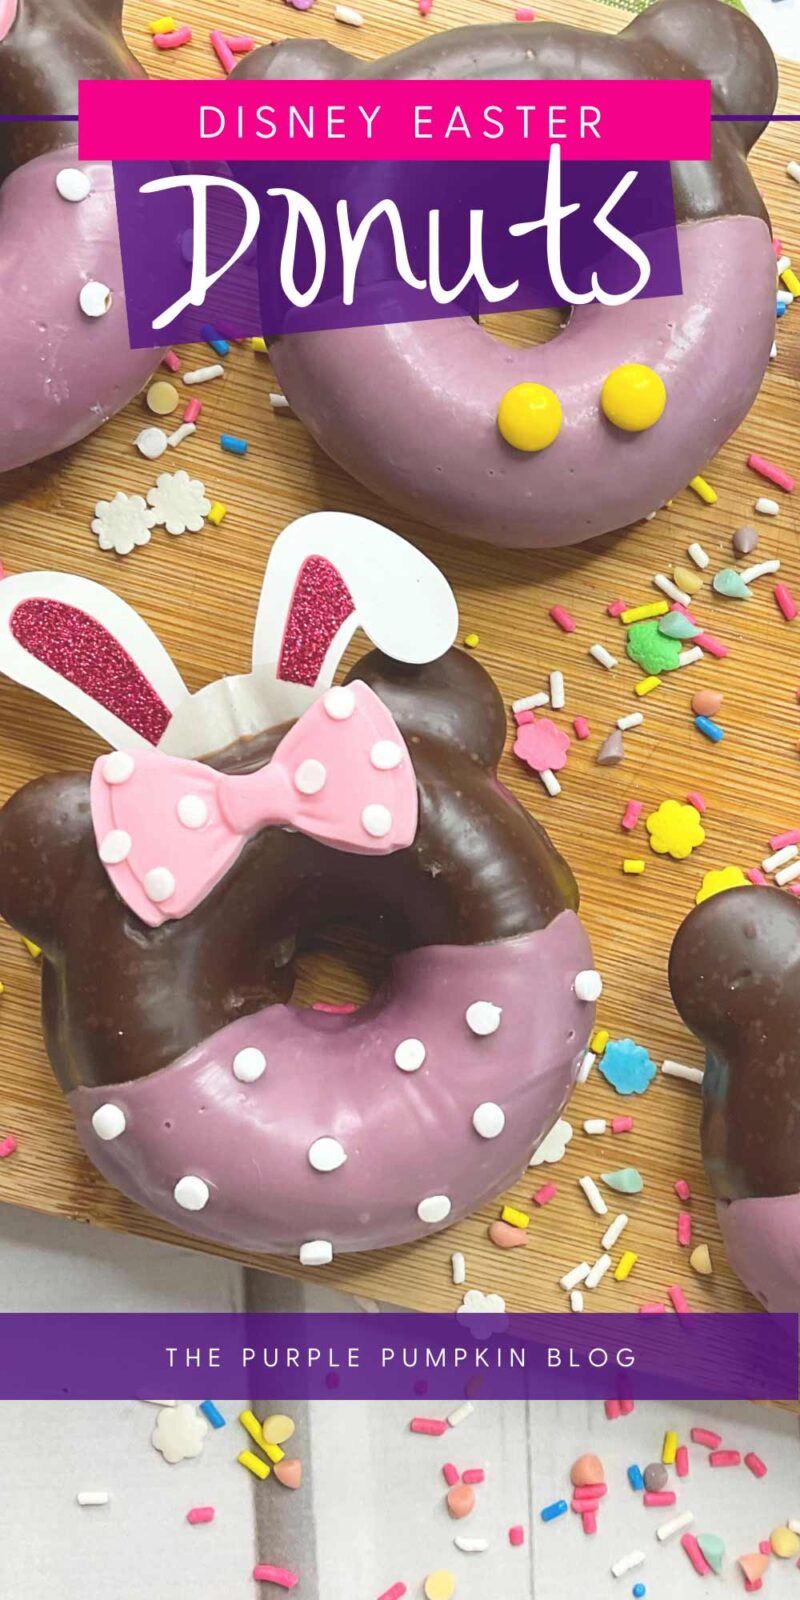
Disney Easter Doughnuts
I know that readers like to skip to the recipe card, but I recommend reading the blog post all the way through so that you don’t miss any tips or substitution suggestions, to ensure that you have all the ingredients and equipment required and understand the steps and timings involved.
These super cute Mickey and Minnie Mouse doughnuts are a must-make dessert for Disney fans everywhere!
Whether packing them in an Easter basket or serving them at a family brunch, these delightfully delicious doughnuts are sure to thrill even the pickiest eaters!
There are several steps involved when making these Disney doughnuts for Easter – making the chocolate ring doughnuts (but you could buy some and skip this step if you like), covering them in chocolate ganache and candy melts, and then decorating them to resemble Mickey and Minnie.
All the steps are in the recipe card at the end of this post, but make sure to read through for all of our tips and tricks!
And for more Easter food, check out these 25+ Delicious Easter Recipes.
Ingredients & Equipment Used In This Recipe
While most ingredients can be bought in grocery stores, for your convenience, any specialized or notable ingredients and equipment needed for this recipe have been linked to Amazon or other stores if available online.
Ingredients Needed For Disney Easter Doughnuts
- Dairy – Buttermilk, Unsalted Butter, Heavy Whipping Cream (Double Cream),
- Other Fresh Ingredients – Eggs
- Pantry – Salt
- All-Purpose Flour – also known as Plain Flour.
- White Granulated Sugar
- Cocoa Powder
- Baking Powder
- Pure Vanilla Extract – always buy good vanilla as it makes a flavor difference.
- Chocolate Chips – semi-sweet (US), plain (UK)
- Chocolate Candy Melts/Wafers – to make Mickey and Minnie’s ears.
- Purple Candy Melts
- Pink Fondant – for Minnie’s bow.
- Yellow M&M’s Minis – for Mickey’s shorts buttons.
- White Confetti/Sequin Sprinkles or White Edible Sugar Pearls – to make the polka dots on Minnie’s bow and skirt.
- Edible Glue
The complete list of ingredients with measurements is found on the recipe card at the end of this post.
No time to read now? Tap the buttons below to save the recipe to your Pinterest boards or Facebook page for later!
Equipment Needed For This Recipe
- Small Sharp Knife
- Mixing Bowls
- Whisk
- Small Saucepan
- 12-Cavity Doughnut Pan
- Cookie Sheet with Rack
- Squeeze Bottle
- Parchment Paper – also known as baking paper or greaseproof paper.
- Wire Cooling Rack
- Easter Bunny Ears Decorations – there are lots of different designs and styles on Amazon, but these are the ones used in the photos. If you can’t source any I’ve supplied a free printable in the Recipe Tips section that you can use!
- Wilton Silicone Bow Mold – the one we use is the Wilton Buttons, Bows & Buckles mold, which isn’t always available. Ultimately, use whichever bow mold you can to make a 2″/5cm bow.
Recipes on The Purple Pumpkin Blog use cups and/or weighted measurements. American cups and kitchen food scales are handy pieces of equipment to have in your kitchen as it means you’ll be able to make all of the different recipes on my blog. I try to give American US customary, imperial, and metric measurements in my recipes. Please note, that you can mix cup measurements with weighted measures, but never mix US customary/imperial (pounds, ounces, pints, etc.,) with metric (kilograms, grams, liters, etc.,).
More Recipes Using Chocolate
One of the hero ingredients in this dish is chocolate, so here are some more recipes using the same:
- Dark Chocolate Espresso Cookies Recipe
- Whiskey Chocolate Cake Recipe with Chocolate Coconut Ganache
- Chocolate Chip Fudge Brownie Cake with Cookie Dough Frosting
- Easy Chocolate Peanut Clusters Make A Great Homemade Gift!
- Delicious & Decadent Deep Dish Cherry Chocolate Ganache Pie
Fondant Tips
If you have never worked with fondant before, don’t panic – it is really easy to use, follow my tips and you’ll be just fine!
- Line a cookie sheet(s) or tray(s)with parchment paper or a non-stick baking mat to place the fondant pieces on to dry.
- Dust your work surface with powdered sugar (icing sugar/confectioner’s sugar) or cornstarch (cornflour) so that the fondant doesn’t stick. Think of it like the way you use flour when rolling dough.
- Rub a little powdered sugar/cornstarch into your hands and knead a handful of the fondant to make it more pliable before rolling, rather than using it straight from the package.
- Dust your rolling pin too, and roll fondant to about ¼” thick. Some fondant rolling pins have guides you can use. You don’t want it too thick as it will take ages to dry, and you don’t want it too thin as it will become more tricky to work with.
- Using a Silicone Mold: Dust with powdered sugar before pressing some fondant into the cavity and leveling off, before gently popping out and leaving to dry. Do not place them in the fridge.
- If there is excess powdered sugar on the pieces, you can gently brush it away with a pastry brush, or an unused, clean paintbrush.
- Alternatively, you can use a vodka spray. Pour some vodka into a mini spray bottle and gently mist the fondant pieces. Vodka dries more quickly than water which is why it is usually used when handling fondant.
- Always make extra pieces – that way if some break or you have another mishap, you have got backups that you can use.
- The fondant pieces should be solid enough to handle and use after 3 – 6 hours. I personally like to leave fondant pieces to dry for around 24 hours. How long this takes, however, is based on the size and thickness of the fondant, and how humid your house is, so you will need to judge if they will hold up as they need to in the cupcakes.
- When making desserts that use fondant decorations I like to make them a few days ahead of time which allows for drying without stress. Fondant that isn’t dry enough can mean disappointing end results.
- After using fondant the surface will be super sticky (it always is in my experience!) so you will probably have to wipe away the sugar first, then give it a soapy hot wash over, and then another clean over! You can always buy a fondant rolling mat for easier cleanup.
- Always keep fondant covered when making decorations to prevent it from drying out. And when you’ve finished, wrap up any remaining fondant very well – I double-wrap it in plastic wrap and place it in an airtight container. This keeps it fresh and you are able to use it for future use.
Melting Tips for Candy Melts
You can melt candy melts/wafers in the microwave or a double boiler, or if you plan on making lots of candy-covered treats in the future, we recommend investing in a Wilton candy melting pot as treat-making life is so much easier!
Try this PME one in the UK, as it is more affordable than Wilton Amazon.co.uk.
If you use the Wilton Candy Melting Pot, you can check out Wilton’s demo video on YouTube, which is helpful. They give tips on how to melt candy melts in the microwave and use the double boiler method.
The two most important things are
- Do not overheat – use an even melting temperature.
- Do not add water – it makes the candy seize up and become unusable. Ensure the equipment is completely dry, and avoid using utensils that retain moisture, like a wooden spoon.
If the candy is too thick, add vegetable shortening or (solid) coconut oil in 1 teaspoon increments, up to 1 tablespoon, and stir well.
Another reminder—do not add water. The first time we used candy melts, we got water in the bowl, which was ruined. Learn from our mistakes! Additionally, do not use vegetable oil, butter, milk, or other liquids, as this will make the candy seize.
If you use your microwave, test a small amount of candy melts first to see how it works. You may need to adjust the temperature and time to suit your machine.
Heat in 15-30 second increments, stirring the candy melts each time. They may not look melted, but they might have started melting from the inside. Stirring helps to distribute the heat.
More Easter Recipes
Looking for more Easter Treats to make? Check these recipes out next:
- Bright & Colorful Easter Egg Brownies Decorated with Frosting & Sprinkles!
- These Sweet Baby Chick Cupcakes for Easter Are So Easy To Make!
- Yummy Easter Cookie Bars With Vanilla Frosting & Sprinkles!
- Chocolate Chips & Cadbury Mini Egg Cookies for Easter!
- Chocolate Peanut Butter Easter Bunny Cupcakes
Download Free Printable Bunny Ears Cupcake Toppers
How to use: print and cut out the bunny ears and use some sticky tape or hot glue to stick to a wooden toothpick/cocktail stick to the back of the ears. Insert into cupcakes.
Click the download link to save the printable file(s) to your computer.
The Shop opens in a new tab/window.
Visit The Purple Pumpkin Shop for more awesome printables & products!
Printable Disney Easter Doughnuts Recipe Card
To save ink, any demonstration photos do not print on the recipe card.
Mickey Mouse & Minnie Mouse Disney Easter Doughnuts
Ingredients
For the Bows
- Pink fondant
- Edible glue
- White sugar pearls or white sequin sprinkles
For the Doughnuts
- 2 cups all-purpose plain flour
- ⅔ cups white sugar
- ½ cup dark cocoa powder
- 2 tsp baking powder
- ½ tsp salt
- ½ cup buttermilk
- 2 large eggs
- 2 Tbsp unsalted butter melted
- 2 tsp pure vanilla extract
For the Chocolate Ganache
- 2 cups semi-sweet/plain chocolate chips
- 1¾ cups heavy whipping cream double cream
To Decorate
- 24 chocolate candy melts
- Purple candy melts
- 12 mini yellow M&M’s
- Bunny ear cupcake toppers
SUGGESTED PRODUCTS
Instructions
- Start by making the bows at least 3 hours in advance. Use a silicone bow mold and dust the mold with cornstarch each time you make a fondant bow. The bows should be about 2"/5cm wide.
- Line a cookie sheet or tray with parchment paper or a non-stick baking mat.
- Pinch off a small piece of pink fondant and press it into the bow mold cavity. After 5 minutes, carefully remove it from the mold and set it on the lined cookie sheet. Repeat to make 12 bows total. TIP! Always make extra fondant decorations as backup!
- Using the edible glue and a clean brush, stick some white sugar pearls onto each bow to form the polka dots. Leave the bows to dry for at least 3 hours.
- To make the doughnuts, preheat the oven to 350°F/180°C/Gas 4. Spray a 12-cavity doughnut pan with nonstick baking spray.
- Sift or whisk the flour, sugar, cocoa powder, baking powder, and salt in a large mixing bowl.
- Whisk in the buttermilk, eggs, melted butter, and vanilla until combined
- Fill each doughnut cavity ¾ full and bake in the oven for 8-12 minutes or until an inserted toothpick comes out clean.
- Leave to cool in the pan for 5 minutes before transferring to a wire rack to cool completely.
- To make the chocolate ganache, place the chocolate chips in a medium bowl and set them aside.
- Pour the heavy whipping cream into a small saucepan over medium heat and bring to a simmer.
- Pour the hot cream over the chocolate chips and leave to sit for 1 minute before whisking until smooth.
- Pour the ganache into a squeeze bottle and leave to cool for 5 minutes.
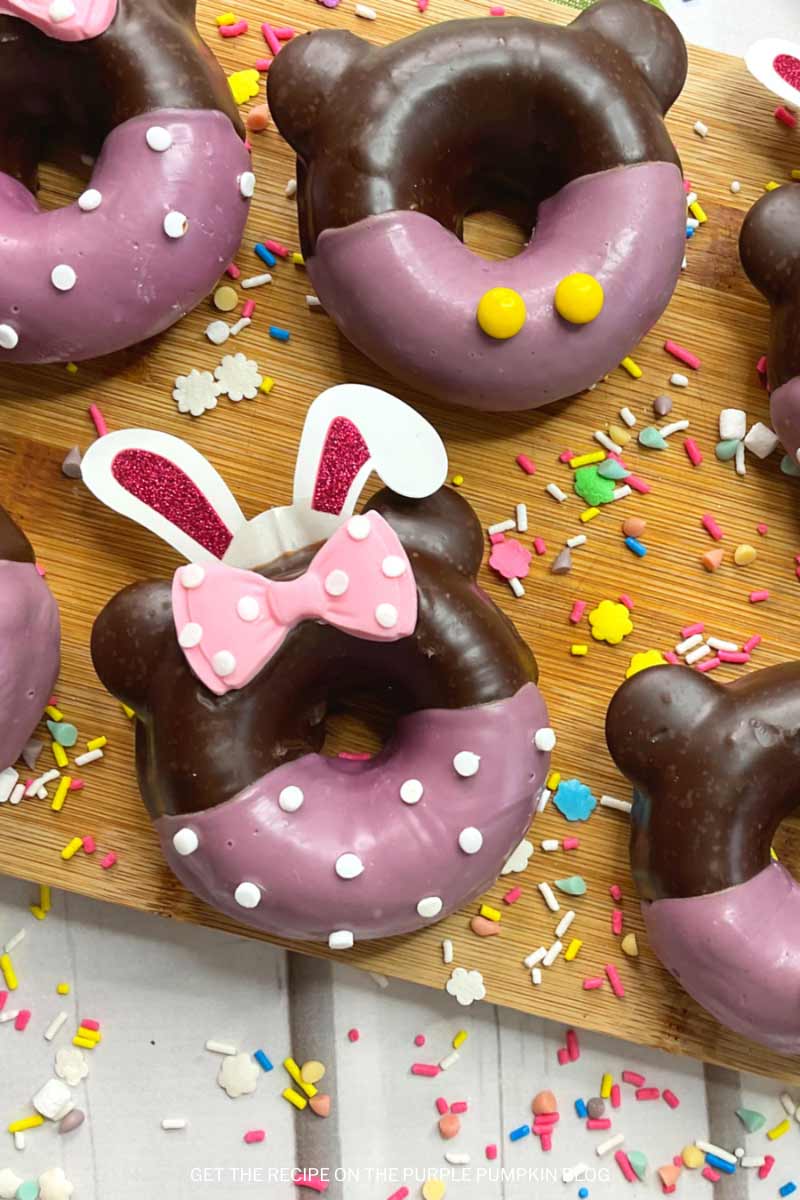
- To decorate the cooled doughnuts, cut a small slit in the top right and left "corners" with a small knife. Push two chocolate candy melt wafers into the slits to create "ears" Repeat with all of the doughnuts.
- Place the doughnuts on a wire rack over a parchment-lined cookie sheet. Carefully pour the chocolate ganache over the top half of the doughnut, covering the ears.
- While the ganache is still tacky, place a fondant ear at the top of six doughnuts to create Minnie Mouse doughnuts.
- Allow the ganache to drip off the doughnuts and leave them to set for about an hour.
- Melt the purple candy melts according to the package instructions. Pour the melted candy into a squeeze bottle.
- Carefully pour the melted candy over the bottom half of the doughnuts, tapping the wire rack gently so any excess drips off.
- While the purple candy melts are still wet, use tweezers to place some sugar pearls on the Minnie Mouse doughnuts.
- Carefully place two yellow M&M's to form Mickey Mouse's short buttons on the purple half of the remaining 6 doughnuts.
- When the candy has set, insert bunny ears into the doughnuts as you wish. Enjoy and Happy Easter!
Nutrition
Nutritional information is always approximate and will depend on the quality of ingredients used and serving sizes. If you need exact calories and macros, please do your own calculations.
Recipes To Make A Special Dinner
You’ve made the dessert, but what about the rest of the courses?
Here are additional recipes to create a menu for a dinner party or special meal:
- Appetizer: Cucumber Smoked Salmon Appetizers
- Soup: Vichyssoise Recipe – a chilled creamy leek & potato soup
- Salad: Classic Caprese Salad with Balsamic Glaze
- Main Dish: Italian Style Lamb Shanks in the Slow Cooker
- Side Dish: Polenta 3 Ways – Creamy, Grilled, and Fried
- Beverage: Easter Jelly Bean Cocktail
There are 500+ Recipes on The Purple Pumpkin Blog for you to enjoy – please feel free to check them out too.