A Budget BBQ For A Tenner with ASDA & #CBias
Home » COOK »Knowing it was going to be a gorgeously hot weekend, the first thought for a family meal was BBQ!!

We’ve just moved house and with a new garden to sit in, it was time to dust off the grill and cook in the sunshine.
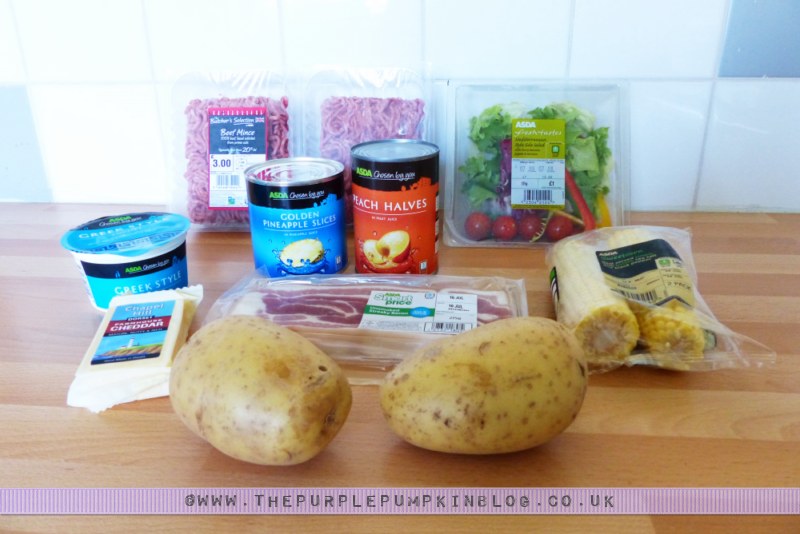
I wanted to keep things as simple and cheap as I could so that meant homemade burgers, salad, and a fruit dessert.

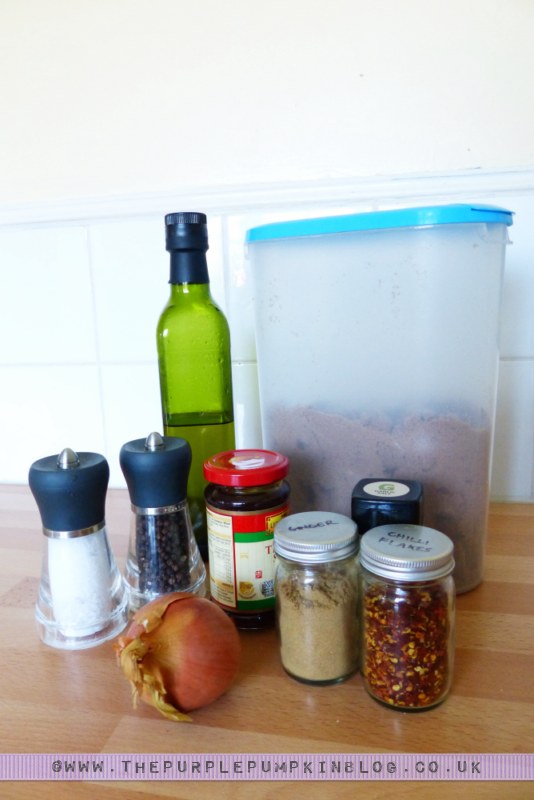
I really am a wing-it sort of cook – often making things up as I go along! I looked at all the ingredients I’d bought with a rough idea in mind, then raided my store cupboard to jazz up the menu.
- 3 types of sliders – Hawaiian, BLCT, and Chilli & Ginger
- Garlic and Rosemary Potato Parcels
- Speedy Side Salad
- Grilled Corn on the Cob with Sea Salt
- Caramelised Grilled Fruit with Greek Yoghurt
I’ll be sharing my recipes throughout this post, so please carry on reading!
From the store cupboard, I pulled out some olive oil, sea salt, black pepper, garlic salt, dried chilli flakes, ground ginger, brown sugar, an onion, and a jar of teriyaki sauce. I also glanced at my rosemary plant on the window ledge. It’s my favourite herb and features a lot in my cooking.


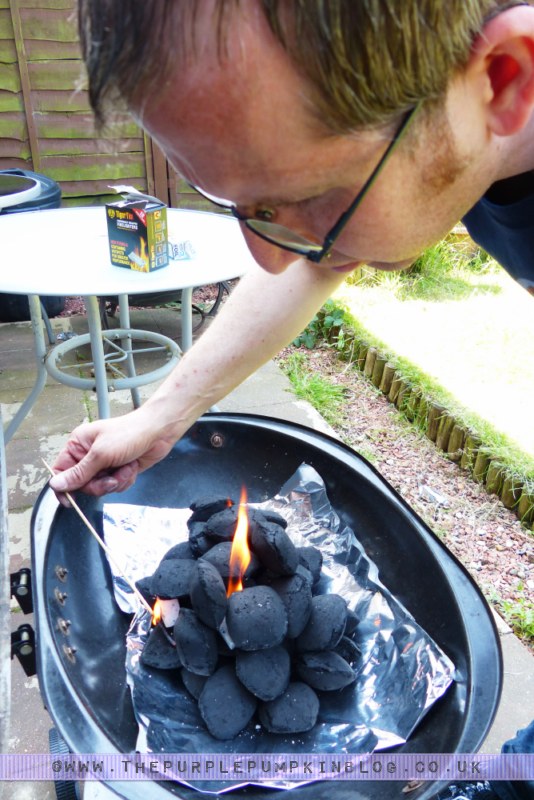
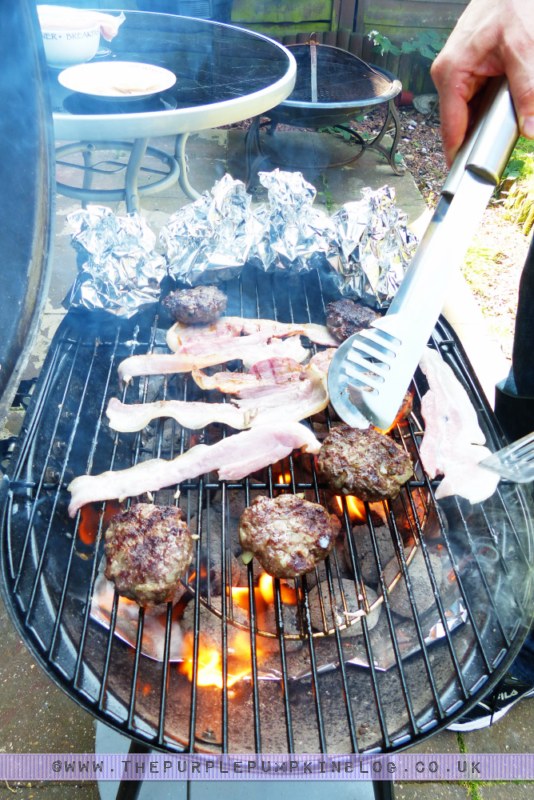
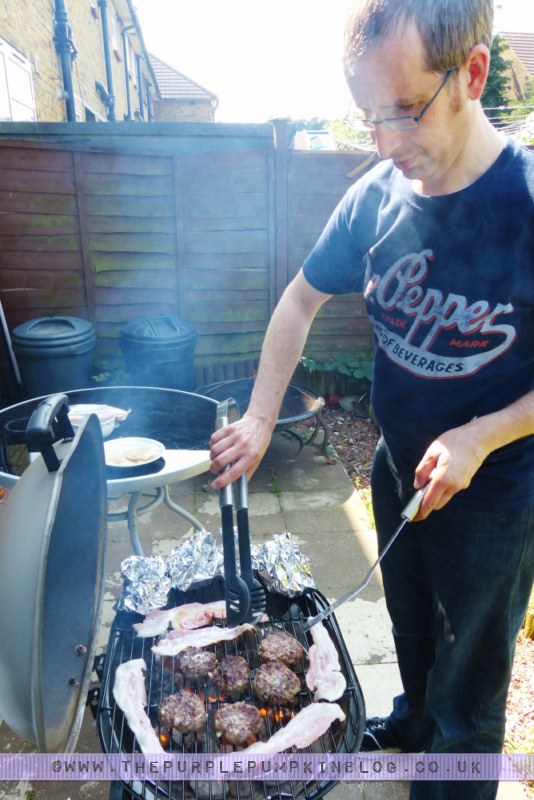
Steve found the BBQ in the shed, among the pile of stuff in there after our house move last week, and got the coals fired up to grill our budget feast, while I prepped the food.

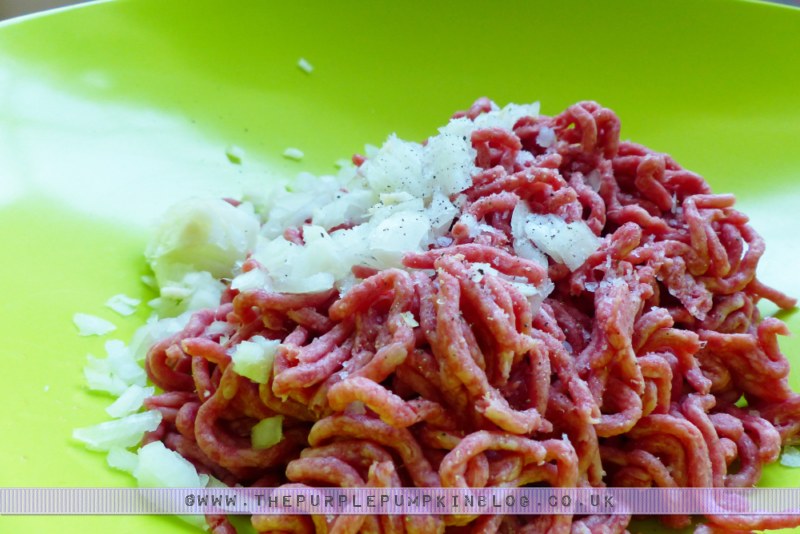
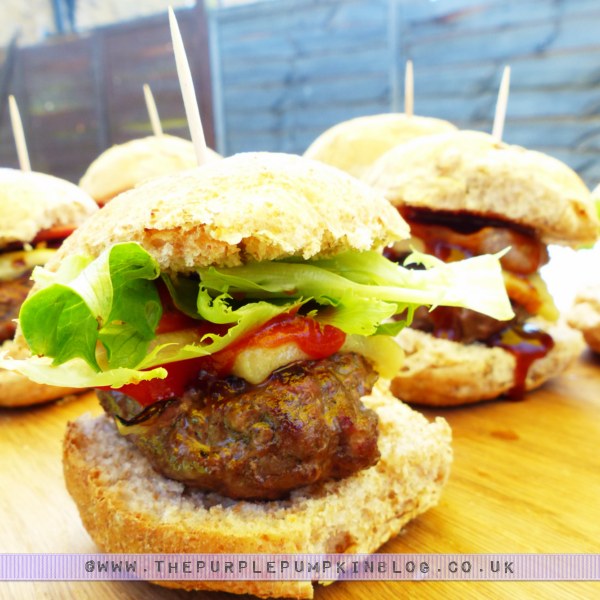
I bought a 750g pack of beef mince for £3. It came divided into two. I used one pack for the BLCT sliders – which are just plain burgers, with the bacon, lettuce, cheese, and tomato (ketchup!) added afterward, so you can serve these to the fussiest of burger eaters without the toppings.

BCLT Burgers
Ingredients
- 375 g beef mince
- ½ white onion finely chopped
- sea salt & pepper
- 6 rashers streaky bacon
- lettuce
- 6 slices Cheddar cheese
- ketchup
- 6 small bread rolls
- 6 cocktail sticks to assemble optional
Instructions
- Place mince and onion into a bowl. Season to your preference with salt and pepper.
- Form into 6 equal sized balls and then press into burger patties with your hands.
- Store in the fridge with greaseproof paper between each burger/slider until ready to cook.
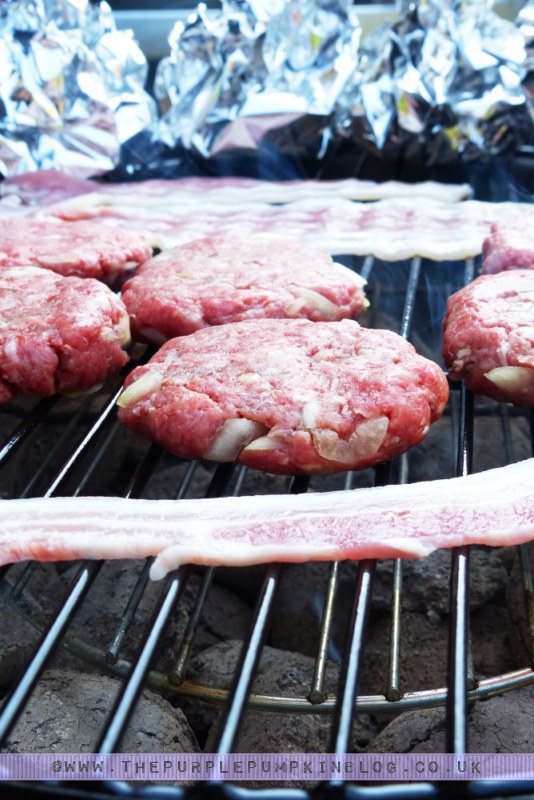
- Cook on the barbecue for 3-5 minutes each side until cooked through, add the cheese on top and allow to melt slightly.
- Cook the bacon on the grill until your desired crispiness.
- To serve, place each slider onto a roll, add the bacon, lettuce and tomato ketchup.
- Hold together with a cocktail stick if you wish.
Nutritional information is always approximate and will depend on the quality of ingredients used and serving sizes. If you need exact calories and macros, please do your own calculations.
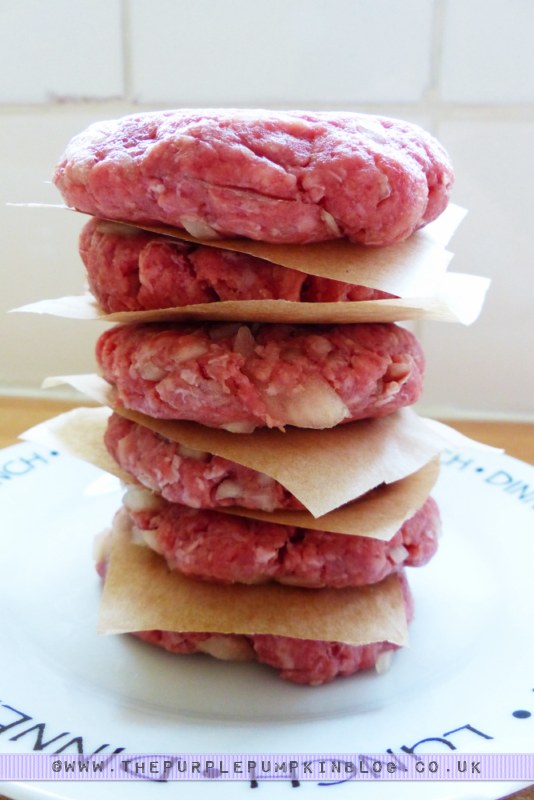
I made all the burgers in advance and kept them in the fridge until needed, but here are some pictures to show you them being cooked and assembled…

.JPG)
.JPG)
.JPG "Budget #BBQ for a family of 4 for a tenner! with ASDA & #CBias: BLCT Sliders")
The BLCT Sliders were juicy and full of flavour – and no need for smoked bacon as the coals do all the work! Having a plain burger as a base means you can jazz things up with various toppings.

I’m all for variety when it comes to throwing a BBQ – no matter how small – so I made two other kinds of burgers to go with the plain/BLCT ones.
Having bought pineapple rings for dessert, and then discovering a jar of teriyaki sauce in the cupboard, I decided to make Hawaiian burgers. Of course, not everyone is going to have teriyaki sauce as a store cupboard staple, we just happen to have quite a lot of ethnic ingredients in ours. If you have soy sauce, I think that would work as well for flavour, you may not need as much though as my ingredients list suggests.
Hawaiian Sliders
Ingredients
- 185 g beef mince
- 3 tsps teriyaki sauce + 3 tsps for basting
- 3 pineapple rings
- 3 bread rolls
Instructions
- Place the mince and teriyaki sauce into a bowl.
- Form into 3 equal sized balls and then press into a burger patties hands.
- Store in the fridge with greaseproof paper between each burger/slider until ready to cook.
- Cook on a hot grill for 3-5 minutes on each side until cooked through
- Grill the pineapple rings on both sides
- Place the burger and pineapple ring into a bread roll to serve.
Nutritional information is always approximate and will depend on the quality of ingredients used and serving sizes. If you need exact calories and macros, please do your own calculations.

.JPG)
.JPG "Budget #BBQ for a family of 4 for a tenner! with ASDA & #CBias: Hawaiian Sliders")
The sweetness of the pineapple went really well with the burgers – the teriyaki sauce made these burgers tender and flavourful. I’m sure soy sauce would work just as well, but if you can get some teriyaki sauce, try these out!

The final burger/slider flavour was chilli and ginger, not having fresh of either of these, I turned to the dried variety and they still worked ^_^
Chilli & Ginger Sliders
Ingredients
- 185 g beef mince
- ½ – 1 tsp ground ginger
- ½ – 1 tsp dried chilli flakes
- ½ tsp garlic salt
- lettuce
- 3 bread rolls
Instructions
- Place all the ingredients into a bowl and mix well.
- Form into 3 equal sized balls and then press into a burger patties hands.
- Store in the fridge with greaseproof paper between each burger/slider until ready to cook.
- Cook on a hot grill for 3-5 minutes each side until cooked through
- Serve in bread rolls with lettuce
Nutritional information is always approximate and will depend on the quality of ingredients used and serving sizes. If you need exact calories and macros, please do your own calculations.
.JPG "Budget #BBQ for a family of 4 for a tenner! with ASDA & #CBias: Chilli & Ginger Sliders")


Hubby commented that these burgers really packed a punch! I didn’t think that they were over chillified – but of course, season to your tastes!
.JPG "Budget #BBQ for a family of 4 for a tenner! with ASDA & #CBias: Chilli & Ginger Sliders")
You could be really brave and add more fresh chilli!
With the sliders all prepared and in the fridge, up next was the prepping for my garlic and rosemary potatoes. These do need some pre-cooking, but they could be doing that while you’re making the burgers.
Garlic & Rosemary Potato Parcels
Ingredients
- 500 g potatoes peeled and cubed
- olive oil
- garlic salt
- fresh rosemary chopped
- 4 squares tin foil to cook on barbecue
Instructions
- Par-boil the potatoes for about 5 minutes until just tender. Remove from the heat and drain.
- Lay out the sheets of tin foil and glug on some olive oil, sprinkle on some garlic salt – a few shakes would do it, and scatter over the rosemary. If you don't have fresh, you could use dried.
- Divide the potatoes between each sheet of foil, give them a little mix in the flavoured oil and then gather up the edges of the foil to form parcels ready for the barbecue.
- Place on top of the grill to finish cooking. You can also put these into the coals – but place them at the edges where it isn't so hot.
Nutritional information is always approximate and will depend on the quality of ingredients used and serving sizes. If you need exact calories and macros, please do your own calculations.


I often cook potatoes this way on the barbecue. Yes, there is the pre-prep of parboiling them, but being on the grill gives them a nice smokey flavour as well. The ones on the bottom were crispy from sitting directly over the coals, and it is worth putting them in the coals to get more crispness around them. Just be mindful to keep them on the outer coals so as not to burn them!

Grilling corn on the cob is one of life’s simple pleasures! To save money, I bought two corn cobs for £1 and halved them myself, instead of paying £1.79 for the same thing, but done by the factory where they are prepared!
Grilled Corn on the Cob with Sea Salt
Ingredients
- 2 fresh corn on the cob halved
- sea salt
Instructions
- Place the corn cobs over hot coals. Cook for 7-10 minutes turning frequently, until charred slightly on all sides.
- To serve, sprinkle with sea salt.
Nutritional information is always approximate and will depend on the quality of ingredients used and serving sizes. If you need exact calories and macros, please do your own calculations.
.JPG "Budget #BBQ for a family of 4 for a tenner! with ASDA & #CBias: Grilled Corn on the Cob with Sea Salt")
.JPG)

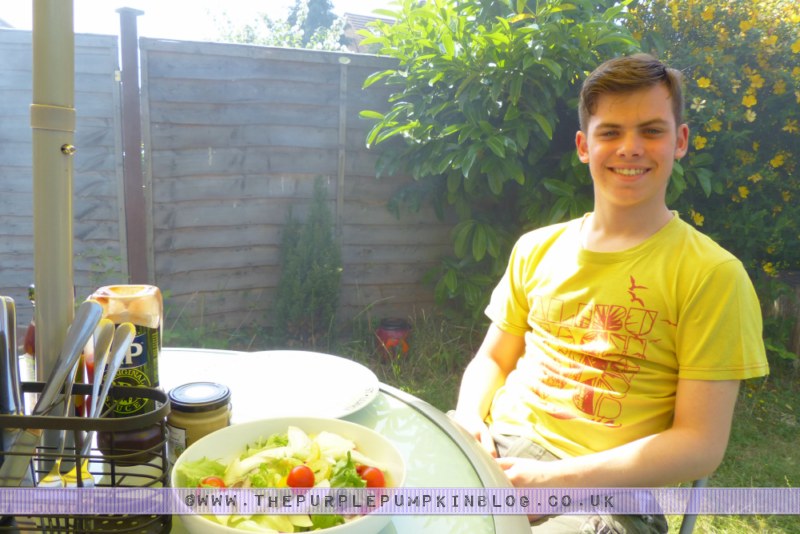
I bought a pre-made salad, so the prep was simple – rip off the plastic lid, wash, and dump it into a serving bowl! The salad had a couple of varieties of lettuce, cherry tomatoes, red onions, and bell peppers.

My boy set up the table with crockery, cutlery, napkins, and condiments, while hubs cooked the grub.

With everything ready and the sun shining, it was time to enjoy our budget BBQ and to see if it was a tenner well spent!


Our budget barbecue was a success! The different kinds of burgers I made went down well, and there was enough to feed a family of 4…although we are a family of 3, I’ve got a teenage boy who likes to eat and a husband who is the same!!


The coals on the BBQ were still red hot about an hour later, so I got the dessert ready. I used canned fruits, but you could just as easily do this with fresh fruit instead. (As I have done in the past). And in case you are wondering, we did change the grill – we didn’t use the same one we’d been grilling meat on!
Caramelised Grilled Fruit with Greek Yoghurt
Ingredients
- 4 canned pineapple rings
- 4 canned peach halves
- 4 tsp soft brown sugar
- 4 tbsp Greek yoghurt
Instructions
- Drain the fruit and pat dry with a paper towel to remove the excess juice/syrup
- Place the fruit onto a plate and sprinkle one side of the fruit with the brown sugar
- Place sugar side down over hot coals and leave to cook for a few minutes before flipping over and cooking on the other side.
- Serve a slice of pineapple and peach half per person and dollop with a spoonful of Greek yoghurt.
Nutritional information is always approximate and will depend on the quality of ingredients used and serving sizes. If you need exact calories and macros, please do your own calculations.


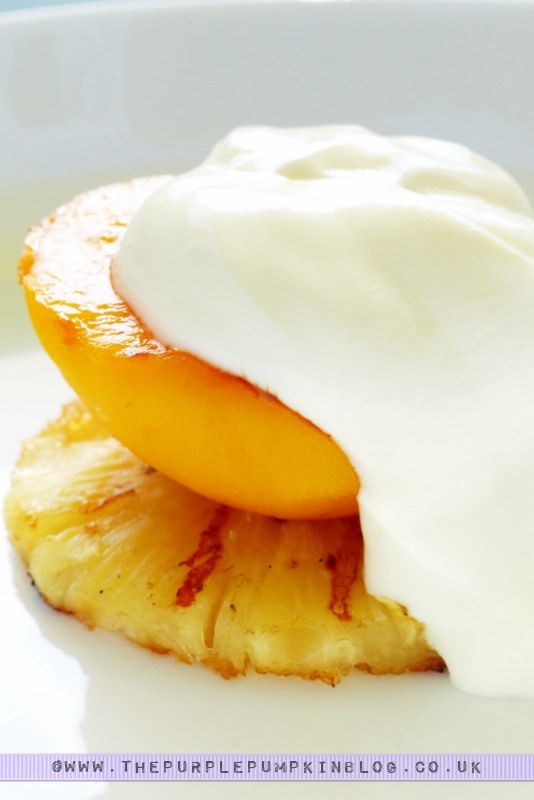

It was a modest and easy dessert – just the right serving size to satisfy a sweet tooth (I always have to have something sweet after a meal!), and the fact that it was fruit and yogurt made it feel not so naughty!
Knowing how much money we tend to spend on BBQ food – things like various different meats, chips, dips, sauces, and salad veggies do add up, but for a tenner and this simple (to me anyway!) BBQ – well, by the end of it we were stuffed!! Had to wait a while before I even bothered to tackle the dessert! I remarked to hubs how far ten pounds actually went – even though we had to throw in some store cupboard bits, I think you can easily have an informal BBQ for your family on a budget much smaller than you realise!
Laura Jayne Bates
January 20, 2014 @ 6:34 pm
cant go wrong for a tenner and they look lovely
Michelle Ordever
January 20, 2014 @ 6:39 pm
It was amazing how far a tenner stretched!
Allan Smith
January 20, 2014 @ 4:54 pm
These look lush!
Michelle Ordever
January 20, 2014 @ 4:58 pm
And for a bargain tenner to boot!
Allan Smith
January 20, 2014 @ 5:00 pm
The price always makes things taste that little bit nicer :D
Michelle Ordever
January 20, 2014 @ 5:02 pm
Always ;) Think I’ll have to do this all over again when the sunshine makes it BBQ time again!
Allan Smith
January 20, 2014 @ 5:04 pm
Now that sounds like a plan! Although sunshine seems like nothing more than a distant memory right now :))
Michelle Ordever
January 20, 2014 @ 6:39 pm
Keep the faith…the sun will be back :D
WifeMumStudentBum
July 14, 2013 @ 3:49 pm
Just popping over from MBPW – wow your BBQ looks a lot more professional than mine – mine went a bit up the wall :) Your photographs are also superb, what a great post :)
Michelle Ordever
July 14, 2013 @ 8:21 pm
You had a good time though right?! That’s what matters at the end of the day! I know when I’ve done things and they’ve got tits up – a good time was still had :D
Glad you enjoyed my post! xx
♫ Alison M ♪
July 12, 2013 @ 8:47 pm
Looks really lovely
Michelle Ordever
July 12, 2013 @ 8:54 pm
Thanks Alison! Someone commented on Twitter that it wasn’t much of a BBQ! But it did us – and for a tenner, from scratch, I like to think I did well!
oneblueonepink
July 12, 2013 @ 12:06 am
Wow, reading this has made me sooo hungry! The pineapple slider would be my fave I think
Michelle Ordever
July 12, 2013 @ 7:52 am
That was my fave too!
Helen @ Fuss Free Flavours
July 11, 2013 @ 4:24 pm
I am really impressed with ASDA, wish I had one nearer to me…
Michelle Ordever
July 11, 2013 @ 4:42 pm
After the price comparison with other supermarkets there was a TON of saving, but a saving nonetheless! It’s a drive and a parking fee for me, so doesn’t always equal a saving, but I was happy that I managed to do all this for a tenner – even if I did have to use some store cupboard bits!
SlummySingleMummy
July 9, 2013 @ 9:49 am
Oh. My. Goodness. I am literally salivating. Is it too early to get the BBQ out do you think?
Michelle Ordever
July 9, 2013 @ 9:56 am
Never to early to get the BBQ out! We’re making the most of this gorge weather and planning another one at the weekend :D