Rudolph the Red Nosed Reindeer Craft
Home » CREATE » Crafts » Christmas Crafts »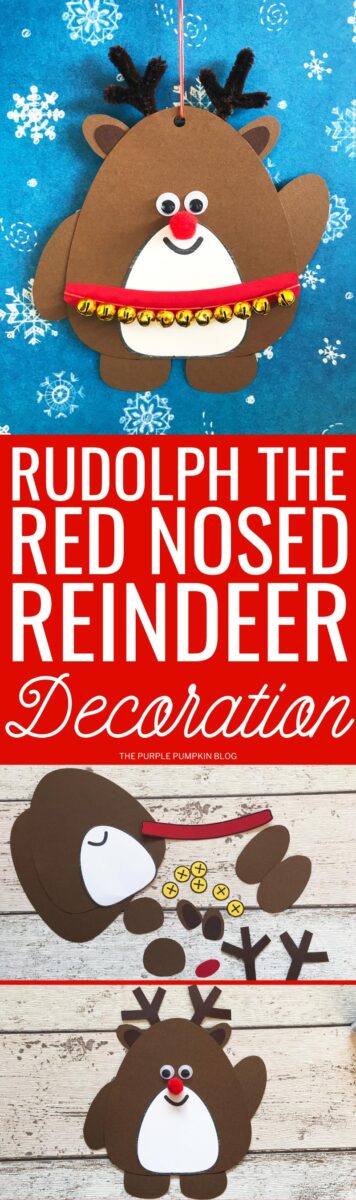

How adorable is this Rudolph the Red Nosed Reindeer Craft?! The reindeer is made with construction paper or cardstock and is so easy to assemble using a free printable template. Turn Rudolph into a Christmas ornament to hang on the tree, or use him to make a Christmas card! This is a fun craft for all ages and there are multiple options for putting him together too. Read on to learn how to make this super cute reindeer craft!
Here are more Reindeer Crafts and Recipes for you to enjoy! Right-click and open a new tab to read next.

Affiliate Disclosure
We have included affiliate links to products and services related to the topic of this post.
This post contains affiliate links, and we will be compensated if you purchase after clicking on those links.
As an Amazon Associate, I earn from qualifying purchases.
Read Our Full Disclosure and Privacy Policy
This post is part of the Create Christmas series on The Purple Pumpkin Blog – a celebration of everything Christmas and Winter.
Rudolph the Red Nosed Reindeer Craft
You may recognize Rudolph from my Build a Reindeer Printable – and you would be correct! I’ve turned that printable into this awesome Rudolph the Red Nosed Reindeer craft where the template is printed directly onto colored construction paper or cardstock.
Going forward I plan to be offering these two styles of printables for my chubby little characters, as the print directly onto colored paper saves on ink, and we all know how expensive that can be! I hope you love this style of printable as much as my originals!
However, if the colored paper or card that you buy doesn’t go through your printer (like my light brown paper didn’t) you can print onto regular paper, cut the pieces out and then trace around them instead. You will have to add some features which you will notice in the printable like the crosses on the bells.
Materials & Tools Used in This Craft
Full instructions are found in the printable tutorial card at the end of this post, but here is a quick outline so you know what to expect from the craft.
I highly recommend always reading everything all the way through before starting any project so you understand all the steps required.
Here are the craft supplies needed for this paper reindeer ornament:
- Construction Paper or Cardstock in the following colors:
- Brown Pipe Cleaners/Chenille Stems
- Mini Jingle Bells
- Red String
- Red Pom Pom
- Googly Eyes
- Scissors
- Hole Punch
- Roller Glue or Glue stick
- Sticky Tape
- Reindeer Craft Template – as with [most of] my free printables, this is available in two different sizes – A4 and US Letter (8.5″ x 11″). You’ll find the downloads below, surrounded by a purple box.
Reindeer Craft Options
I mentioned in the opening that there are multiple options for this craft. How you construct Rudolph the Reindeer may depend on the supplies that you are able to buy, or the age of the person crafting.
All of the options will need colored construction paper or cardstock (that will ideally go through your printer, but I already mentioned how you can overcome that if required), scissors and glue.
- Option 1: All Paper Elements. Print the template – the color required is listed at the top of each page. Cut the pieces out and then stick all the pieces together to make the reindeer.
- Option 2: Googly Eyes. As above, but cover the printed eyes with googly eyes.
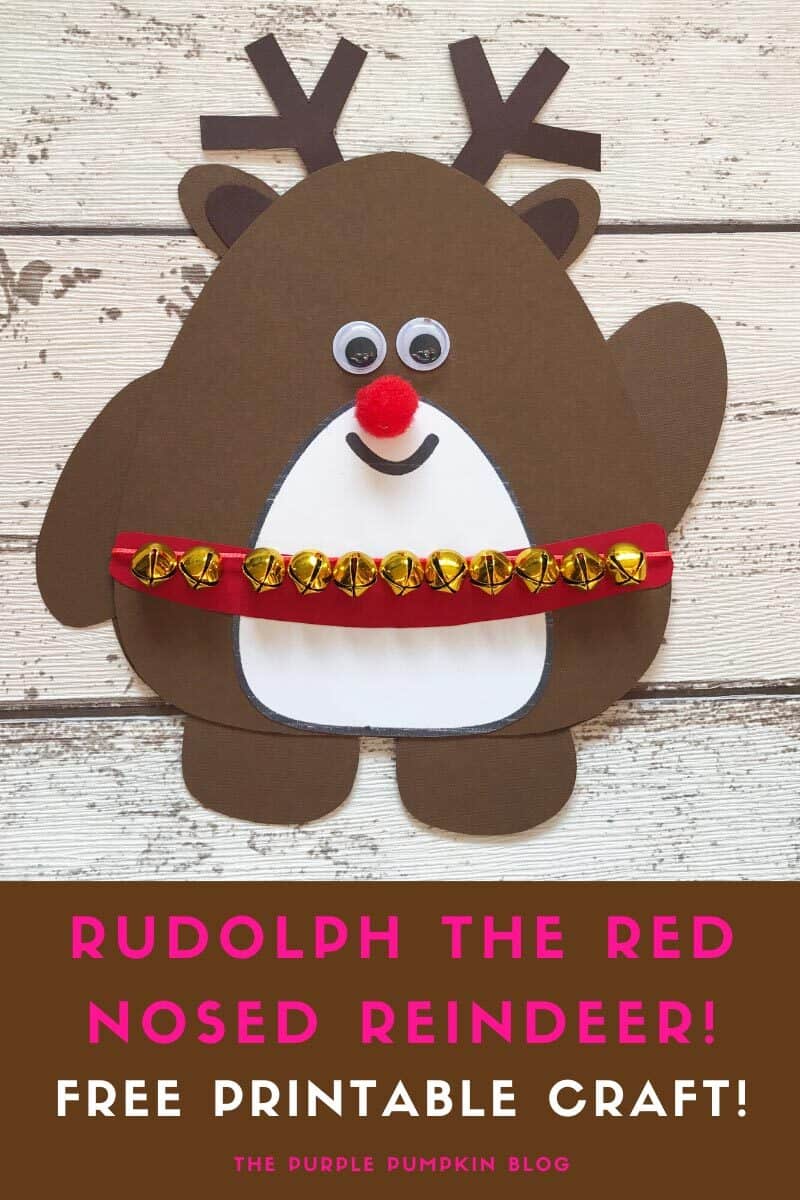
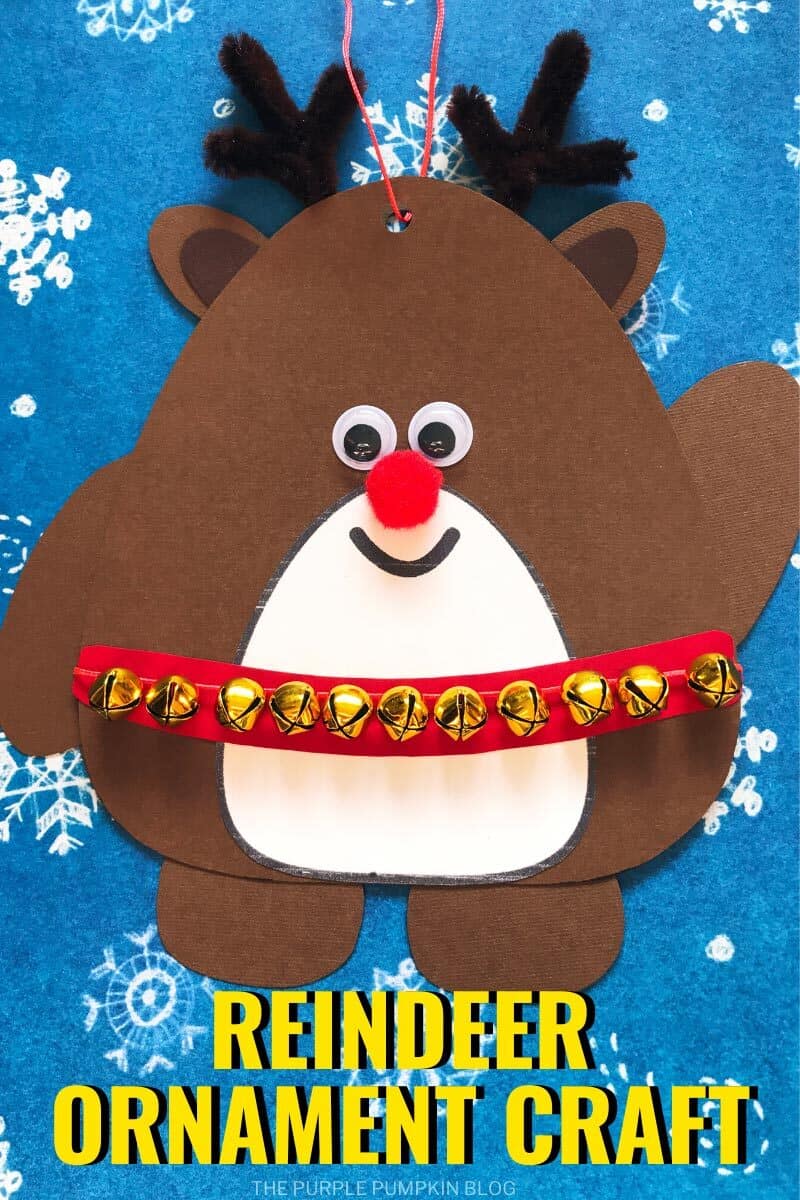
- Option 3: Fully Embellished! Several non-paper embellishments replace some of the paper pieces – jingle bells, a pom pom red nose, googly eyes, and pipe cleaner antlers.
Important! The free printable will make 1 (one) reindeer. Most of the pieces are light/medium brown and a whole page is used. However on the other pieces, I’ve placed them along the top so that you can cut the strip of them out, then continue to reuse the paper for other projects.
How To Make This Reindeer Craft
I’ve got several step-by-step photos to guide you through making this reindeer craft and there is also a slideshow video over on my YouTube channel that you can watch and save to your Playlists for future reference. (Don’t forget to subscribe while you are there!)
Print off the template onto the corresponding colored paper and carefully cut everything out. You can cut inside or outside the black outline – your choice.
If you are making Option 1, then use the photos in this post as a guide to layering the pieces and sticking them together. For Option 2, simply select some googly eyes that will cover the printed eyes and stick them in place.
For Option 3 you will need to make a string of bells to hang on Rudolph’s collar and some pipe cleaner antlers – details below!
If you want to turn it into an ornament, use a hole punch at the top and thread some red string through to hang up on your Christmas tree.
If you want to turn the ornament into a Christmas card, stick it to the front of a large folded piece of cardstock.
How to Make Reindeer Antlers From Pipe Cleaners
It’s so easy to make reindeer antlers from pipe cleaners – you just need to make a few folds.
Take a regular length (about 12″/30cm) pipe cleaner, fold it in half and cut so you have two pieces, then follow the demonstration pictures below.
Jingle Bell Collar
For the collar thread about 10 miniature jingle bells (I used gold) onto a piece of red string long enough to go around the whole body and tie a knot – this makes it easier to handle. Wrap across and around the collar and tape in place at the back.
Once all the pieces have been stuck in places, add another body piece at the back to cover all the workings. And your Rudolph the Red Nosed Reindeer craft is done!
More Christmas Ornament Crafts
Want to make more Christmas ornaments? Try these ones after the reindeer craft:
- Easy No-Sew Felt Christmas Ornament Penguin + Free Printable Pattern
- Disney’s Frozen Olaf Christmas Ornament Craft
- Handmade Maleficent Ornament
I’ve shared lots of great craft ideas on The Purple Pumpkin Blog over the years, in fact, there are 100+ crafts to make and do at home that you can try, including more Christmas crafts.
Download Rudolph Craft Template
- Rudolph the Red Nosed Reindeer Printable Template – US Letter Size
Downloads open in new tab/window
I’ve also got lots more Christmas Crafts for Adults for you to try out. Right-click and open a new tab to read next.
Rudolph the Red Nosed Reindeer Craft
This cute reindeer is made with construction paper or cardstock and is so easy to assemble using a free printable template.
Materials
- Construction Paper or Cardstock in the following colors: Light or Medium Brown, Dark Brown, Red, Yellow, White or Cream
- 1 (12"/30cm) Brown Pipe Cleaner/Chenille Stem
- Mini Jingle Bells
- Red String
- Red Pom Pom
- Googly Eyes
- Reindeer Craft Template
Tools
- Scissors
- Hole Punch
- Roller Glue or Glue stick
- Sticky Tape
Instructions
- Download and print out the reindeer craft template onto corresponding colored papers or cardstock (Link in the blog post). Cut out and set aside. If you are adding the jingle bells you do not need to print the yellow sheet. If you want to make this craft just out of paper, then you can skip the embellishment steps.
- To make the pipe cleaner antlers, fold the pipe cleaner in half and cut into two pieces. Take one of the pieces and fold it in half, then bend up each side at right angles to form the top part. Fold back on itself to form the side antlers, then back down and twist to secure.
- Measure around the middle of the reindeer body with the red string, leaving a little slack and cut to length. Thread on about 10 miniature jingle bells onto the string and tie a knot to secure. Set aside.
- Using roller glue or a glue stick, stick the white belly to the front of the body, then stick on googly eyes, and a red pom pom for a nose.
- Stick the dark brown inner ears to the lighter brown ears and stick at the top of the body. Stick the arms and legs in place, followed by the red belt.
- Place the bells around the reindeer and use tape at the back to secure in place.
- Stick the pipe cleaner antlers at the top of the head.
- Flip reindeer over and glue the back in place to cover the workings.
- Punch a hole in the top and thread a red string loop for hanging.
The Create the Holidays series on The Purple Pumpkin Blog features free printables, crafts, recipes, and more for Christmas and the Winter Holidays. Check out Create the Holidays (formerly Create Christmas) from 2023, 2022, 2021, 2020, 2019, 2018, 2017, 2016, 2015, 2014, 2013, and 2012.