How To Make Glitter Snowflakes
Home » CREATE »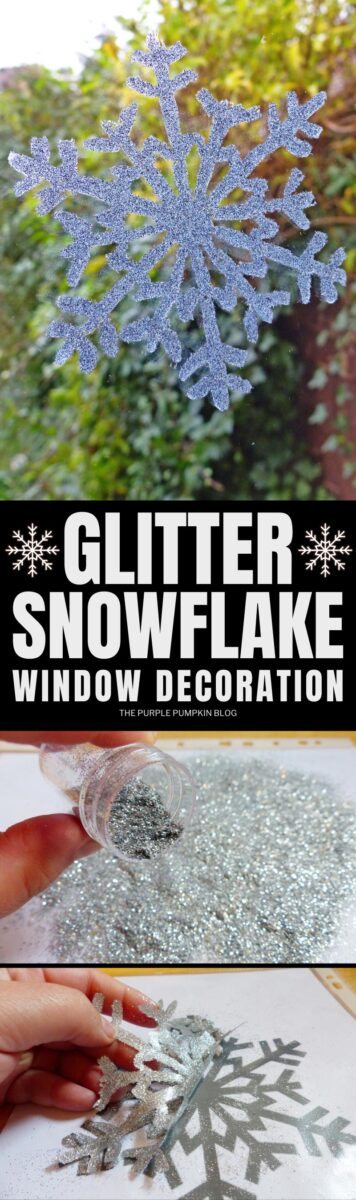
Make a whole flurry of glitter snowflakes to decorate with during the winter and holiday season!

These snowflakes are so easy and fun to make, and you can make them in all sorts of sizes, shapes, and colors too.
All you need for this winter craft is some glue and some glitter and you’ll have sparkly snowflakes adorning your home in no time!

Affiliate Disclosure
We have included affiliate links to products and services related to this post.
We may earn a commission if you purchase after clicking on those links.
As an Amazon Associate, I earn from qualifying purchases.
Read Our Full Disclosure Policy and Privacy Policy
Glitter Snowflakes
Oh, the weather outside is frightful… so why not gather up some craft supplies, and make some awesome winter decorations with the kids? It’s a fun way to spend an afternoon when it’s cold and wet outside!
These glitter snowflakes so easy to make, and so pretty too! You just need a little patience while the glue dries, then you can use them to decorate the windows of your home.
For younger children, this Torn Paper Snowflake Craft is ideal—and you won’t have to worry about glitter going everywhere! Or add a little learning to your winter crafting with this fun Snowflake Science activity.

Materials & Tools Used in This Craft
If you’ve already got an established craft box for crafting with the kids, you are likely to have most, if not all of the materials you’ll need to make these sparkly snowflakes.
And if not, they’re all pretty inexpensive in craft shops or online.
- Snowflake Template – you can find lots of snowflake templates online, just find one (or several) that you like, print them off, and away you go!
- Clear Plastic Sleeves – the kind you use in ring binders
- White School Glue/PVA Glue – in a bottle with a nozzle if possible.
- Small Paint Brush – to help spread the glue if required
- Glitter – your color choice
- Removable Glue Dots – to stick up the finished snowflakes
Tips For Making Glitter Snowflakes
I’ve got several step-by-step photos to guide you through making these glittery snowflakes, and there is also a slideshow video over on my YouTube channel that you can watch and save to your Playlists for future reference. (Don’t forget to subscribe while you are there!)
- You could use simple snowflake designs for younger children and more intricate designs for older children and adults.
- You will need one plastic sleeve per snowflake if you are making several of them.
- Using glue that is in a squeezy bottle with a nozzle will make applying glue to the template quick and easy.
- Apply a thick layer of glue, covering the lines of the snowflake.
- Use a paintbrush to spread the glue out if needed.
- Work fairly quickly so that the glue doesn’t start drying out.
- Sprinkle a generous layer of glitter over the glue snowflake.
- You can use one color glitter, or mix some different colors together.
- Don’t waste precious glitter! Gently tap the excess glitter off onto a sheet of paper, and put it back into the pot for the next one.
- Leave the glitter snowflake to dry for several hours – 12 to 24 hours for the best results.
- When the glue has fully dried, carefully peel the glitter snowflake away from plastic sleeve.
- To attach your glitter snowflake to a window, apply (removable) glue dots to the back of the snowflake and press against the glass.
Another great activity for kids is this Painted Salt Snowflake Craft and Template that uses a humble kitchen ingredient to make cool snowflakes!
More Winter Crafts
I’ve shared lots of great craft ideas on The Purple Pumpkin Blog over the years, in fact, there are 100+ crafts to make and do at home that you can try!
It’s good to have a few simple craft ideas on hand, for when the weather outside is a bit grim, and the kids are saying that they’re bored – how can they be bored when there is glitter and glue involved?!
Here are some more fun seasonal crafts to do with the kids!
How To Make Glitter Snowflakes
Materials
- Snowflake Template
- Clear Plastic Sleeves
- White School Glue/PVA Glue – in a bottle with nozzle if possible
- Glitter any color
- Removable Glue Dots
TOOLS
- Small Paint Brush
Instructions
- Print your snowflake template(s) and place inside a plastic sleeve.
- Following the template, apply a thick layer of glue on the plastic sleeve. Squeeze direct from the bottle if it has a nozzle, or use a paint brush to spread the glue out. You will need to work fairly quickly, so that the glue doesn’t start drying out.
- When you have completed the design, generously sprinkle glitter over the entire gluey snowflake, making sure everything is well covered.
- Gently tip the extra glitter off onto a sheet of paper, and put it back into the pot for the next one. Leave to dry for several hours (12 to 24 is best).
- When the glitte snowflake is dry, carefully peel it away from plastic sleeve.
- To attach your glitter snowflake to a window, apply glue dots to the back of the snowflake and press against the glass.
I’ve also got lots more Christmas Crafts for Adults for you to try out. Read them next!