Red, White & Blue Paper Flower Wreath
Home » CREATE » Crafts » 4th of July Crafts »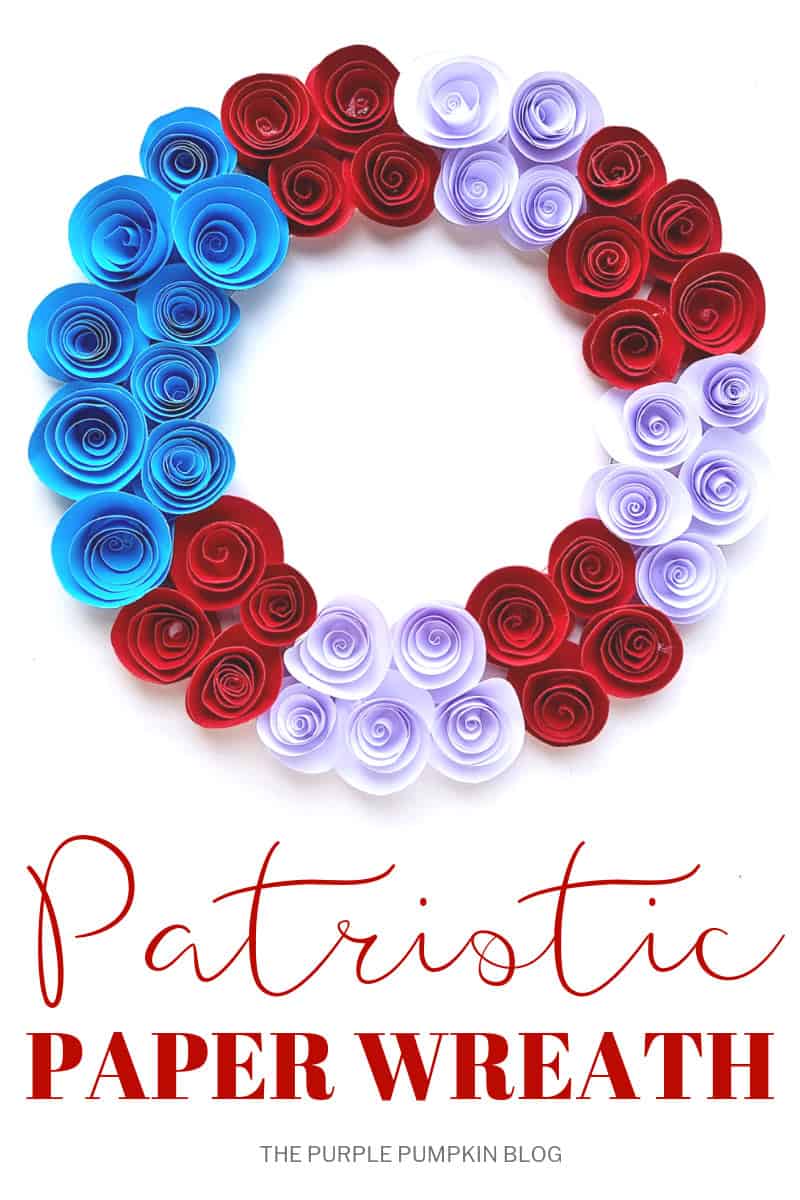
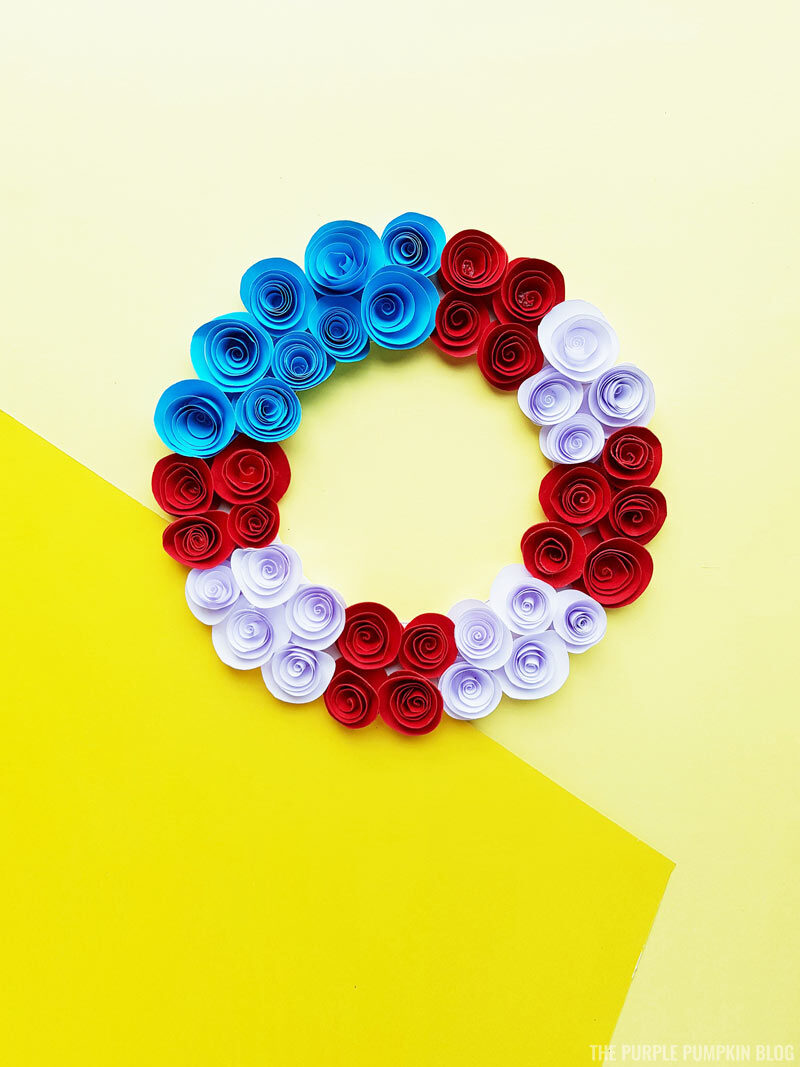
Make this red, white & blue Paper Flower Wreath to decorate for 4th of July, or simply when you want to add some patriotic decor for your home.

The paper flowers (which I think look like roses!) are made by rolling up strips of red, white, and blue paper. Once you have the technique down, you’ll want to make paper flower wreaths for all occasions!
For lots more craft ideas, including more 4th of July crafts, check out these 100+ crafts to make and do at home!
Affiliate Disclosure
We have included affiliate links to products and services related to this post.
We may earn a commission if you purchase after clicking on those links.
As an Amazon Associate, I earn from qualifying purchases.
Read Our Full Disclosure Policy and Privacy Policy
You can save my flower wreath craft tutorial video to your Playlists over on my YouTube Channel. Don’t forget to subscribe while you are there!
Paper Flower Wreath
If you craft regularly, you are likely to already have most, if not all the craft supplies that you need for this flower wreath in your stash!
Craft Supplies
- Free Printable Paper Wreath Template
- White cardstock
- Pencil
- Scissors
- ¼” Red Ribbon
- Sticky Tape
- Craft/construction paper in the following colors:
- Glue and/or Glue Tape Roller
How do I make a paper flower wreath?
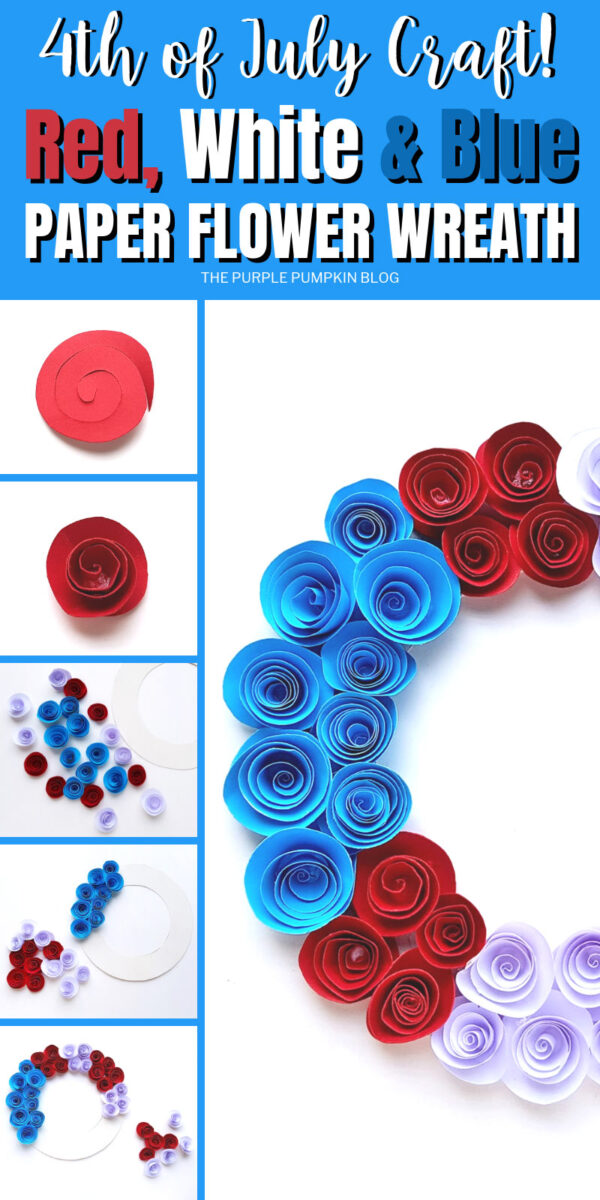
To make this patriotic wreath you are going to need to make lots of paper flowers – I think they look like roses, what do you think?! There are 39 roses in my wreath – however you may find you need a few more, or a few less, depending on what size you make your flowers.
Wreath template printable
But before you get stuck into making paper flowers, you are going to need the wreath base. You can make your wreath any size you like – but I recommend it to be around 7½” wide.
I recommend making the base from cardstock, however due to the thickness of the card, it may not go through your printer. If this is the case, just print the template (opens in new window/tab) onto regular printer paper, and cut it out. Then trace around it onto your piece of card, and then cut out the wreath ring.
Adding a hanging loop
You are going to want to display your wreath when you’ve finished making it, so attach a loop of ribbon to the top, center of the wreath. You can use sticky tape – which I think is the easiest – to attach the ribbon, or you could use glue. Another option is stapling it in place as you will cover the staples used with the paper flowers. Do whatever is suitable to what you have at home. I suggest the loop be around 6″, so that’s a foot long piece of ribbon folded over.
How to make the paper flowers
The flowers are made by rolling (or coiling) up paper circles (around 3″ wide) that have been cut in a spiral. It can be a bit fiddly to start with, but you’ll quickly get the knack – especially as you have to make quite a lot to fill the wreath!
The paper roses do not have to be all exactly the same size – flowers in real life are not perfectly the same! You can coil the paper tighter, or let the flower open up a bit more. Or you could experiment with different size circles – maybe a 2″ or a 4″ and see what happens!
Included in the wreath template are 3 size circles that you can use as a cutting guide. I used 3″ circles for my roses, so please feel free to do the same!
Cut 10 blue circles, and 20 each of red, and white circles. Next cut into a spiral as shown in the photo below. You can just eyeball this, it doesn’t have to be precise.
Now, starting from the outer end, start rolling the spiral to form a rose. Keep rolling towards the center – you can determine how tight, or loose you want the coil to be – then secure with a dab of glue on the bottom flap.
Make sure you allow the glue to dry fully. You may have to hold in place for a moment while it sets. Or, you could use a glue roller if you find that easier. Double sided tape would also work.
Repeat with all the other circles of paper until you have enough to cover the wreath!
Attaching paper flowers to wreath base
It is now time to assemble! Grab the wreath base, and fill the top left quarter with blue flowers. You can use the photo below as a guide. Use lots of white craft glue (which dries clear) to keep the flowers in place – place them as close as possible as they will help support each other too.
Now add sections of white and red flowers with 4 to 5 flowers per section, again use the photo below as a guide. Continue until the whole wreath is filled up. Leave to dry completely.
When all the glue has dried (I would leave it for 24 hours, just to be sure) you can proudly hang your wreath for all to see! Happy 4th of July!
Paper Flower Wreath Tutorial
Materials
- Craft/construction paper in red blue, and white
- White cardstock
- Free printable wreath template
- ¼ ” wide red ribbon
Instructions
- Print wreath template and cut out. Draw around the template onto white cardstock, and cut out the wreath ring.
- Attach a loop of red ribbon to the top, center with sticky tape.
- Cut 10 blue circles, and 20 each red and white circles. Then cut the circles into spirals.
- Take a spiral cutout and start to roll the from the outer end
- Continue to roll the spiral towards the center. Apply glue to the base part of the coil and hold in place to secure. (A bit tricky to explain, but you'll figure it out as you do it!)
- Repeat with the rest of the spirals and leave to dry.
- To assemble the wreath, attach the blue rolled flowers on the wreath base. Keep the flowers as close together as possible. Fill the top left corner with blue flowers.
- Now grab the red and white paper flowers and start attaching them to the base. Stick in groups of 4 or 5 around the wreath ring – use pictures below as a guide.
- Once all flowers are attached, leave to dry for a a couple of hours, or overnight if you can.
- Hang wreath when dried completely.
More 4th of July Crafts You Will Love!
- American Bald Eagle Felt Plush
- Patriotic Paper Banner
- 30 Awesome Patriotic Crafts for the Whole Family!