How To Make An American Bald Eagle Felt Plush
Home » CREATE » Crafts »How awesome is this felt American Bald Eagle plush? This adorable craft is perfect for 4th of July, or for when you fancy making something patriotic!

Felt plushies are fun to make, and the step-by-step tutorial will show you how easy they are to craft. There’s a free printable pattern to download and print too.
Affiliate Disclosure
We have included affiliate links to products and services related to this post.
We may earn a commission if you purchase after clicking on those links.
As an Amazon Associate, I earn from qualifying purchases.
Read Our Full Disclosure Policy and Privacy Policy
You will find the felt plush tutorial video on my YouTube Channel – save it to your Playlists for future reference! Don’t forget to subscribe while you are there!
Felt American Bald Eagle
I can’t think of a more patriotic creature than the American Bald Eagle. With its fierce beauty and proud independence, this great bird symbolizes the strength and freedom of the USA.
So to celebrate Independence Day, why not have a go at making a felt American Bald Eagle?
You could use them as placeholders, or party favors; or you could sew a ribbon to the back and turn them into hanging decorations. Or how about making a nest full of them, and turning them into a garland to string across the mantel?
To make these felt plush eagles you will need:
- Felt fabric in the colors:
- Pencil or fabric marker
- Scissors
- Needle and thread – try to match the thread to the felt colors
- Toy stuffing or scrap felt
- Free printable American Bald Eagle pattern template (opens in new tab/window)
- Pins (optional)

You will need a few different felt colors for this project – black, white, yellow, green and brown. I buy bulk packs of felt to use for crafts, which means I always have it on hand in a wide variety of colors!
Instructions:
Step 1
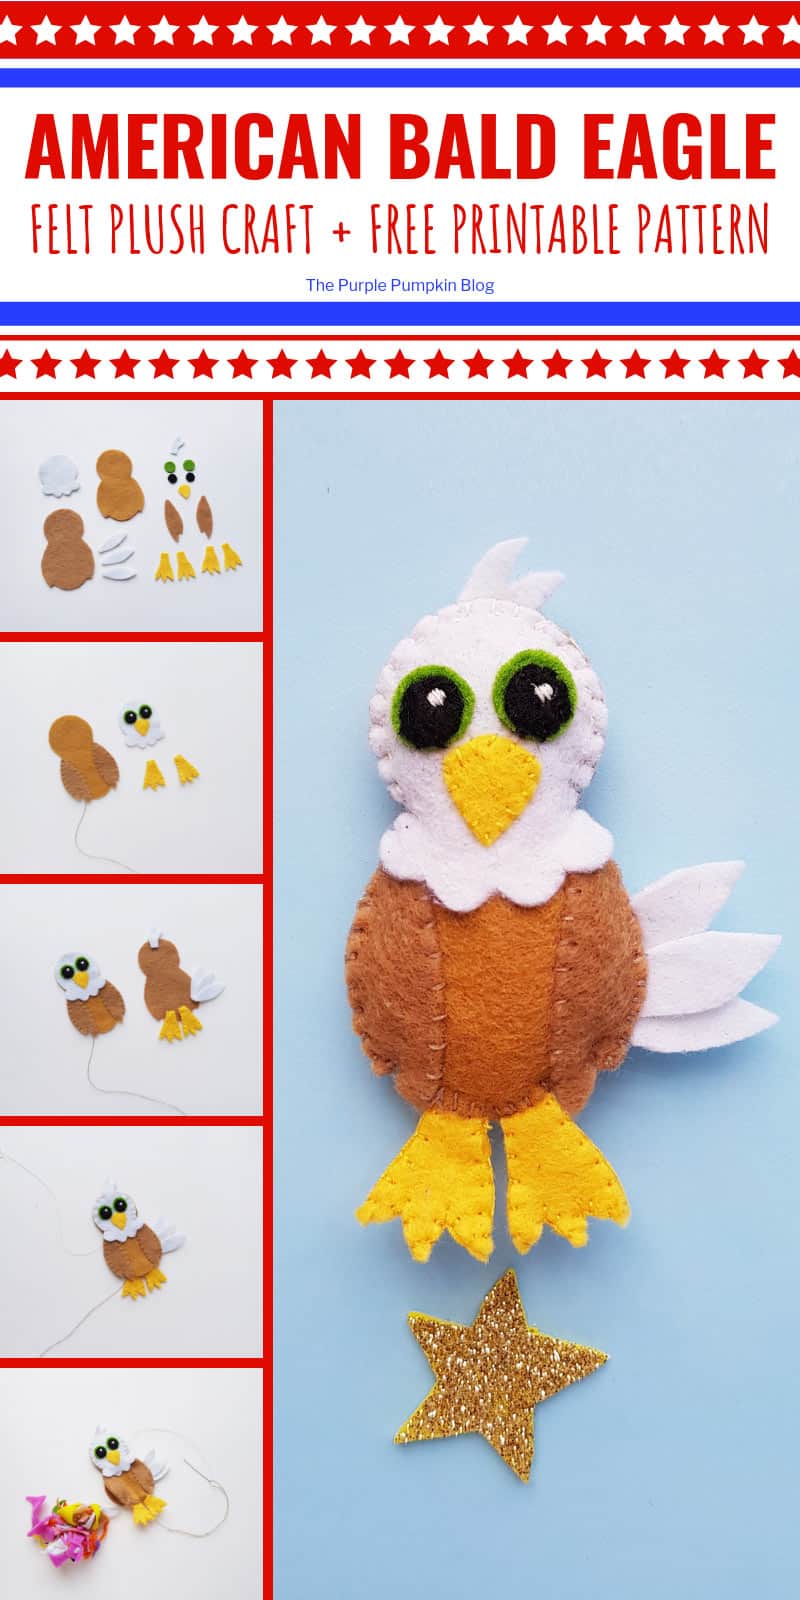
Print the eagle pattern template and cut the pieces out. The template includes:
- 2 body pieces (brown)
- 3 tail feathers (white)
- 2 big eye circles (green)
- 2 small eye circles (black)
- 1 beak (yellow)
- 4 legs (front and back for each leg – yellow)
- 1 crown feather (white)
- 1 head (white)
- 2 wing patterns (brown)
Use a fabric marker or pencil to trace around the pattern pieces onto the felt, and cut with scissors. Alternatively, pin the paper pieces to the felt and cut the pattern.
Step 2
Before sewing, layer the pieces as shown in the photo below:
- Place the wings on the sides of one of the body pieces
- Place the two feet together (twice)
- Place the eye pieces (green, then black) and the beak onto the head
- Place the tail feathers on the side of the other body piece, and the crown feather at the top.
Another patriotic craft to try: Red, White & Blue Paper Flower Wreath
Step 3
Prepare needle and thread – try to match the thread to the felt color, so brown for the body, yellow for the beak and feet, white for the head.
- Stitch the wings to the body
- Stitch the fronts and backs of the feet together
- Stitch the beak to the head
- Use a few stitches to create white highlights in the eyes to attach the green and black layers to the head.
Use the photo below as a guide.
Step 4
Now place the head at the top of the winged body; and place the sewn feet at the bottom of the other body – again, use the photo to guide you.
Step 5
Place the front of the eagle onto the back, and stitch everything together – make sure that you stitch through all the different layers – and that you leave an opening to stuff your eagle plush!
TIP! Pin the pieces in place if you feel less confident in holding them.
Step 6
Now it’s time to stuff! Use toy stuffing or scrap felt to pad the head and body out, making sure you fill it evenly. Use the end of a pencil to poke into place if you need to.
Step 7
When your eagle is well and truly stuffed, stitch the opening closed. Tie a knot and draw the needle inside the plush, then back out and cut off extra thread.
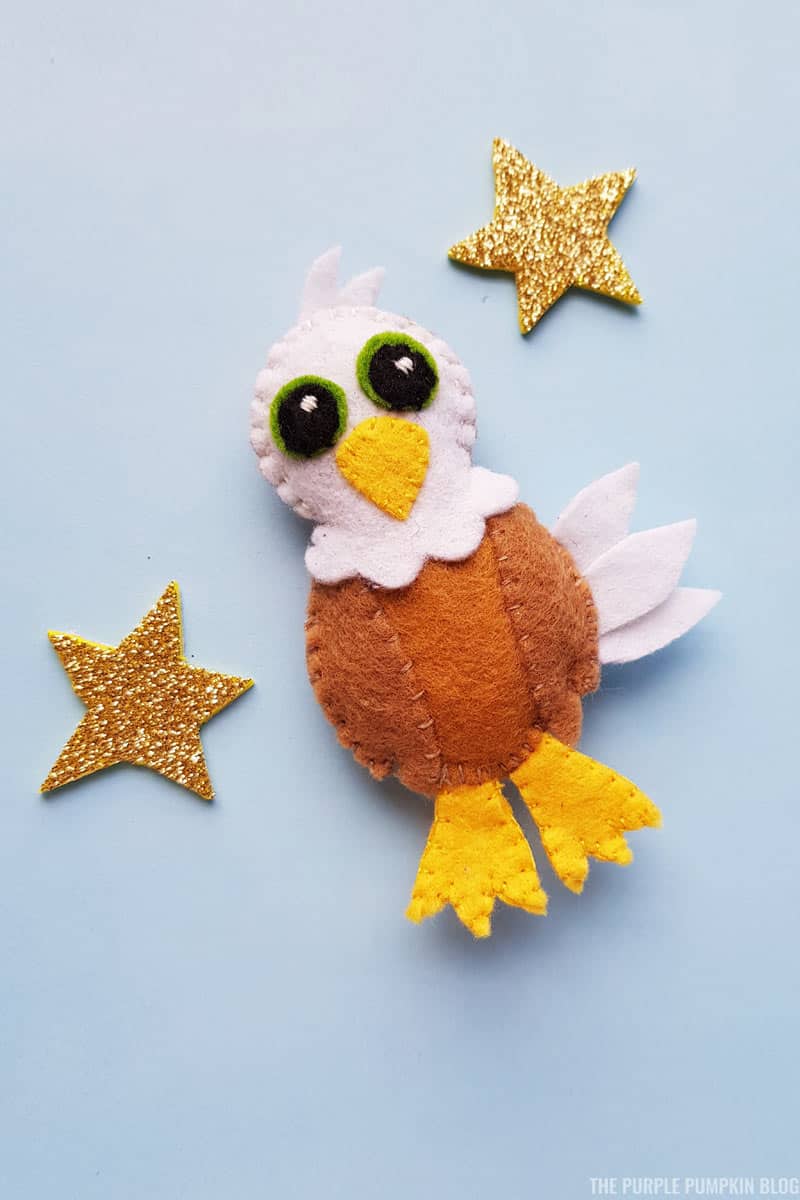
And there you go – your patriotic plush is made! A fun craft right?
Want more 4th of July crafts? Check out these 30+ Awesome Patriotic Crafts for the Whole Family!
Felt American Eagle Plush
Materials
- Felt fabric in the colors: black white, yellow, green, brown
- Toy stuffing or scrap felt
- Free printable American Bald Eagle pattern template
TOOLS
- Pencil or fabric marker
- Needle and thread – try to match the thread to the felt colors
- Pins (optional)
Instructions
- Print the eagle pattern template and cut the pieces out. The template includes: 2 body pieces (brown); 3 tail feathers (white); 2 big eye circles (green); 2 small eye circles (black); 1 beak (yellow); 4 legs (front and back for each leg – yellow); 1 crown feather (white); 1 head (white); 2 wing patterns (brown) Use a fabric marker or pencil to trace around the pattern pieces onto the felt, and cut with scissors. Alternatively pin the paper pieces to the felt and cut the pattern.
- Before sewing, layer the pieces as follows: Place the wings on the sides of one of the body pieces; Place the two feet together (twice); Place the eye pieces (green, then black) and the beak onto the head; Place the tail feathers on the side of the other body piece, and the crown feather at the top.
- Prepare needle and thread – try to match the thread to the felt color, so brown for the body, yellow for the beak and feet, white for the head. Stitch the wings to the body; Stitch the fronts and backs of the feet together; Stitch the beak to the head; Use a few stitches to create white highlights in the eyes to attach the green and black layers to the head.
- Now place the head at the top of the winged body; and place the sewn feet at the bottom of the other body piece.
- Place the front of the eagle onto the back, and stitch everything together – make sure that you stitch through all the different layers – and that you leave an opening to stuff your eagle plush!
- Now it’s time to stuff! Use toy stuffing or scrap felt to pad the head and body out, making sure you fill it evenly. Use the end of a pencil to poke into place if you need to.
- When your eagle is well and truly stuffed, stitch the opening closed. Tie a knot and draw the needle inside the plush, then back out and cut off extra thread.
- And there you go – your patriotic plush is made! A fun craft right?
Video
Handy Tips & More Ideas
Looking for some red, white and blue treats for your 4th of July celebrations? Why not make these American Flag Cupcakes?