Button Star Ornament Craft
Home » CREATE » Crafts » Christmas Crafts »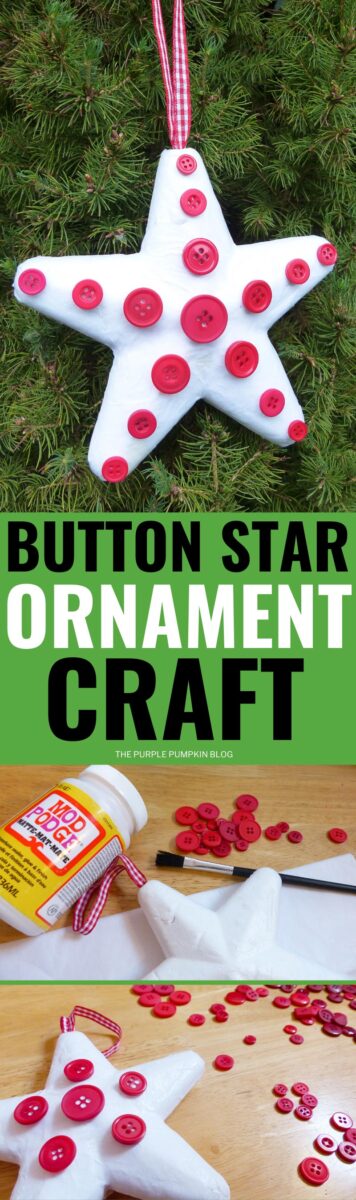
This Button Star Ornament Craft is a simple Christmas craft for all ages. Using a foam star and buttons you can make this decoration very quickly and have it hanging up on your tree in no time at all!

Make a variety of sizes or use different color buttons to match your festive decor. This star-shaped ornament is a great group activity too, so perfect for a crafternoon with friends!

Affiliate Disclosure
We have included affiliate links to products and services related to this post.
We may earn a commission if you purchase after clicking on those links.
As an Amazon Associate, I earn from qualifying purchases.
Read Our Full Disclosure Policy and Privacy Policy
Button Star Ornament Craft
I have a habit of buying up a bunch of craft supplies without not quite knowing what the end result is going to be. What then happens is I discover random crafty bits when I’m having a clear-out and I really don’t like tossing things away.
I then come up with ideas like this star ornament as a way to have a bit of crafty fun and make something that can be useful, rather than another piece of clutter to add to the pile!
This button star ornament craft is something that all ages can do – from kids through to seniors – and that makes it a fun activity for maybe a family afternoon of crafting, or if you run a social group of some kind.
Add some color to your holiday crafting with these vibrant Melted Crayon Ornaments—a fun complement to your button star decorations.

Materials & Tools Used in This Craft
Full instructions are found in the printable tutorial card at the end of this post, but here is a quick outline so you know what to expect from the craft.
I highly recommend always reading everything all the way through before starting any project so you understand all the steps required.
- Foam (polystyrene/styrofoam) star – any size you like. The one I used in this craft was 10cm/4″
- White tissue paper
- Mod Podge – a glue and varnish all in one or
- White/PVA school glue
- Foam sponge brush – or paintbrush
- Red buttons – 1 large, 5 medium, 5 small, 5 tiny
- Red ribbon
As with so many of the ideas on The Purple Pumpkin Blog you can customise this craft depending on the materials you might have in your craft stash, or what you are able to source.
You could make several ornaments in different sizes – just adjust the size of the buttons that you use to decorate them with.
And speaking of buttons, you could use any color – or a variety of different colors. Similarly, you could use different colored tissue paper to cover the star with too.
As long as you have fun making this, that’s the important thing!
More Christmas Crafts
Here are some more great Christmas crafts for you to try next:
I’ve shared lots of great craft ideas on The Purple Pumpkin Blog over the years, in fact, there are 100+ crafts to make and do at home that you can try.
Button Star Ornament Craft
Materials
- Foam polystyrene/styrofoam star – any size you like. The one I used in this craft was 10cm/4″
- White tissue paper
- Mod Podge – a glue and varnish all in one or White/PVA school glue
- Red buttons – 1 large 5 medium, 5 small, 5 tiny
- Red ribbon
TOOLS
- Foam sponge brush – or paintbrush
- Wooden skewer
Instructions
- Tear the tissue paper into pieces; don't worry about them not being even.
- Apply Mod Podge or glue to the star and start sticking down the tissue paper to cover it completely.
- Leave to dry for about an hour or two and then add a layer of Mod Podge or glue to seal the tissue paper. Leave to dry completely.
- Cut a length of ribbon and tie it into a loop.
- Use scissors or a wooden skewer to create a hole at the top of the star and push the knot of the ribbon into the hole. Add a generous blob of glue to seal into place and let dry.
- Arrange a button pattern for your star then stick it into place with a generous amount of Mod Podge or glue (they both dry clear).
- Leave to dry before hanging it on your Christmas tree!
This post is part of my long-running Create the Holidays series on The Purple Pumpkin Blog. Since 2012, I’ve shared free printables, crafts, recipes, and more for Christmas and the Winter Holidays. While I don’t officially run the series anymore, seasonal inspiration will still be here! Browse past Create the Holidays (formerly Create Christmas) years: 2024, 2023, 2022, 2021, 2020, 2019, 2018, 2017, 2016, 2015, 2014, 2013, and 2012.