Reindeer Cake! An Adorably Cute Festive Cake
Home » COOK » Recipes » Holiday Recipes » Christmas Recipes »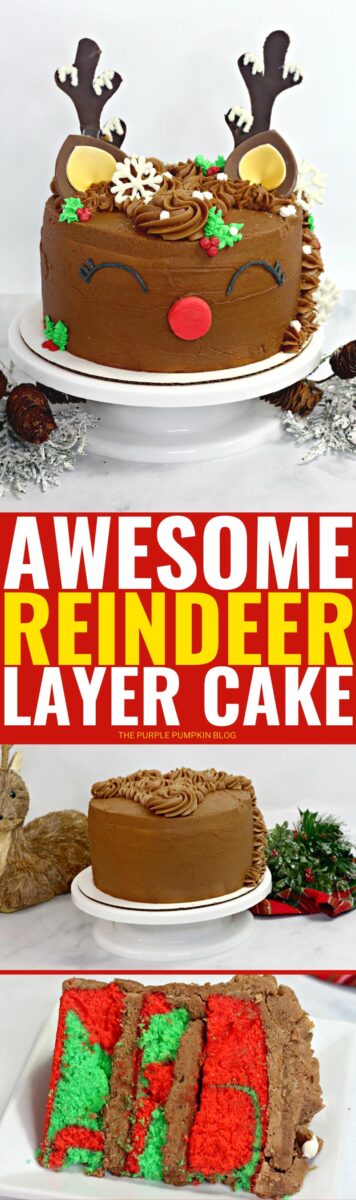
You can’t tell me that this isn’t the most adorable Reindeer Cake you have ever seen! It’s just so cute, isn’t it? Hidden beneath the chocolate frosting and decorations are three layers of red and green marbled sponge cake which is a cool surprise as you cut into it.

This is a perfect cake for the holidays and an awesome centerpiece on a Christmas dessert table! Or if there is a birthday during the holidays, this would also make an awesome birthday cake!

Affiliate Disclosure
We have included affiliate links to products and services related to this post.
We may earn a commission if you purchase after clicking on those links.
As an Amazon Associate, I earn from qualifying purchases.
Read Our Full Disclosure Policy and Privacy Policy
Reindeer Cake
If you are throwing a party over the holidays or hosting a festive meal then why not wow your guests with this amazing reindeer cake?
Don’t let all the decorative elements of the cake scare you off! I’m going to walk you through everything so that you too can make this cake at home.
The cake itself is made using a boxed cake mix which means you can really focus on the frosting and decorations. (If you want to make a cake from scratch, you are welcome to do so!)
Some of the decorations need at least 24 hours to dry and harden, so start making those well in advance of when you actually need to serve the cake.
If you don’t have the time, you can always make one of the other showstopping cakes I have on The Purple Pumpkin Blog including this Candy Cane Chocolate Cake.

Ingredients used in this recipe
The full ingredients list and instructions are found in the printable recipe card at the end of this post, but here is a brief outline so you know what to expect from the recipe.
I highly recommend always reading a recipe all the way through before starting.
Alongside regular frosting ingredients like butter, powdered (icing) sugar, etc., you will need some more specialized ingredients which I’ve linked below to Amazon for your convenience.
- 2 boxes Betty Crocker Vanilla Cake Mix + ingredients to make – usually oil, water, and eggs.
- Gel Food Coloringin the following colors:
- White Candy Melts or Ghirardelli White Chocolate Melting Chips
- Chocolate Fondant
- White Fondant
- Red Fondant
- Gold Edible Mist Spray
- White Sugar Crystal Sprinkles
- Dark Cocoa Powder
- Tubes of Wilton Decorating Icing in the following colors:
Equipment used in this recipe
You are likely to have most standard cooking tools in your kitchen but I’ve added some Amazon links for your convenience should you need something more specific for this recipe.
- Disposable Piping Bags
- Cookie Sheet
- Parchment Paper
- 3 (9-inch) Cake Pans
- 1 (10-inch) Cake Board
- Heart Cookie Cutters – you will need a medium and small one, approx 4″ and 2″
- Circle Cookie Cutter – you will need approx 1″ circle
- Fondant Rolling Pin
- Cake Leveller (optional, you could use a knife to level off your cakes)
- Cake Turntable (optional, can help to turn the cake around as you decorate)
- Microwave-Safe Bowl
- Cooking Spray
- Medium Star Piping Tip
- Wilton Leaf Piping Tip – Wilton’s standard piping tips fit onto their tubes of ready-made icing.
- Wilton Round Piping Tip
Tips for Making a Reindeer Cake
I always say to read a recipe all the way through before starting so that you understand all the steps and have all the ingredients and equipment needed. (I can’t be the only one who sometimes skips doing that!)
However, you really need to go through this reindeer cake recipe as there are several elements to making this cake! But don’t be put off by the length of the recipe – it’s just me explaining everything as thoroughly as I can.
Some of the decorations need drying time (up to 24-36 hours if possible!), so you will want to get started on those a couple of days in advance of when you want to serve the cake.
Using Fondant
If you have never worked with fondant before, don’t panic – it is really easy to use, follow my tips and you’ll be just fine!
- Dust your work surface with powdered sugar so that the fondant doesn’t stick. Think of it like the way you use flour when rolling out dough.
- Rub a little powdered sugar into your hands and knead a handful of the fondant to make it more pliable before rolling, rather than using straight from the package.
- Wrap unused fondant well to prevent it from drying out.
- Dust your rolling pin too, and roll fondant to about ¼” thick (unless otherwise stated in the recipe). Some fondant rolling pins have guides you can use. You don’t want it too thick as it will take ages to dry, and you don’t want it too thin as it will become more tricky to work with.
- When using cutters or plungers, pour a little pile of powdered sugar onto your surface and dip the cookie cutter into it before using it. Again, this is to prevent sticking. Place on a cookie sheet lined with parchment paper to dry overnight (or up to 24 -36 hours if you have the time).
- The fondant pieces could be solid enough to handle and use after 3 – 6 hours. I personally leave fondant pieces to dry for around 24 hours. How long this takes, however, is based on the size and thickness of the fondant, and how humid your house is, so judge best if they will hold up as they need to.
- If there is excess powdered sugar on the fondant pieces, you can gently brush away with a pastry brush, or an unused, clean paintbrush.
- Alternatively, you can use a vodka spray. Pour some vodka into a mini spray bottle and gently mist the fondant. Vodka dries quicker than water which is why it is usually used when handling fondant.
- Always make extra pieces – that way if some break or you have another mishap, you have got backups that you can use.
- Leave the cut fondant pieces to harden in a cool, dry place – do not place in the fridge. Fondant can turn sticky if left in the fridge.
- When making cakes or cupcakes that use fondant decorations, I like to make them a few days ahead of time which allows for drying without the stress. Fondant that isn’t dry enough can mean disappointing end results.
- After using fondant the surface will be super sticky (it always is in my experience!) so you will probably have to wipe away the sugar first, then give it a soapy hot wash over and then another clean over! You can always by a fondant rolling mat for easier cleanup!
The Antlers
- The antlers should be around 6″/15cm high. You can use any template that you like – there are so many free antler templates online. Adjust in your printer settings as required.
- Cut the paper antler template out and then use a small sharp knife to cut around them onto rolled chocolate fondant. You can use your finger to smooth and round off the edges if you need to.
- Make an extra set – just in case!
- When the antlers are dried you can pipe on snow drips from parts of them using candy melts. Sprinkle over sugar sprinkles and brush away excess and leave to dry completely before placing them into the cake.
The Reindeer Ears & Nose
- The ears are made using two different sized heart-shaped cookie cutters (approx 4″ and 2″).
- The inner part of the ears are white fondant and sprayed gold with edible mist. You could use gold fondant if you can find it!
- Stick the small heart to the larger heart with some water. Use your finger or a clean paintbrush to apply water to the back of the small piece and stick in place.
- Pinch the hearts at the bottom to give some curve to the ears.
- Make an extra set – just in case!
- To make the nose, roll out the fondant to about half-an-inch and then use a circle cookie cutter to cut the nose out. Make an extra one and leave to dry.
Edible Snowflakes
- You can make the snowflake decorations with either white candy melts or white melting chocolate – use what is available to you.
- The snowflakes in this cake were piped out by hand onto a cookie sheet lined with parchment paper.
- If you aren’t confident piping freehand, print off some snowflake templates and place under the parchment paper (or draw some on the underside of the paper) and trace over with the melted candy.
- Alternatively, you could use a snowflake candy mold and pour candy melts into the mold. Or you could use white fondant and a snowflake cutter.
- Adding white sugar crystal sprinkles is an option too if you want to add a little bit of sparkle!
- If you have never used candy melts before you can check out my tips in my Aladdin Oreo Cookie Pops.
- As always, make extras!
Making the Layers for the Reindeer Cake
- This recipe uses two boxes (15.25oz/423g) of vanilla cake mix – use your preferred brand – plus the ingredients to make them which is usually eggs, water, and oil.
- Once you’ve made the cake batter according to the package instructions, divide it into two bowls and color one red and one green with gel food coloring.
- Food Coloring Tips: Use good quality food coloring gel or paste as the color will be more vibrant. Do not use liquid color as this will change the consistency of the cake batter, and really won’t taste good!
- Remember that you can always add more color, but not take it away. Add a little to start with and add more to get the shade required.
- Use two ice cream scoops (one for each color batter) to add red and green cake batter to the cake pans to get a kind of marbled effect.
- Once the cakes are baked (temperature/time according to box instructions) leave to cool for 5 minutes in the pan before removing and transferring to a wire rack to cool completely.
- When the cakes have cooled, you will need to level off the tops so that they are flat. You can use a cake leveler which is a really handy tool to get a nice even cut. Or you can use a sharp knife and a steady hand.
- Do NOT throw away the excess cake though! You can use it to make cake pops! Simply crumble up the cake and mix it with some frosting and roll into balls. Insert a lollipop stick and dip into melted chocolate or candy melts. Leave to set, and enjoy!
Making & Using Frosting
- The frosting recipe uses unsalted Sweet Cream Butter – in the UK, sweet cream butter is our regular butter – buy unsalted. You can read all about different types of butter here.
- It also uses dark chocolate cocoa powder. If you can’t find this, just use regular cocoa powder.
- Place one cake layer onto a cake board or cake stand (I usually put a blob of frosting under the cake to hold it in place).
- Use an offset spatula/palette knife and/or a scraper to spread out the frosting on each layer and to make it smooth all the way around when frosting the whole cake.
- To prevent the frosting getting onto your cake board or cake stand, a tip I learned from Ina Garten (The Barefoot Contessa) is to slip squares of parchment paper just under the cake all the way around. Once the cake is frosted you pull the paper away and you get a nice clean edge.
- Use the photos as a guide for piping on swirls of frosting for the reindeer’s mane, and for placement of the ears and antlers. Place the snowflakes where you like around the mane.
- The eyes, drops of snow, and holly leaves and berries are piped on using Wilton’s Decorating Icing tubes which fit all of Wilton’s standard piping tips. In the UK the Dr. Oetker brand has some ready-made icing that comes with various tips that is an alternative option if you can’t source the Wilton ones.
Make It A Meal!
You’ve made the Reindeer Cake for dessert, but what about the rest of the courses?
Here are additional recipes if you want to make a full meal!
- Soup Appetizer: Chestnut & Sage Soup
- Main Dish: Orange & Rosemary Roast Duck
- Side Dish: Roasted Apple Cauliflower Mash with Crispy Brussels Sprouts
- Side Dish: Honey Mustard Roasted Roots
- Beverage: Naughty Elf Cocktail
There are 500+ Recipes on The Purple Pumpkin Blog for you to enjoy! Please feel free to check them out too.
More Cake Recipes
Want to make more cakes? Take a look at these recipes next:
- Candy Cane Chocolate Cake
- Apple Pie Layer Cake with Cinnamon Frosting & Walnut Crumble Topping
- Chocolate Explosion Cake
Reindeer Cake
Ingredients
For the Snowflakes
- 1 cup white candy melts or chocolate melting chips
For Antlers, Ears & Nose
- 1 package Chocolate fondant
- 1 package of white fondant
- Gold edible mist spray
- ½ cup white candy melts
- White sugar crystal sprinkles
- Powdered sugar icing sugar
- 1 package red fondant
For the Cake
- 2 15.25oz/423g boxes vanilla cake mix
- Plus ingredients to make the cake: usually eggs water, and oil
- Red and green gel food coloring
For the Chocolate Frosting
- 1½ cups unsalted sweet cream butter softened
- 8 oz cream cheese softened
- 1½ cup dark chocolate cocoa powder
- 7 cups powdered sugar
- ¼ heavy whipping cream
- Wilton tube frosting in red green, white, and black
Instructions
- To make the snowflakes, melt the white melting chips according to the package instructions.
- Pour into a disposable piping bag and cut the tip off.
- Line a cookie sheet with parchment paper and pipe 10 snowflakes in different sizes.
- Leave to dry overnight or up to 24 hours.
- To make the reindeer ears, roll out the chocolate fondant and cut out two medium hearts. Set aside.
- Roll out the white fondant and cut two small hearts.
- Place the white hearts onto paper towels and spray with edible gold mist.
- Apply a little water to the brown hearts to stick the gold hearts on top. Pinch at the bottom to form the ears.
- Place on a parchment lined cookie sheet and leave to dry in a cool, dry place (not the fridge as this can make fondant go sticky) overnight or up to 24 hours.
- To make the antlers, roll out the chocolate fondant and use a template (6"/15cm) to cut out the antlers using a small sharp knife.
- Place on a parchment lined cookie sheet and leave to dry in a cool, dry place (not the fridge as this can make fondant go sticky) overnight or up to 24 hours.
- When the antlers are dried, melt the white melting chips according to the package instructions
- Pour into disposable piping and cut the tip off.
- Pipe some snow drips on the antlers and sprinkle some white sugar crystal sprinkles on top. Brush away any excess that falls onto the antlers. Leave to dry.
- To make the reindeer nose, roll the red fondant to about half-inch thick and use the circle cutter to cut out the nose. Leave to dry with the antlers and ears.
- To make the cake layers, preheat oven to 18C/350F/Gas 4 (or to the temperature on the cake mix box) and spray the cake pans with baking spray.
- Make the cake batter according to the package instructions using the quantities of eggs, water, and oil indicated on the box.
- When combined, divide the cake batter between two bowls. Color one bowl of cake batter red, and the other one green.
- Using two ice cream scoops, alternating red and green cake batter between the cake pans to create a marbled effect.
- Bake for time indicated on box or until a toothpick comes out clean.
- Allow to cool in pan for 5 minutes then remove from pan and transfer to a wire rack to cool completely.
- When the cakes have cooled use a cake leveler to remove the domes of the cake to make them even.
- To make the chocolate frosting, using an electric mixer beat the butter and cream cheese until combined and smooth. Gradually mix in the cocoa powder.
- Very slowly, beat in the powdered sugar until combined.
- Whisk in the cream until the frosting is smooth and fluffy.
- Scoop 1 cup of frosting into a large piping bag fitted with a medium star tip and set aside.
- To frost the cake, place one layer of the cooled cake into the middle of a cake board. Use a little frosting on the base of the cake to keep it in place.
- Use an ice cream scoop to place 4-6 scoops of frosting onto the first layer of cake and spread out evenly with a spatula.
- Add the second cake layer and repeat with more frosting.
- Add the final layer of cake and cover the cake completely with frosting. Use a spatula to smooth the surface all the way around.
- To pipe the reindeer mane, use the reserved chocolate frosting in the piping bag and pipe a large swirl at the front and center of the cake. Add more swirls of varying sizes on the top and down the side of the cake – use the photo as a guide, but you can pipe however you like.
- Place the dried fondant ears on the top of the cake and place the antlers behind the ears.
- Carefully remove the white chocolate snowflakes and place randomly over the mane
- Use the black frosting tube fitted with a round tip to pipe the eyes onto the front of the cake.
- Pipe a dot of the frosting onto the back of the dried red fondant nose and stick to the front of the cake.
- Use the white frosting tube fitted with a round tip to pipe white dots around the hair for snow and sprinkle with the white sugar crystal sprinkles.
- Use the green frosting tube fitted with a leaf tip to pipe holly leaves around the cake, then use the red frosting tube fitted with a round tip to pipe the holly berries.
Notes
- The time stated doesn't include drying time for some of the decorations – snowflakes, reindeer antlers, ears, and nose. Make these 24-36 hours in advance to allow time for them to set/dry completely.
- If you are not confident piping snowflakes freehand you can draw the on the underside of the parchment paper to use as a guide. Keep the designs simple! Pipe 10 even though you won't need as many, just in case they break!
- You can use any antler design you like (there are lots of free ones online) The antlers should be around 4½"/11.5cm tall so adjust the size when printing.
- You can follow the finished cake photo as a guide for the placement of the decorations, but it's your cake so decorate as you wish!
Disposable piping bag
Cookie sheet
Parchment paper
Medium heart cookie cutter (approx 4")
Small heart cookie cutter (approx 2")
Mini Circle Cutter (approx 1")
3 (9-inch) round cake pans
1 (10-inch) round cake board
Cake leveler
2 large ice cream scoops
Wilton piping tips (to fit frosting tubes): round, leaf, medium star
Nutrition
Nutritional information is always approximate and will depend on the quality of ingredients used and serving sizes. If you need exact calories and macros, please do your own calculations.
This post is part of my long-running Create the Holidays series on The Purple Pumpkin Blog. Since 2012, I’ve shared free printables, crafts, recipes, and more for Christmas and the Winter Holidays. While I don’t officially run the series anymore, seasonal inspiration will still be here! Browse past Create the Holidays (formerly Create Christmas) years: 2024, 2023, 2022, 2021, 2020, 2019, 2018, 2017, 2016, 2015, 2014, 2013, and 2012.