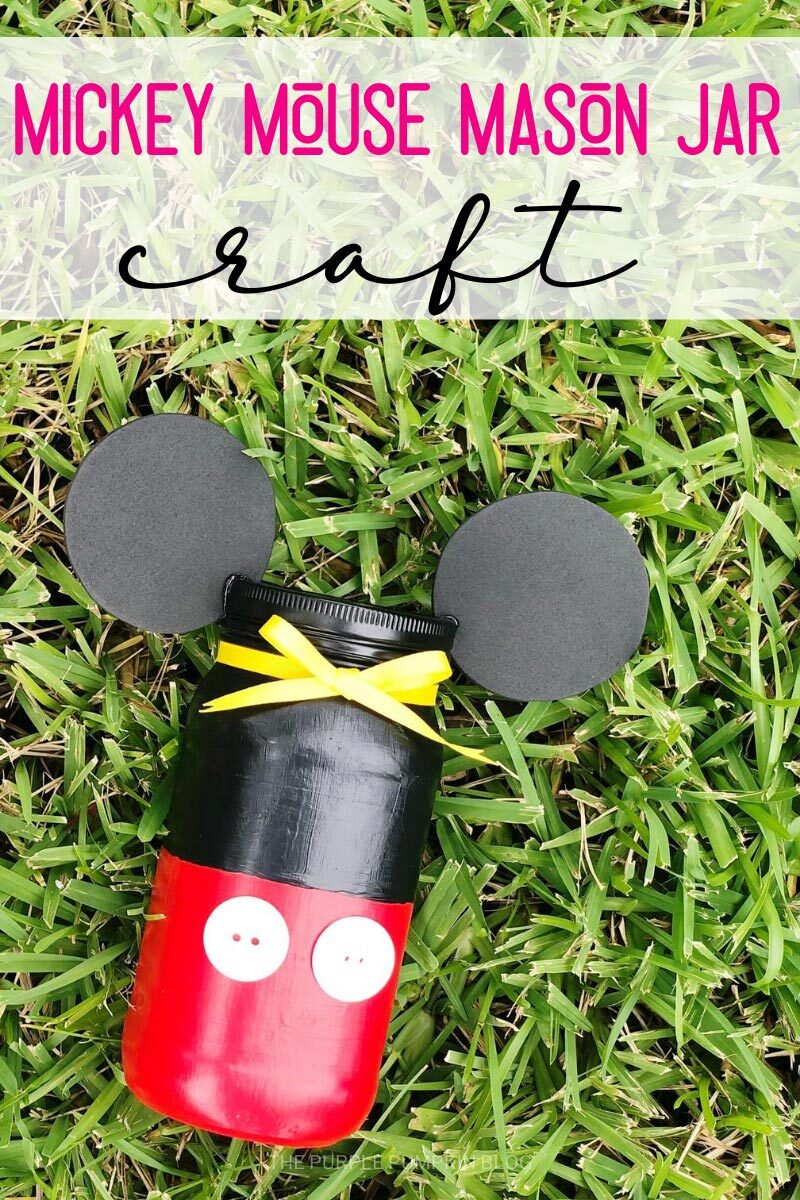
Minnie & Mickey Mouse Mason Jars Disney Craft!
Home » CREATE » Crafts » Disney Crafts »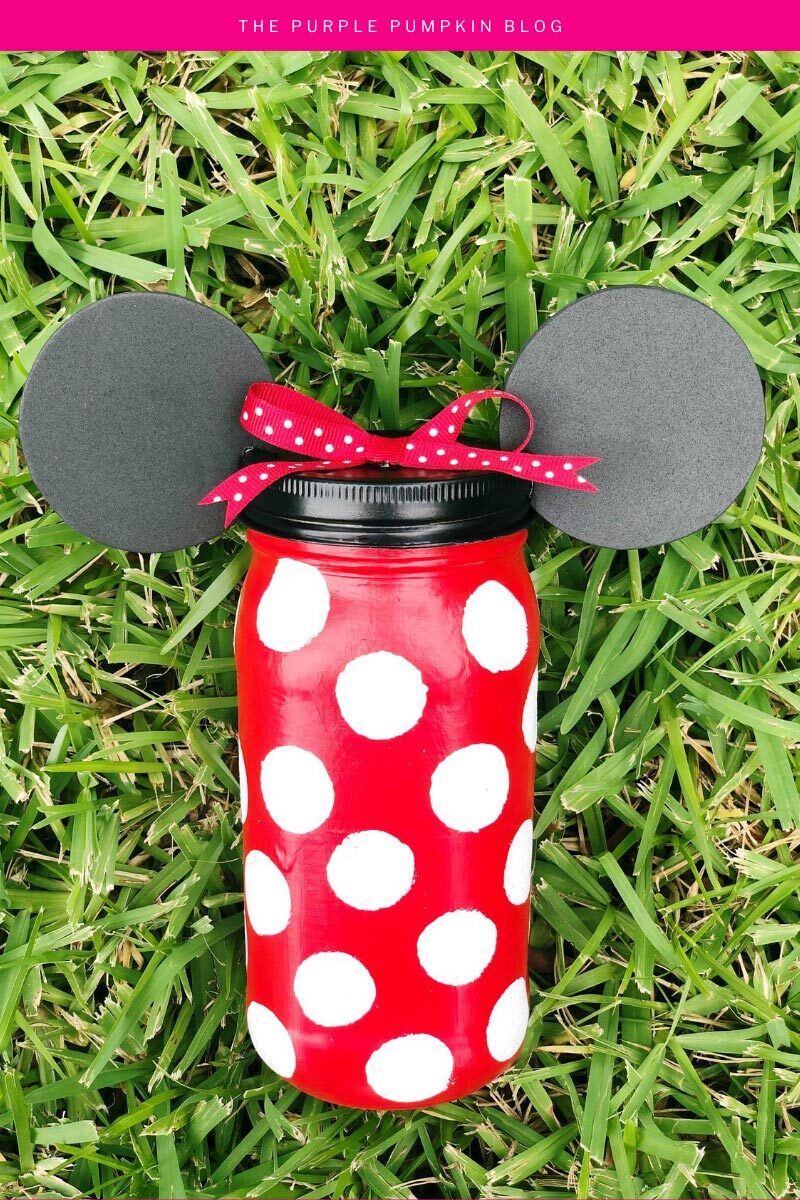
These Minnie & Mickey Mouse Mason Jars are a fun craft to create for the Disney lover! Upcycle your glass jars for this adorable Disney-inspired craft! Fill with yummy snacks or candy, a gift card, or use as a “next trip to the parks” savings bank! Grab your craft supplies and let’s get making!

Affiliate Disclosure
We have included affiliate links to products and services related to this post.
We may earn a commission if you purchase after clicking on those links.
As an Amazon Associate, I earn from qualifying purchases.
Read Our Full Disclosure Policy and Privacy Policy
Minnie & Mickey Mouse Mason Jars
The full list of materials, tools, and instructions are found in the printable tutorial card at the end of this post. I highly recommend reading the blog post all the way through before starting this project to ensure that you have everything required and understand the steps and timings involved.
If you enjoy upcycling (use old jars you have stashed away!) and also love everything Disney, this DIY project ticks all the boxes!
Mason jars are one of the most versatile items in your house, even if you don’t know it yet. You can virtually transform them into (almost) anything you want!
So grab a couple of large jars and turn them into these super cute Minnie & Mickey Mouse mason jars. I gotta say it, but this is what Pinterest dreams are made of!
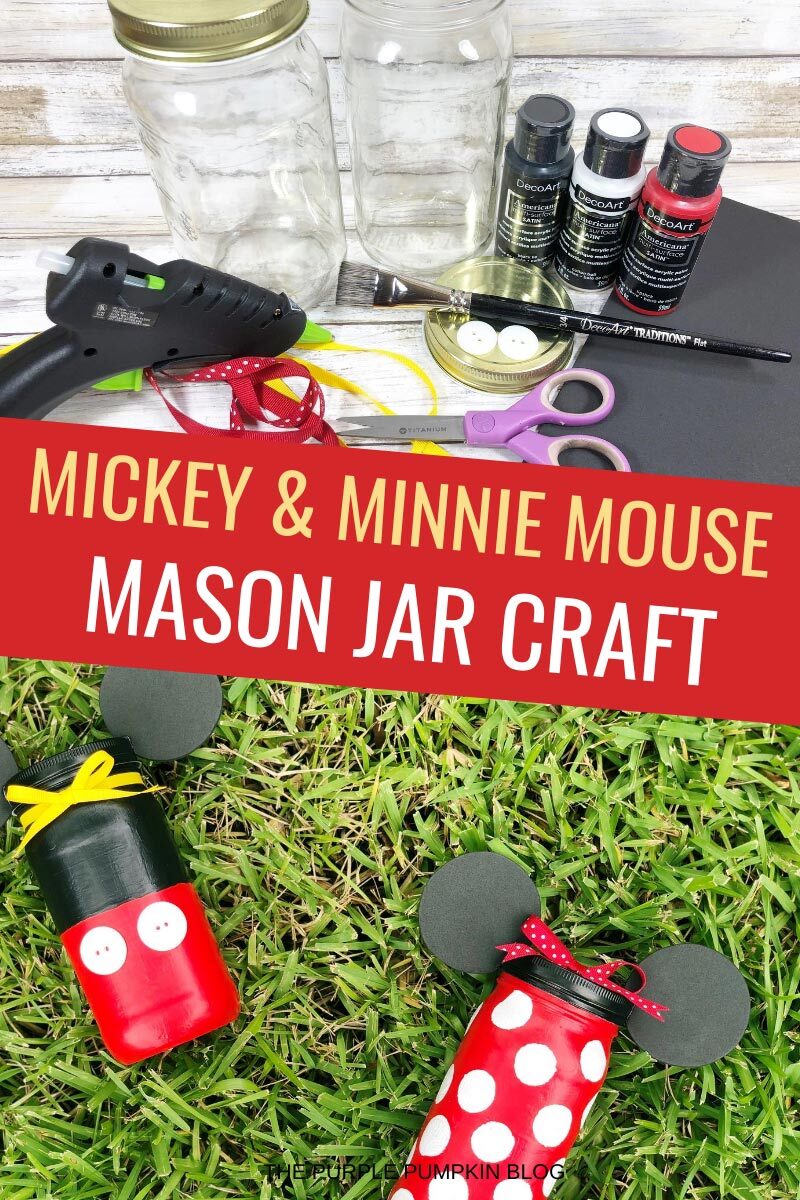
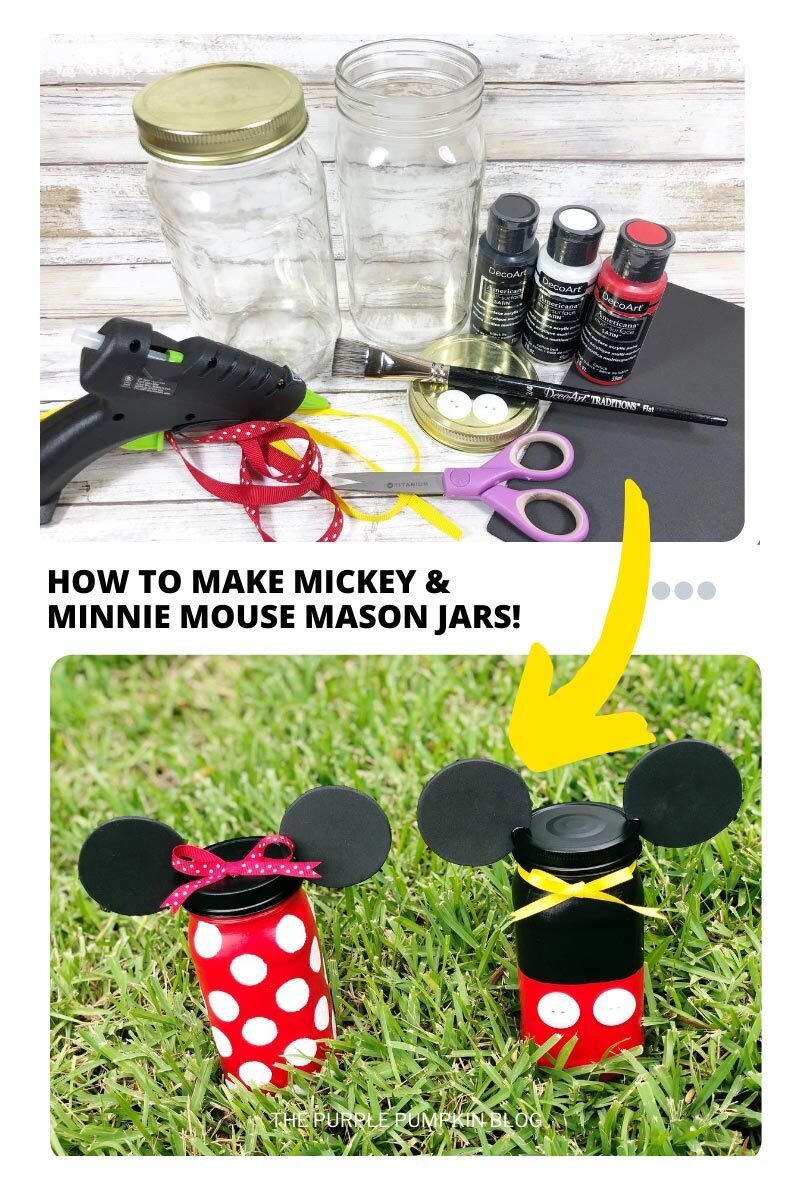
Materials & Tools Used in This Craft
You may actually have most, if not all of the craft supplies needed for this craft already, however, for your convenience, I’ve linked any specialized materials and tools needed for this craft to Amazon below.
- Mason Jars – this craft uses 2 one-quart/litre size jars, but you could use any size you like, to be honest. Depends on what you want to use the jars for when finished!
- Americana Multi-Surface Satin Acrylic paint from DecoArt in the following colors:
- Lipstick
- Black Tie
- Cotton Ball
- Buttons – you will need 2 white, one-inch buttons for this project
- Black Craft Foam – to make the ears
- Grosgrain Ribbon – 3/8″ to 1/2″ (10-12mm) wide in the following colors:
- Yellow
- Red and White Polka Dot
- Paintbrush – 1” flat wash
- Sponge Applicator – ¾” round, for dabbing on Minnie’s polka dots
What Can I Use Mickey Mouse Mason Jars for?
So you’ve made the Minnie and Mickey mason jars, but what can you do with them? Well, let me give you some fun ideas!
- If you have a Disney vacation planned, use them to save money! Instead of a piggy bank, you’ve got a Mickey (or Minnie) bank! The kids could save their allowance or pocket money, or do chores to earn for their trip.
- Use them as boredom jars – write out a bunch of different things to do on strips of paper – read a book, go for a bike ride, watch a movie, etc. Fold up and pop inside the jar. Whenever the kids say “I’m bored” pick an idea from the jar.
- Similarly, you could write down all of the different Disney movies you have access to (on DVD or streaming on Disney+ for example), and pull out a movie when you’re stuck deciding on what to watch.
- Fill with candy, sweets, or wrapped chocolates as a surprise gift when you tell the kids about your Disney trip!
- You could also pop a gift card in there too!
- Use them to store marbles, mini figs, or other small toys.
- Use them as a countdown jar to a Disney trip – whether you add something to the jar, or take it out, when it’s full (or empty) it’ll be time to visit the Magic!
More Disney Crafts To Try!
I’ve shared lots of great craft ideas on The Purple Pumpkin Blog over the years, in fact, there are 100+ crafts to make and do at home that you can try, including more Disney Crafts. Check these out next:
- How To Make A Wooden Disney Sign With A Cricut Maker
- Disney’s Frozen Olaf Christmas Ornament Craft
- How To Make Snow White Poison Apple Mickey Ears
How Do I Make Minnie & Mickey Mason Jars?
Just check out the how-to card below with full materials, tools, instructions, and demonstration photos. You can print the card out too (don’t worry, the pics don’t print to save your ink!).
Minnie & Mickey Mouse Mason Jars
Materials
- 2 Mason Jars – quart/litre size
- Americana Multi-Surface Satin Acrylic paint from DecoArt in the following colors: Lipstick Black Tie, and Cotton Ball
- 2 Buttons – white 1″ (2.5cm)
- Black Craft Foam
- Grosgrain Ribbon – ⅜” to ½” 9 to 12mm width in the following colors: Yellow, and Red & White Polka Dot
TOOLS
- Paintbrush – 1” (2.5cm) flat wash
- Sponge Applicator – ¾” (2cm) round
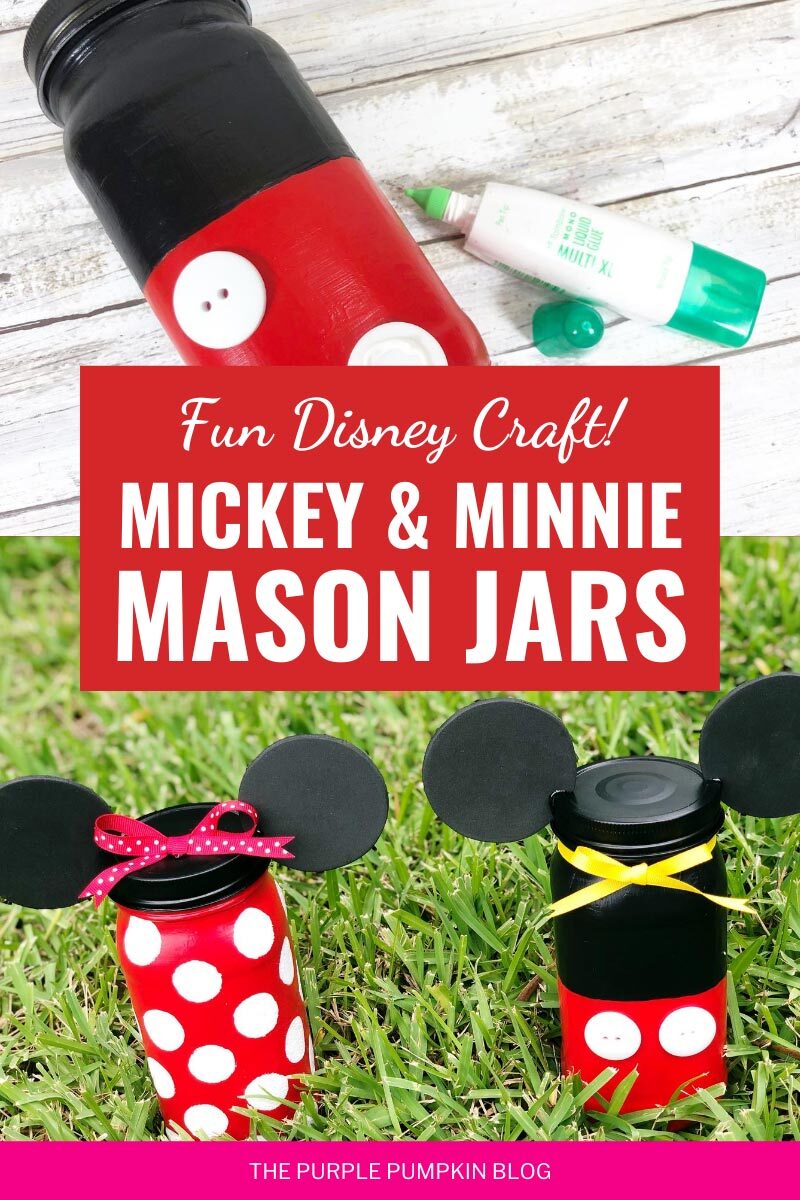
- Liquid Glue with fine tip applicator (white or clear PVA/school glue)
- White Pencil
Instructions
- Wash and dry mason jars completely.
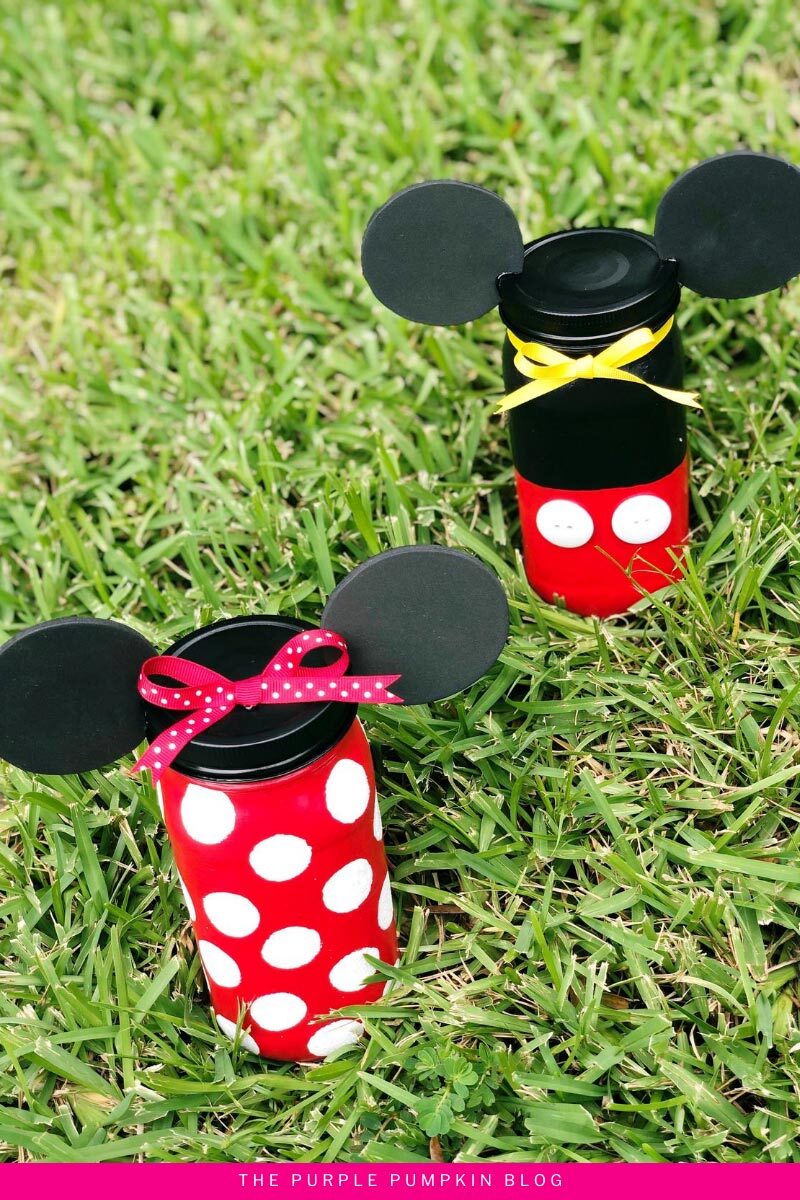
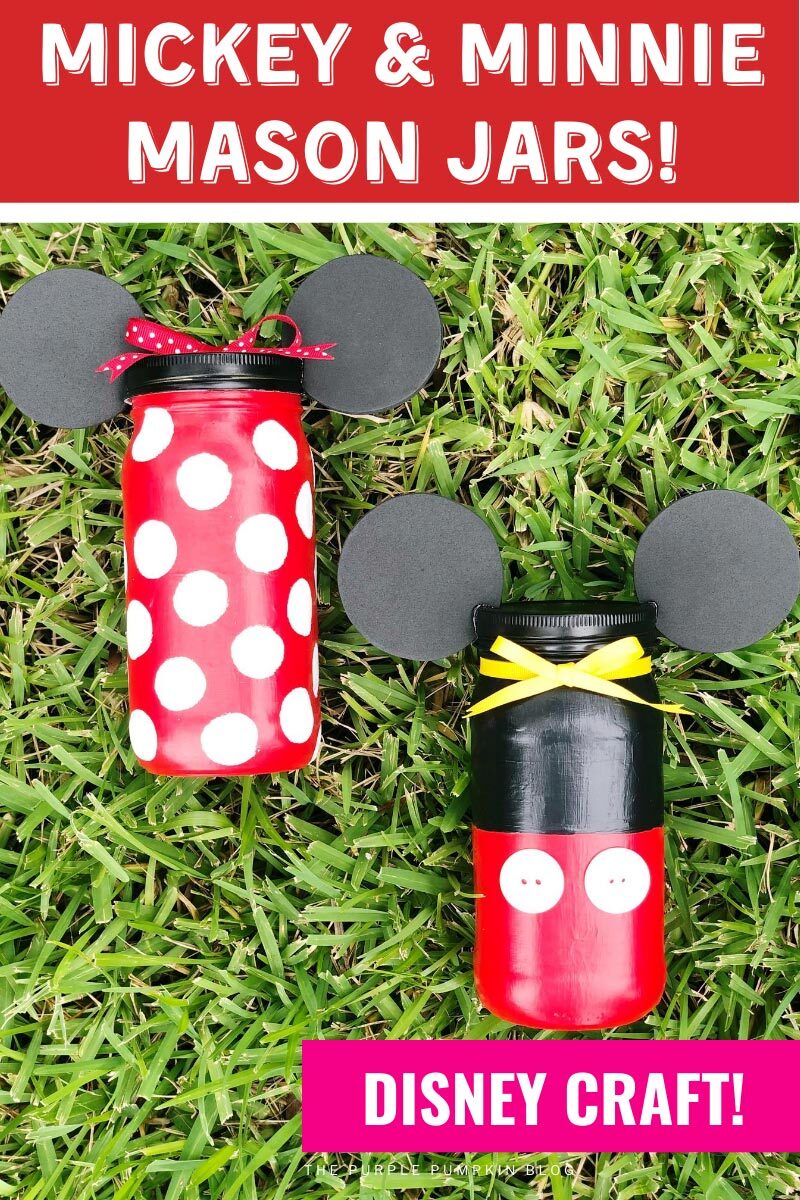
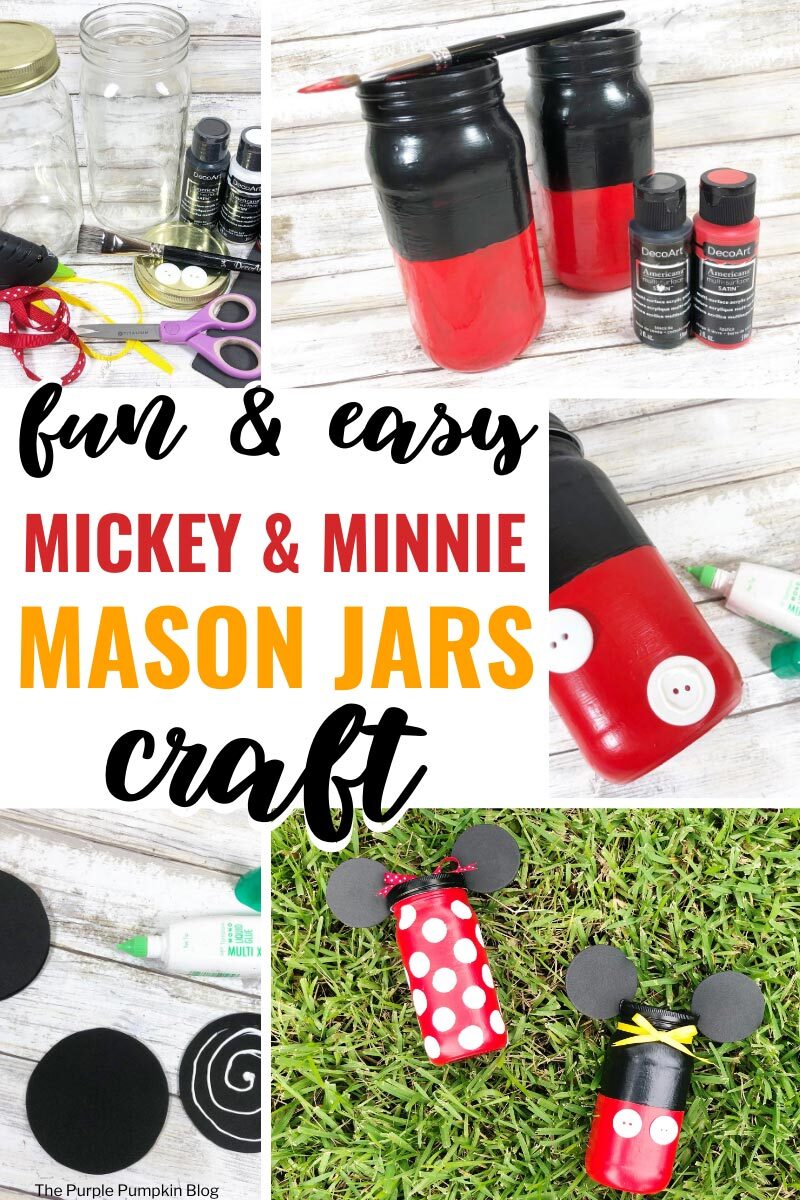
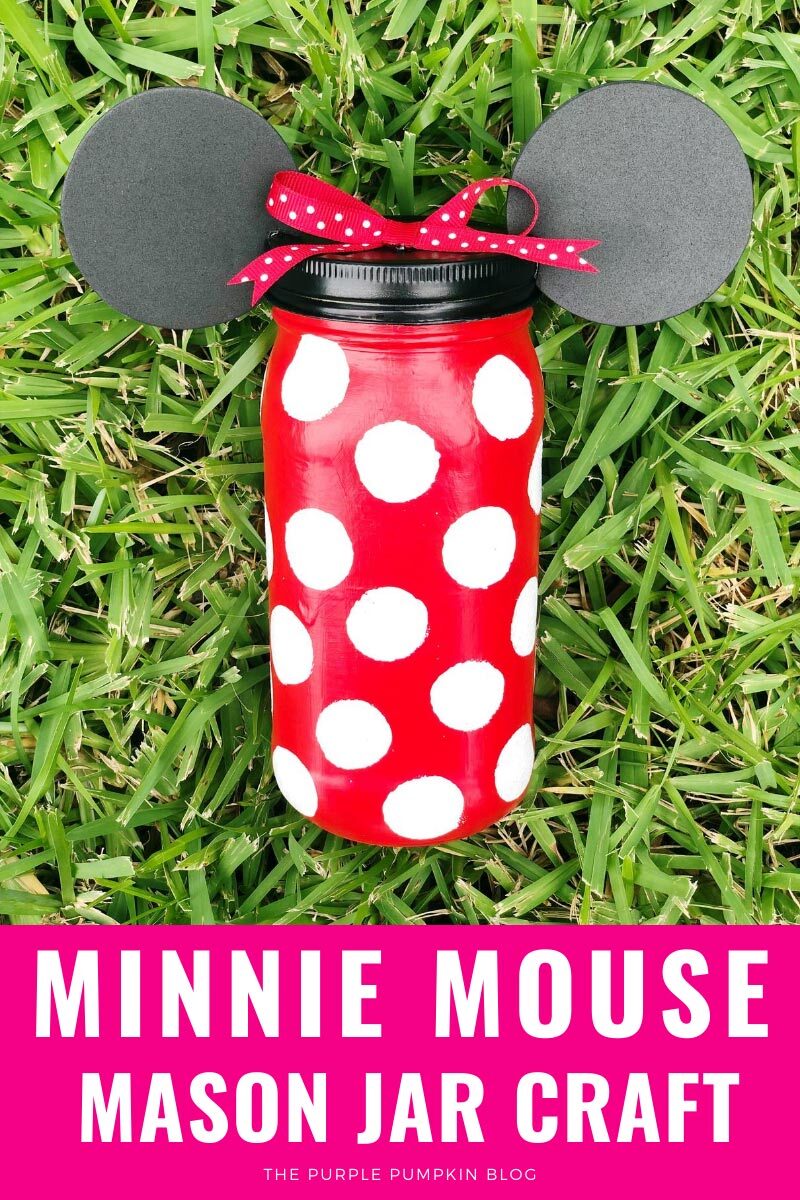
- For the Minnie Mouse jar, apply a base coat of the paint color Lipstick to the entire jar. Set aside to dry. Apply a second coat, if necessary.
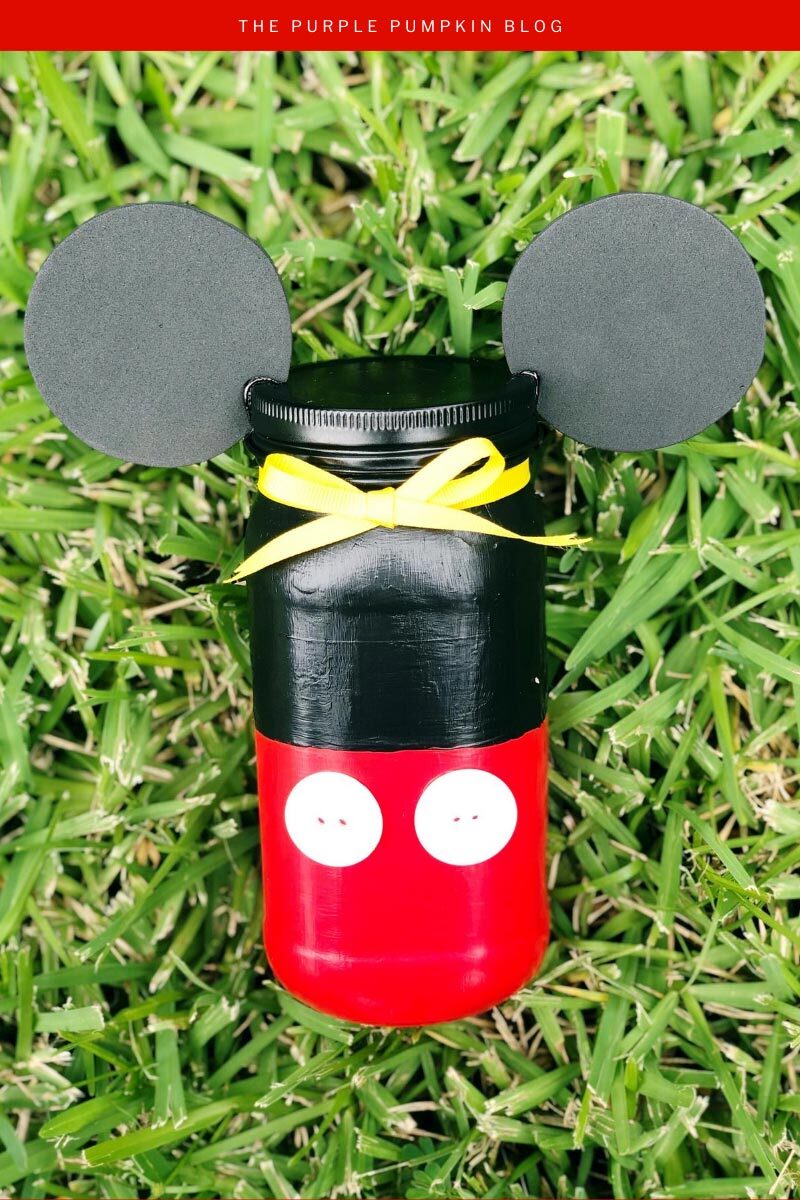
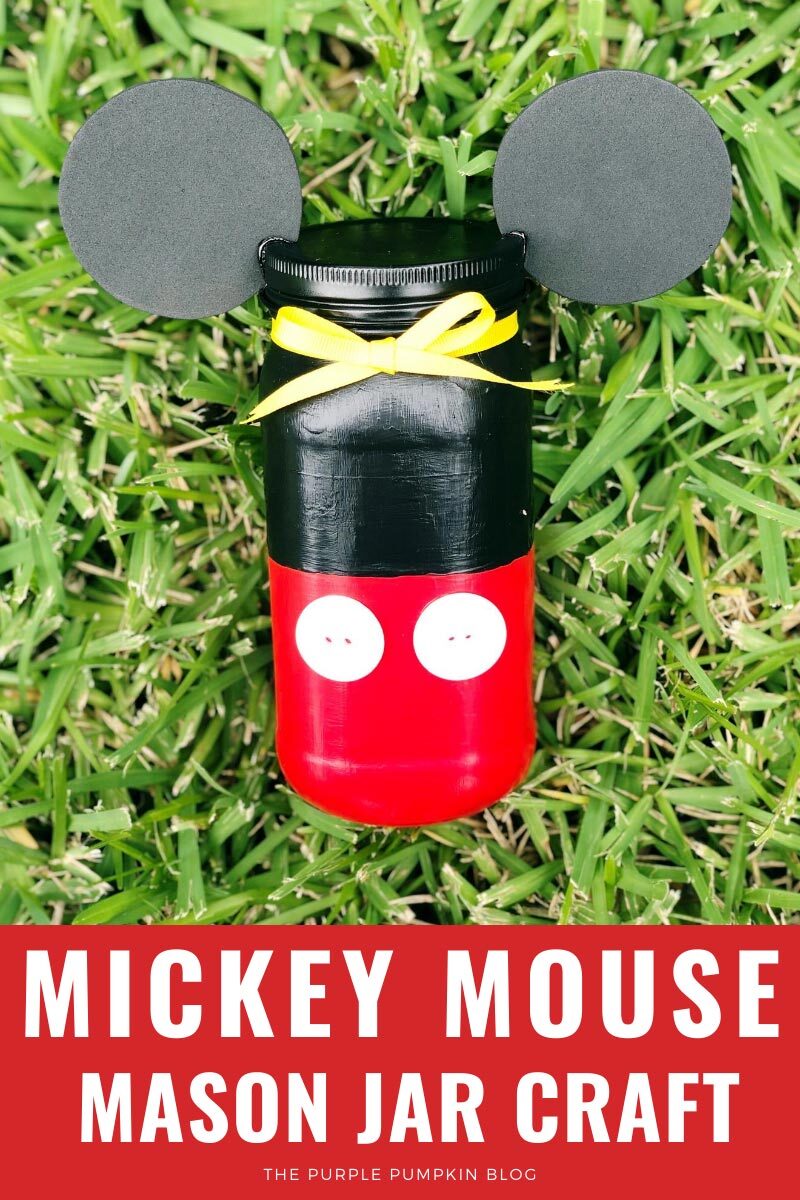
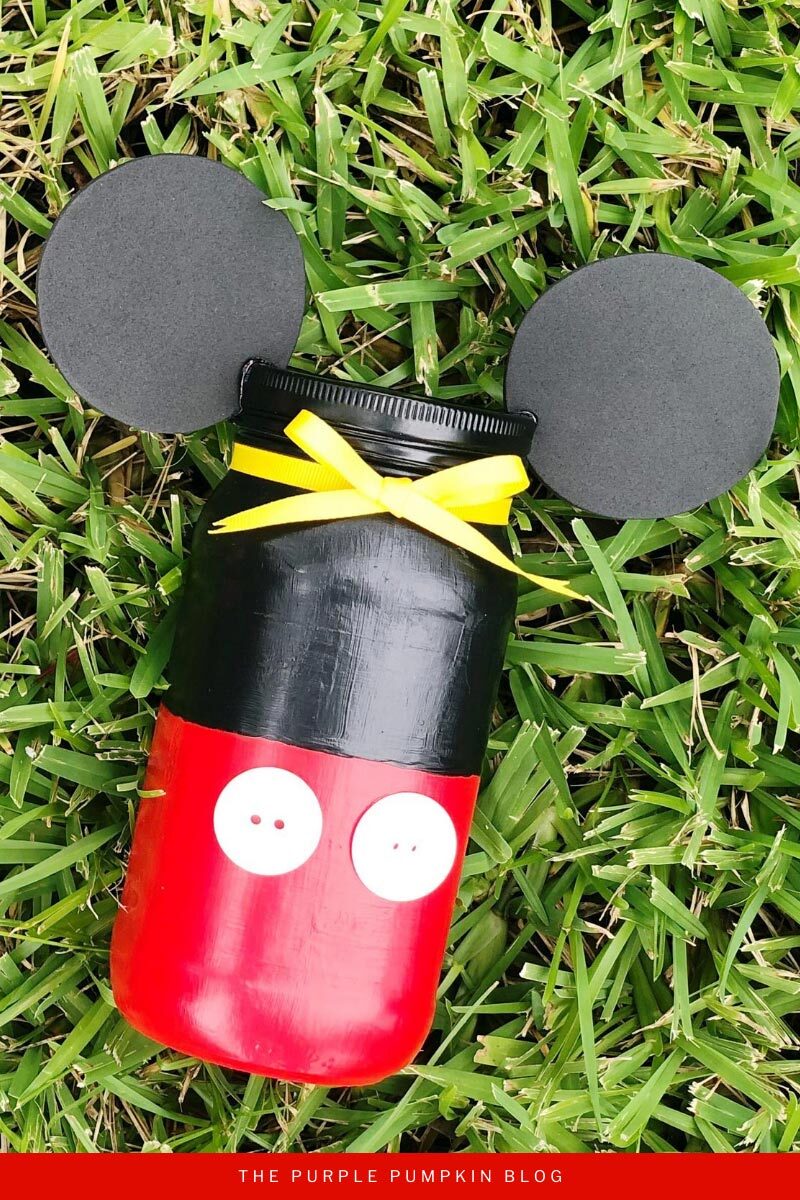
- For the Mickey Mouse jar, apply a base coat of the paint color Lipstick to the bottom one-third of the jar, and the paint color Black Tie, to the top two-thirds. Set aside to dry. Apply a second coat, if necessary.
- Trace jar lid on black craft foam with white pencil, eight times, and then cut out with scissors.
- Layer two circles on top of each other and attach with liquid glue. This will create four ears to attach to the jar lids later.
- Apply a base coat using the paint color Black Tie to both of the jar lids. Set aside to dry. Apply a second coat, if necessary.
- Cut a small notch from each ear and attach them to each side of a jar lid with a glue gun.
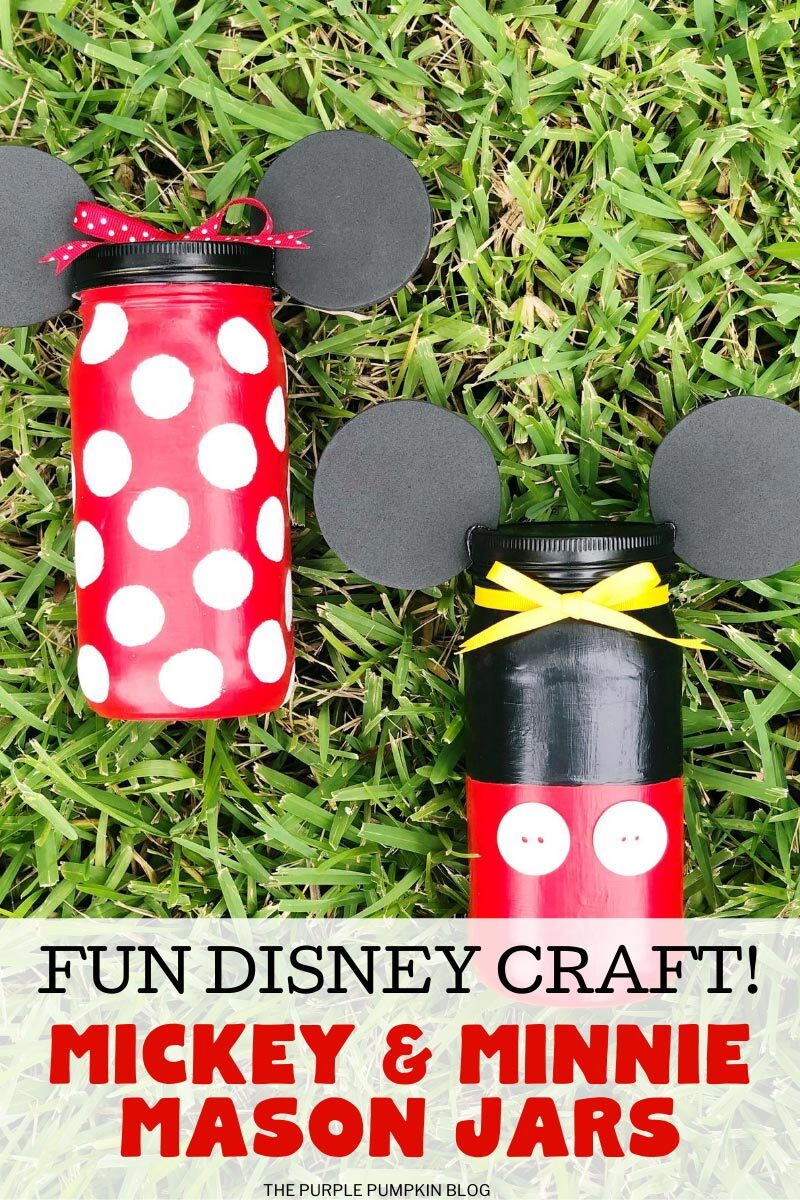
- Attach two white buttons to Mickey jar with liquid glue. Position them towards the top of the red part of the jar, side by side to mimic the buttons on Mickey's shorts.
- Use the round sponge applicator the paint color Cotton ball to create polka dots on the Minnie jar. Tap sponge gently in the paint until full and then carefully pounce and twist to create random polka dots. Set aside to dry.
- Measure and cut a 24” (60cm) length of yellow ribbon to attach around the neck of the Mickey jar and then tie in a bow.
- Measure and cut a 12” (30cm) length of red and white polka dot ribbon, tie in a bow and then attach to Minnie jar lid with a glue gun. Trim ends of both ribbons with scissors.
- Your Minnie & Mickey Mouse Mason Jars are done! I told you they were cute!