Sleeping Beauty Christmas Ornament Craft
Home » CREATE » Crafts » Christmas Crafts »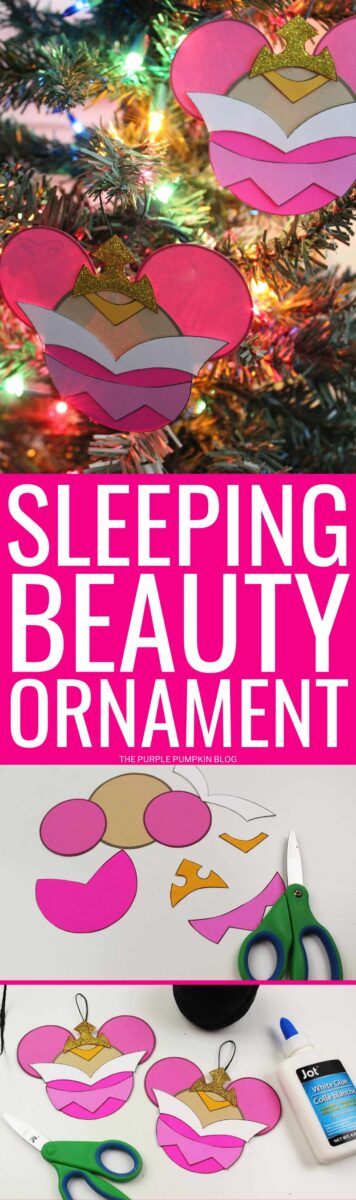
This Sleeping Beauty Christmas Ornament Craft is made with construction paper and is so easy to assemble using a free printable template! Turn a classic Mickey-Head shape into Princess Aurora’s pink dress and hang the ornament on your Christmas tree!
This Disney Princess craft is fun for all ages. Read on to find out how to make this awesome Sleeping Beauty decoration!

Affiliate Disclosure
We have included affiliate links to products and services related to this post.
We may earn a commission if you purchase after clicking on those links.
As an Amazon Associate, I earn from qualifying purchases.
Read Our Full Disclosure Policy and Privacy Policy
Sleeping Beauty Christmas Ornament Craft
Sleeping Beauty, also known as Princess Aurora has always been my favorite Disney Princess and so I simply had to share this gorgeous Sleeping Beauty Christmas ornament craft with you.
If you are a regular reader you may have seen the Maleficent ornament I also shared that would pair so well with this one!

Materials & Tools Used in This Craft
Full instructions are found in the printable tutorial card at the end of this post, but here is a quick outline so you know what to expect from the craft.
I highly recommend always reading everything all the way through before starting any project so you understand all the steps required.
A few simple craft supplies are needed for this paper ornament:
- Construction Paper or Cardstock in the following colors:
- Gold (Fine) Glitter (optional)
- Pink (Fine) Glitter (optional)
- School Glue/White PVA Glue
- Glue Stick
- Scissors
- Black String or Ribbon – for hanging your completed ornament
- Laminator – optional, but you can laminate your ornaments if you wish
- Sleeping Beauty Ornament Template – as with [most of] my free printables, this is available in two different sizes – A4 and US Letter (8.5″ x 11″). You’ll find the downloads below, surrounded by a purple box.
How To Make Sleeping Beauty Ornaments
I’ve got several photos to guide you through making these Disney ornaments, and there is also a slideshow video over on my YouTube channel that you can watch and save to your Playlists for future reference. (Don’t forget to subscribe while you are there!)
Assembling your Disney ornament is really easy – here is how you do it!
Simply print the template onto the corresponding colored paper or card and cut the pieces out.
Alternatively, you could print onto regular paper and trace around the pieces onto the colored card, especially if you are worried that it won’t go through your printer.
Using a glue stick, attach the dress and collar pieces, followed by the dress trim and part of the crown.
Then attach the ears at the back, evenly spaced apart, and then the final piece of the crown in between.
Adding glitter is optional, but Christmas ornaments need to be sparkly, so I think you should!
Add white glue to the crown and sprinkle gold glitter over it. Shake off excess and leave to dry. You can add glitter to other areas if you like.
Just one more step which is sticking a loop of black string or ribbon to the back of the ornaments. Leave everything to dry completely before hanging on your tree!
If you want the decorations to last longer, you could run them through a laminator before attaching the hanging loop. When cutting out after laminating the ornaments, make sure you leave a slight edge so that the laminating sheets do not come apart!
More Disney Ornament Crafts
Here are some other Disney character ornaments for you to make after this one!
- Disney’s Frozen Anna Christmas Ornament Craft
- Disney’s Frozen Elsa Christmas Ornament Craft
- Disney’s Frozen Olaf Christmas Ornament Craft
I’ve shared lots of great craft ideas on The Purple Pumpkin Blog over the years, in fact, there are 100+ crafts to make and do at home that you can try, including more Christmas crafts.
Download Sleeping Beauty Template
- Free Printable Disney Ornament Template – Sleeping Beauty – A4 Size
- Free Printable Disney Ornament Template – Sleeping Beauty – US Letter Size
Downloads open in new tab/window
Sleeping Beauty Ornament Craft
Materials
- Construction Paper or Cardstock in the following colors: Dark Pink Light Pink, Skin Tone, Dark Yellow or Gold, White
- Pink Fine Glitter optional
- Black String or Ribbon
TOOLS
- White School Glue (PVA Glue)
- Glue Stick
- Laminator & Laminating Sheets (optional)
Instructions
- Download and print out the Sleeping Beauty ornament template onto corresponding colored papers or cardstock (Link in the blog post). Cut out and set aside.
- Using a glue stick attach the dress and collar, followed by the dress trim and bottom part of the crown.
- Attach the ears evenly spaced apart, and stick the top part of the crown in between.
- If you are adding glitter, apply white school glue to the crown and sprinkle gold glitter over. Shake off the excess and leave to dry.
- Finally, form a hanging loop with a piece of string or ribbon and stick to the back of the ornament.
- If you want, you can laminate the ornaments so that it lasts longer. Before attaching the loop, run it through a laminator and cut away the excess. Make sure you leave a slight edge as you cut it out so that the laminating sheets don’t fall away! Attach the loop to back.
- Hang your Princess Aurora ornament on your Christmas tree!
Video
This post is part of my long-running Create the Holidays series on The Purple Pumpkin Blog. Since 2012, I’ve shared free printables, crafts, recipes, and more for Christmas and the Winter Holidays. While I don’t officially run the series anymore, seasonal inspiration will still be here! Browse past Create the Holidays (formerly Create Christmas) years: 2024, 2023, 2022, 2021, 2020, 2019, 2018, 2017, 2016, 2015, 2014, 2013, and 2012.