Personalized Baby Bodysuits with Cricut Maker + EasyPress 2
Home » CREATE » Crafts »This is a sponsored conversation written by me on behalf of Cricut. The opinions and text are all mine.
Homemade gifts are always special, and these cute baby bodysuits that you can make with the Cricut Maker, and the EasyPress 2 are perfect for gifting to new parents, or at baby showers.
Using an inexpensive cotton bodysuit / sleepsuit / vest / onesie (depends where in the world you are as to what you call this item of baby clothing!) and iron-on vinyl, this project takes less than half an hour to make.
Read on for my EasyPress 2 Review, and for the tutorial on how to make this sweet garment!
⬇️ Save this post to Pinterest for later! ⬇️
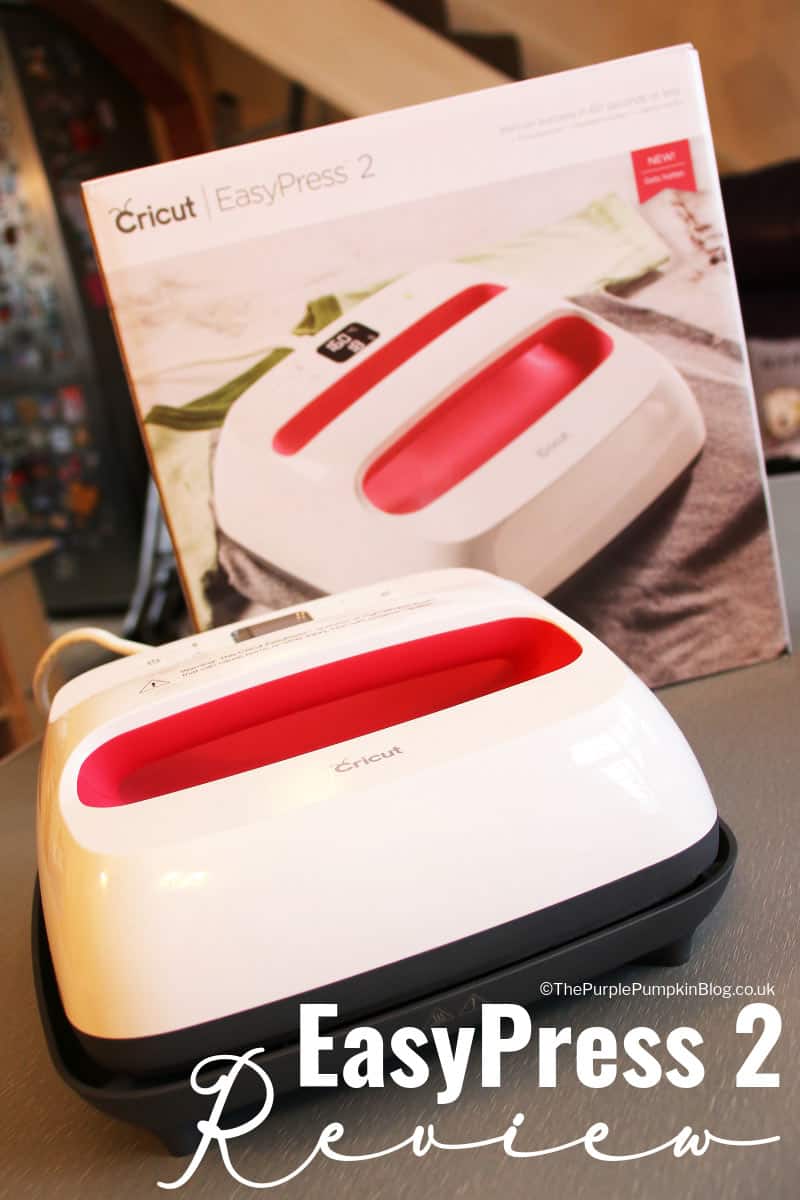
EasyPress 2 Review
Before getting into the tutorial to show you how to make these cute baby bodysuits, let me tell you about Cricut’s EasyPress 2 that I used in this project.
If you have ever used your regular household iron for iron-on transfer projects, you may have found the process to be a bit hit and miss at times. I know I have!
Guessing if the temperature is correct for the iron-on I’m using, or hoping that I’ve managed to apply enough heat to all parts of the design. Then going to peel off the film to find nope, you have to heat it again to make it stick properly. I’m sure fellow crafters will feel my pain on this!
With Cricut’s EasyPress 2 there is no need to reach for your iron any more! The EasyPress 2 gives you professional iron-on results without the guesswork, and gives you flawless transfers and lasting results.
- 6″ x 7″ (15 cm x 17.5 cm) – Perfectly petite for pint-size projects like baby & toddler clothes, hats, accessories and more
- 9″ x 9″ (22.5 cm x 22.5 cm) – Your everyday essential for mid-size projects like t-shirts, tote bags, pillows and more
- 12″ x 10″ (30 cm x 25 cm) – Ideal for jumbo-size projects like large t-shirts, blankets, banners and more
I used the 9″x 9″ in this baby sleepsuit project. It didn’t hinder the process at all – it’s right in the middle of the sizes available and I think a good all-rounder for most projects.
The EasyPress 2 feels sturdy, well made, and the big handle means you have a good grip when handling.

I found the EasyPress 2 so easy to use, and a lot less hassle than setting up the ironing board, and heating up my regular iron.
With the use of a Cricut EasyPress Mat* and the EasyPress 2, I could complete this project at my crafting table in a matter of minutes.
I love that Cricut have got an Interactive Quick Reference Guide (there’s even a printable version for when you can’t get online) which gives you precise settings that have been rigorously tested using every iron-on type. Being able to set the temperature and timer on the machine to match my project materials exactly right was awesome – no more guesswork!
The heat plate of the EasyPress 2 has precise temperature control up to 400°F (205°C), and has an insulated safety base that keeps the heat plate safe and protected – as well as the person using it. I can’t tell you how many times I’ve caught my arm on the edges of a hot iron. Another great There is also an auto shut-off after 10 minutes of inactivity.
- 20″ x 16″ (50 cm x 45.5 cm) – great for large projects
- 12″ x 12″ (30 cm x 30 cm) – great all-rounder for most projects
- 8″ x 10″ (20 cm x 25.5 cm) – great for small projects
Can you transfer iron-on without an EasyPress 2 and an EasyPress Mat? Of course you can – use a regular iron on an ironing board, or on a folded towel. But, if you do a lot of this type of crafting with iron-on materials, then an EasyPress 2 is going to make your project making so simple! I’m loving using mine to make customised items for my family!

EasyPress 2 Quick Review:
- Pro-level performance. Home-friendly design.
- Edge-to-edge heat plate, with precise temperature control up to 400°F (205°C)
- Available in 3 sizes: 6″ x 7″ (15 cm x 17.5 cm); 9″ x 9″ (22.5 cm x 22.5 cm); 12″ x 10″ (30 cm x 25 cm).
- Get professional iron-on results without the guesswork – use the Interactive Quick Reference Guide
- Easy to use – enter time and temperature, and press Go – that’s it!
- Adheres iron-on in 60 seconds or less with long lasting results.
- Large handle for easy maneuvering.
- Insulated safety base for when not in use.
- Auto-shutoff feature after 10 minutes of inactivity.
Much like the Cricut Maker, the EasyPress 2 has got a project for you to get started with, right out of the box! There is a tote bag, and a cut piece of glitter iron-on in the shape of the letter C with antennae sticking out the top – the Cricut logo. (Ever wondered how you say the word Cricut? Think of the insect and you’ve got it!)
There is a step-by-step card to guide you through your first iron-on project. It certainly proves from the very start, just how easy the machine is to use! Plus the tote is so handy for storing craft supplies!
Personalized Baby Bodysuit Iron-On Tutorial
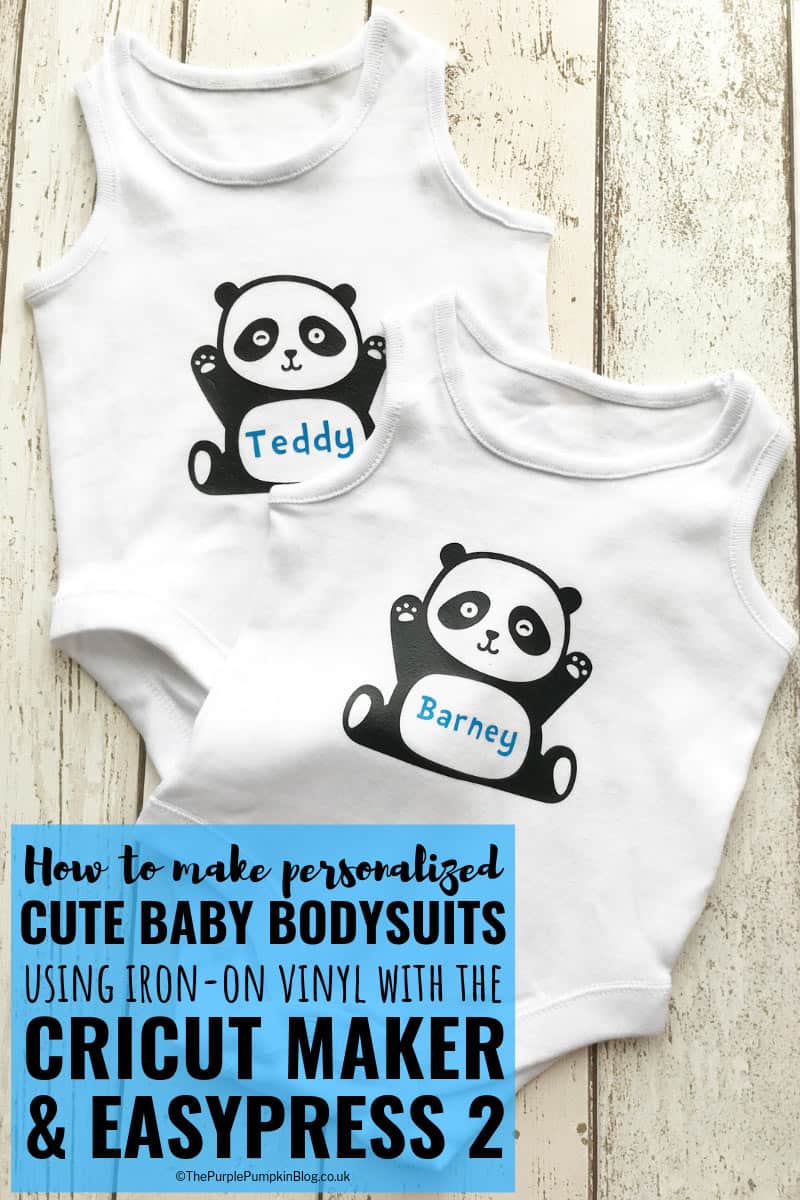
My sister recently had twin boys (who are just the cutest little things!) and I immediately thought of them when it came to this iron-on project.
I bought a pack of inexpensive baby sleeveless bodysuits. I have always called this style of baby clothing, vests, but you might call them sleepsuits or a onesie! And it doesn’t have to be sleeveless either – the shop only had this kind available at the time.
It can be a bit confusing when I’m writing for a worldwide audience – but I hope you can tell from the pictures of what I am talking about! To avoid confusion, I’ll be calling them bodysuits in the tutorial.
I used two different iron-on colours in this project – black for the pandas, and blue for the boys’ names. You can use whichever colours you like.
I also used my Cricut Maker (but you can use any earlier models of Cricut that are supported in Cricut Design Space). Similarly, I used my EasyPress 2 and mat, but you can use a regular iron and follow the heat instructions that come with the iron-on package.
My Twin Pandas project is available in Cricut Design Space, but if for some reason you cannot access it, then please download the free Panda SVG Cut file to use. I used the font Doctor Soos which you can download from DaFont.
Design Space Projects can be customised, so you are able to resize images to fit, remove an image if you only need one, edit the names (unless you have a Teddy or a Barney you’re making this for!), and change the font too. The pandas are 4″ x 3.765″ and fit the front of a 0-3 months size bodysuit. For my UK readers, I bought these from Tesco.
You will need:
- Cricut Maker
- Standard Mat
- EasyPress 2
- EasyPress Mat
- Cotton baby bodysuit
- Measuring tape
- Black Iron-On
- Blue Iron-On
- Weeder
- Craft knife – optional
Instructions:
- Measure the front of the bodysuit to determine how big the panda needs to be. I used 4″ x 3.765″ for a 0-3 months size bodysuit.
- Open the Twin Pandas project in Cricut Design Space and click on the customize button which will open the canvas for you to edit the project.
- Unless you are going to make two bodysuits, you can go ahead and delete one of the pandas, and one of the names. Do this by clicking the image and clicking the red X. You can do the same with one of the names too. To edit the name, double click and a dialogue box will pop open. Overwrite the name, and then click anywhere outside the box to get rid of it. You can re-size the name by using the arrows on the bottom right (which you see if you click on the name) and you can also change the font and colour too. Drag it to make sure it fits inside the panda’s belly.
- When I got my first Cricut, I only had one mat, and so, to save time I soon learned that you can cut lots of pieces in one pass through the machine, rather than removing and reloading different mats. This hack only works if you are using the same material throughout as different pressures are used for different materials and if you make all the elements you are cutting the same colour on your canvas – this is so that Design Space loads everything onto the same mat.
As you can see in my example screenshot below, I’ve got some of the elements to be cut on a mat loaded with black iron-on, and the other element is on a mat with blue iron-on. So the app will tell the Cricut to cut the first design in black and then ask you to remove it when complete, and load the second mat with blue. But if you make everything the same colour (it really doesn’t matter what colour, these digital mats are for your guidance only) on your canvas, it will show only one mat as loaded (even if you place several different colours on the mat itself.
- You can re-position the elements on your digital mat by clicking each one and dragging it to where you want it to be. Make sure you pay attention to the grid guide, and that your actual mat matches the one on the screen. You must also remember to toggle the mirror option when cutting iron-on for transfer.
- Now it’s time to place the iron-on, onto your mat. Iron-on is placed shiny side down. The shiny side is the carrier sheet that will enable you to move the cut pieces to the bodysuit for heat pressing. You can see my iron-on placement in the photo below. Before you commit to cutting, double check that everything matches up correctly!
- Once you’re satisfied that all is as it should be, click continue and follow the on-screen instructions for the Cricut Maker to do its magic! It took about a minute for the Maker to cut one panda, and mere moments for the letters.
- With everything cut, it is time to do some weeding. But before that, I like to cut away any excess iron-on (that stuff is valuable, and the smallest scraps can be used!) with a craft knife. Make sure that you don’t slice over your Cricut Maker cuts! Of course you can always cut your iron-on down to size before putting it through the Cricut Maker.
You can buy the weeder as part of the Cricut tool kit, which I think is invaluable for any Cricut projects!
- Use the weeder in one corner to start lifting the iron-on from the carrier sheet. Then with your fingers, carefully start to peel and pull it all away to reveal the outline of the panda, and the letters. Take your time with this step as you don’t want to tear any of your cut pieces.
- With the bulk of the iron-on removed, it’s now time to use the weeder to remove the negative space. Good light will help you see the cut lines – especially on dark colours. Use the images from Design Space as a guide to make sure you are removing the correct pieces. For the name it will be the space in the middle of letters. For the panda this would be the face, belly, feet, paw beans, and the whites of his eyes.
You may have noticed that the eyes of my cut-out pandas are different to the template. That is because I made a boo-boo when weeding and couldn’t salvage the piece… so I switched it out with one of the paw beans to make it look like the panda is winking. And because my twin nephews are identical, I switched out the other panda’s eyes too. You don’t have to do this, just pointing out what happened here!
Using the Cricut EasyPress 2 to transfer your Iron-On
- Head over to Cricut’s Interactive Quick Reference Guide. Select the iron-on material and base material you are using, as well as if you are using a Cricut EasyPress Mat or a towel. It will then tell you the exact temperature and time for your transfer.
I used Everyday Iron-On, and a 100% cotton garment. I also used my EasyPress Mat. The step that says to preheat for 5 seconds, is for the base material – it’s also an opportunity to get rid of any creases!
- Now position the panda on the bodysuit. You can use a measuring tape to get it exactly right, or by eye – whichever you are most comfortable with. When happy with the position, place the EasyPress 2 on top, start the timer, and apply pressure. Flip the bodysuit over, reset the timer as instructed and press again.
- Peel back the carrier sheet (making sure the iron-on has adhered to the bodysuit, if it hasn’t, repeat the heat process) and put to one side as you will be using it again. Position the name in the belly area, and replace the other piece of carrier sheet – this will protect the panda from the heat of the press. Once again apply the EasyPress 2 as instructed, remove the carrier sheets, and you are done! Project complete!
I just love how this project turned out, and was so excited to give them to my sister for Barney and Teddy! She commented on how cute they were, and also how good quality the finish was. This was good to hear, as it shows what greaat products Cricut make.
She also spied the unused baby clothes I had on the side, and I said “yes, I’m going to be customizing ALL the things now!
I hope you love this sweet baby bodysuit as much as I do, and have a go too. Even if it is not for a baby garment, the process is exactly the same for any image, any size – just scale up.
I know that this was a long post, because of not only the tutorial, but also the EasyPress 2 review, which I hope you found to be useful. If you are new to heat transferring and plan to do a lot of this type of project, then I would recommend Cricut’s EasyPress 2 as it will make the process smooth and easy. If you are a veteran crafter and still using an iron, let me tell you that you will find the EasyPress 2 an absolute dream to work with!
⬇️Save this Cricut EasyPress 2 Project to Pinterest for later⬇️
anthea
April 27, 2019 @ 6:11 pm
Such an adorable craft to make and perfect for the EasyPress 2
Michelle Ordever
April 27, 2019 @ 8:23 pm
The twins look so sweet in them! I’m making personalised bibs next so we can tell twin is which!