Painted Halloween Stones for Tic-Tac-Toe (Plus Free Printable)
Home » CREATE » Crafts » Halloween Crafts »
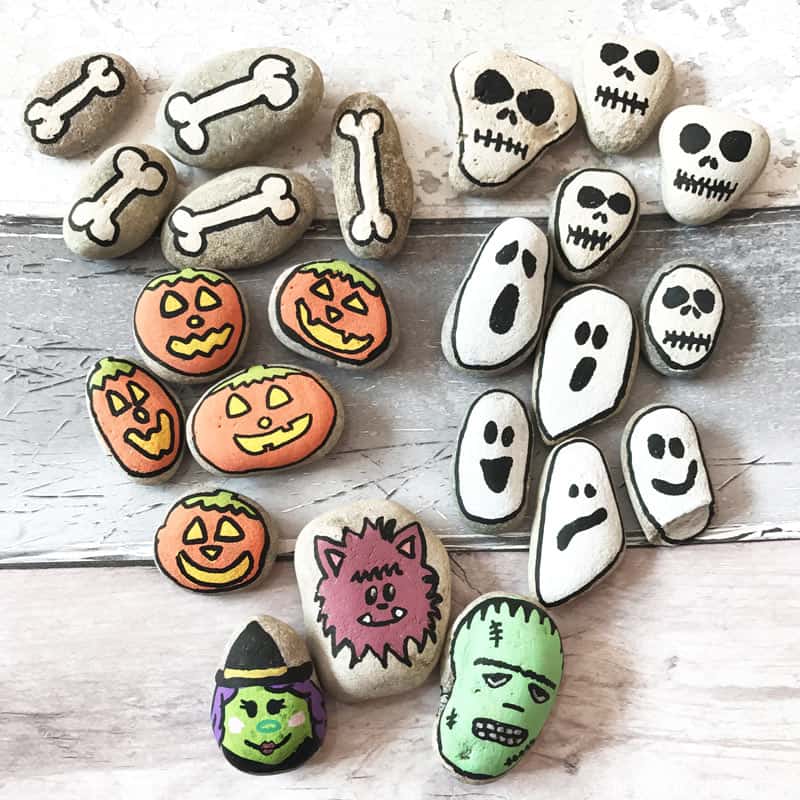
These Painted Halloween Stones are a fun craft to do for the spooky season!
Give rock painting a creepy twist by using acrylic paint pens to draw fun characters like Jack-o’-lanterns, ghosts, and skulls onto flat stones and use them to play a game of Tic-Tac-Toe!

Affiliate Disclosure
We have included affiliate links to products and services related to this post.
We may earn a commission if you purchase after clicking on those links.
As an Amazon Associate, I earn from qualifying purchases.
Read Our Full Disclosure Policy and Privacy Policy
Painted Halloween Stones
Do you remember our Story Stones? Well, that summer craft inspired this Halloween activity and it’s a great alternative to carving pumpkins!
These painted Halloween stones are not only a creative way to get into the Halloween spirit but also double as a delightful DIY tic-tac-toe game that kids and adults alike will enjoy.
Whether you’re hosting a Halloween party or simply want to add some handmade charm to your décor, this project is both entertaining and easy to make!
What You Need For This Halloween Craft
Acrylic Paint Pens: For this project, we opted for the Ohuhu Acrylic Paint Markers Cotton-Core, and they truly made the painting process a breeze. These markers come in a set of 36 vibrant colors and feature dual tips, offering versatility for various design needs.
The Brush & Fine Tip combination is perfect for smooth blending and precise detailing, while the Brush & Dot Tip allows for fluid strokes and dynamic dot effects. The Fine & Dot Tip is excellent for intricate lines and controlled stippling techniques.
What sets these markers apart is their cotton-core design, which means no shaking or pressing is required—just uncap and start creating! Plus, they’re suitable for a variety of surfaces, including stone, wood, glass, and more, making them ideal for this Halloween stone project.
Stones: The stones came from a local DIY store—a huge 20kg bag was CHEAP! They were all different shapes and sizes, perfect for this craft as it adds to the charm, and you can match them with the characters. Like long stones for ghosts, and rounded ones for Jack-o’-lanterns.
You can of course by flat stones also known as river rocks, which are ready for crafting with. You could even have a dig around in your yard, you might find some out there!
Tic-Tac-Toe Board: You can draw out your own on some paper or cardstock, or download our free printable boards further down the post (surrounded by a purple box).

Painted Halloween Stones #1: Pumpkins & Ghosts
To make the Jack-o’-lanterns and ghosts for this Halloween Tic-Tac-Toe game, you will need 10 stones in all—5 for the pumpkins, and 5 for the ghosts.
- For the pumpkins use round (ish) stones. Paint in orange first and allow to try.
- Then draw on the features in bright yellow, and add the green stalk.
- Finally, outline in black so that everything stands out.
- For the ghosts, try to use longer stones. Cover in white first (you may need a few layers) and allow to dry.
- Draw on eyes and mouth in different expressions, and outline in black.
You don’t have to be an amazing artist to make these stones, and kids will have lots of fun coming up with different faces and expressions for the Halloween characters!
How to Play Tic-Tac-Toe
- Tic-tac-toe is a two-player game played on a 3×3 grid.
- One player uses one type of marker (e.g., skulls), and the other uses a different one (e.g., bones).
- Players take turns placing their markers in an empty square.
- The first player to get three of their markers in a row—horizontally, vertically, or diagonally—wins the game.
- If all squares are filled and no one has three in a row, the game is a draw.
Painted Halloween Stones #2: Skulls & Bones
To make the skulls and [cross]bones for this Halloween Tic-Tac-Toe game, you will need 10 stones in all—5 for the skulls, and 5 for the bones.
- For the skulls use some triangular (ish!) shaped stones. (This shape would also be great for aliens!
- To draw the skull, use a cream or white coloured acrylic pen to draw the skull outline and fill it in. Leave to dry.
- Use a black pen to draw two eye sockets, nose holes and a row of teeth as shown.
- Outline the skull in black. (We know we forgot to do two of them for the photo!)
- For the bones, use longer stones, and drew a long thick line across the stone with two circles at either end to create a bone design.
- Again, allow to dry and outline in black.
Painted Halloween Stones #3: Witches & Werewolves
We didn’t finish painting this set before photos, but showing you so you can visualize the designs.
- For the witches, try to use a stone that is tapered to a point at one end for her hat.
- Draw the witch face in green and let dry. Then paint on her hat (leaving a gap for the bat band).
- Then drew in her hair and facial features, and course outline in black. Remember to let dry between layers.
- Use a large flat stone for the werewolves. Use brown and draw and fill in a circle first. Then add jagged triangles around the edge of the circle for fur.
- Add two larger triagles for ears, then add facial features, including sharp teeth! When dry, outline in black.
You’ll also notice another character—Frankenstein’s Monster. We had a stone that looked like a big head and it was perfect for him! Use green for his skin, black for details like furrowed brow, hairline, and scars, and white for eyes and teeth. For his neck bolts, use grey.
Acrylic Paint Pen Tips
- No Shaking: Unlike other acrylic pens, Ohuhu Acrylic Paint Markers Cotton-Core work immediately. You don’t have to shake or press down on the nib to use them, making them easy for kids to use.
- Surface Preparation: If you’ve bought stones from a DIY shop, they will probably be grubby or covered in sand. Wash them off and allow them to dry before painting. Ensure your stones are clean and dry before starting. A quick rinse and thorough drying will help the paint adhere better.
- Design Planning: Sketch your designs lightly with a pencil before painting. This helps in planning the layout and details.
- Layering Colors: Colors can be layered on top of each other, but you must wait for each layer to dry; otherwise, they become smudged—unless that’s the style you’re going for!
- How to Layer: Start with lighter colors and layer darker shades on top. This technique helps in achieving depth and dimension in your designs.
- Fixing Mistakes: If you make a mistake, wait for it to dry and draw over it!
- Inspiration: Use pictures from books, magazines, comics, and online for drawing inspiration. Story stones can be as straightforward or as intricate as your skills allow!
- Cleaning Up: To remove the ink/paint from the skin, use warm, soapy water. Hand gel works.
Download Halloween Tic-Tac-Toe Boards
The downloads are in the purple box below. Click the purple download button link to save the printable file(s) to your device.
Each page has one tic-tac-toe game board on it – one each for Pumpkins & Ghosts, Skulls & Bones, and Witches & Werewolves.
Download Free Printable Here:
UK Readers! No printer? No problem! Get your printables printed and sent to you with Doxzoo!
Visit The Purple Pumpkin Printables Shop for more awesome printables and products! (Opens in new tab.)
This post is part of my long-running Crafty October series on The Purple Pumpkin Blog. Since 2012, I’ve shared Halloween recipes, printables, and crafts every October. While I don’t officially run the series anymore, all my new Halloween posts are still part of this decades-long celebration of spooky fun! Browse past Crafty October years for even more inspiration: 2024, 2023, 2022, 2021, 2020, 2019, 2018, 2017, 2016, 2015, 2014, 2013, and 2012.
Kim
October 18, 2017 @ 10:31 pm
I love these! Thanks for sharing and for the detailed how- to guide.