Make Professional Looking Badges (and more!) with eBadges!
Home » CREATE » Crafts »The Purple Pumpkin Blog was recently featured on the eBadges website, as a Craft Blogger to follow in 2018. Since I tend to only get really crafty around Halloween and Christmas, this was a lovely honour to receive, and has kick [re-]started my creativity too!
I took a good look around the site, and reached out to them asking if I could review their Micro Badge Maker; eBadges said “yes”, and here we are!
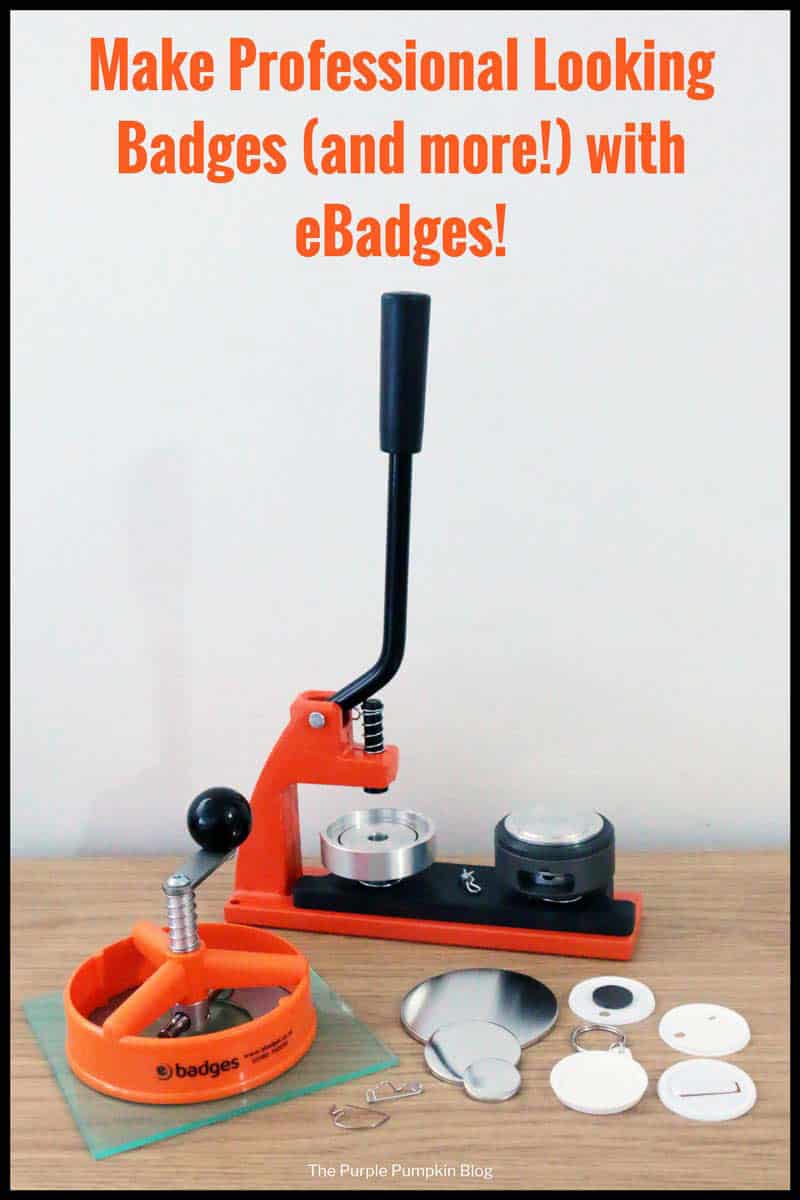
eBadges Micro Badge Maker
eBadges, suppliers of Enterprise Products is a Lincolnshire-based, family-run business which has been designing and producing professional button badge making machines for over 30 years.
There are three sizes of badge makers available from eBadges – Micro, Mini and Maxi. They all do the same thing, the difference is the speed of operation (depending on the user). The Micro makes 3 badges per minute, the Mini makes 5, and the Maxi makes 6 – 8 badges per minute. The Micro is most suitable for at home use.
![]()
You can choose from ten different badge components to make up using their badge makers. eBadges supply badges (with various backings), supersafe badges (suitable for young children), mirrors, keyrings, mirror keyrings, fridge magnets, medals, bottle openers, clothing magnets and flat back badges. All components can be made up in a variety of sizes.
You can find out more about the eBadges badge makers here, and components here.
![]()
The cost at the time of writing for the Micro Badge Maker with a choice of die (in 25, 38, 45, 58 and 77mm) is £60+VAT, which makes it an affordable machine for the crafter or home user.
You can purchase extra dies, as well as a circle cutter (to cut perfect circles of your paper). There is also the option of buying kits which will include the various product components. The components can also be bought separately…
…In fact, there are so many options that I’m sending you over to the eBadges website to see all the range available. Don’t worry, the link opens in a new window, so you won’t lose your place here!

Now, I know that the name of the badge I was sent is Micro, so the name gives it away that it’ll be small – but I was pleasantly surprised to see how compact a machine it was. The handle can be removed which is fab – I have a lot of art and crafts supplies and space to store everything is a premium. With its micro-ness (in badge machine making terms!) it will fit nicely in a drawer. The components come in bags and I plan to transfer them into boxes so that I can stack and store them when not in use.
This post contains Amazon Affiliate and other affiliate links. If you clicked the link then made a purchase, a small percentage of the sale price would be paid to this me. It doesn’t cost you anything more but it helps keep the lights on over here!
Making Badges
Now the fun part – making badges!
I’m going to walk and talk you through the process using photos, as eBadges have got so many great video tutorials on their site, including the one below, which is what I followed to make my first badge. I can assure you, that it really is as simple as it looks in the eBadges videos!
There are several choices when it comes to badges – different sizes, and different backings. In my photo tutorial I made 25mm and 45mm badges, and a keyring. I do have the dies and components for a few other products, which I’m going to make at a later date. This first round of using the Micro Badge Maker was to just get a feel of how it works.
Before you make your badge*, you are going to need some art work. This could be something of your own design – either digital or hand drawn. Or it could be something you cut out of a magazine. I printed off one of my Halloween characters – the purple pumpkin of course! And I also cut some pictures from a travel brochure. *or other item – keyring, mirror etc.,
TIP! eBadges recommended using 100gsm inkjet or laser printer paper, but not photo paper – for my US readers, that is 23-28lb weight paper (yes, eBadges ships internationally). When creating your own designs (or even cutting out of a magazine) you have to be mindful that there will be some wraparound the edges of the badge. Luckily, you receive a size guide with the machine, and this can also be downloaded from their FAQs section.
The circle cutter is an additional piece of kit, and I would highly recommend you buying one – cutting perfect circles is a breeze! It comes with a perspex cutting board so that you don’t damage your surface. You simple turn the crank at the top and boom, a perfect circle for your badge!
Step-by-Step
Step 1 – Place the metal front into the die. The metal edge should slot in easily. Then add your artwork – face up – followed by one piece of plastic film.
TIP! Make sure it is just one piece of plastic film, as I accidentally put in two, and that jammed the machine, in that I couldn’t pull the level all the way down. Easy enough to rectify – I just removed it from the die and started over. This time making sure I had just one piece of film.
Step 2 – You then move the grey ring from the other die and then turn the centre punch over so that it looks like a top hat.
Rotate the dies so that the top hat one is directly under the handle, and pull down firmly. Make sure you hold onto the base of the machine to help you get good leverage.
TIP! Making a badge is easy but you need to make sure you apply firm pressure when you pull the handle down. The first time I used the machine I didn’t, so the art work didn’t cling around the badge, and I had to bin it and start over. But lesson learned!
Step 3 – Place the badge back into the second die with the zig-zag side facing up. The pins and the backs come separate, so you have to insert the pins yourself.
TIP! If you are making a batch of pins, get these all done in advance as it can be fiddly!
Move the grey ring and top hat section over to the other die.
TIP! It’s at this point you might want to check the orientation of your badge front in relation to the pin so that it is in the correct position. Turn the top hat over so that it fits into the grey ring, and rotate it so that it is directly under the handle and pull down firmly – the top hat should sink firmly into the die – it is this process that adheres the badge front to the badge back, and where I didn’t pull down firmly enough on my very first try.
Lift the grey ring and top hat section off and remove your completed badge!
Told you it was easy!