Pearl Oyster Cupcakes for Mermaid or Under the Sea Parties!
Home » COOK » Recipes » Baking » Cupcakes »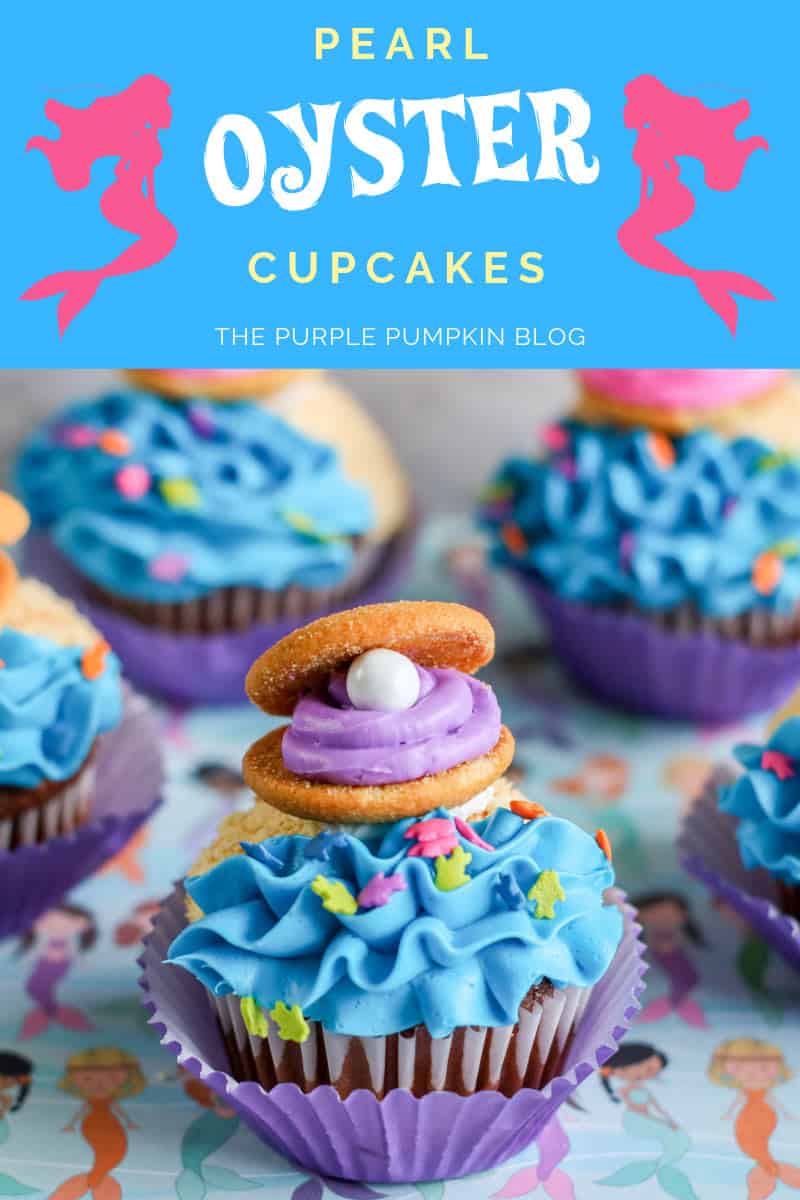

Aren’t these Pearl Oyster Cupcakes the cutest thing you’ve ever seen?! They are just perfect for a Mermaid Party, or an Under the Sea Party, and so much fun to make!

We have many more Cupcake Recipes for you—why not take a look at them next?
Save these cute cupcakes to your Pinterest Boards for later – just use the button below!
Pearl Oyster Cupcakes
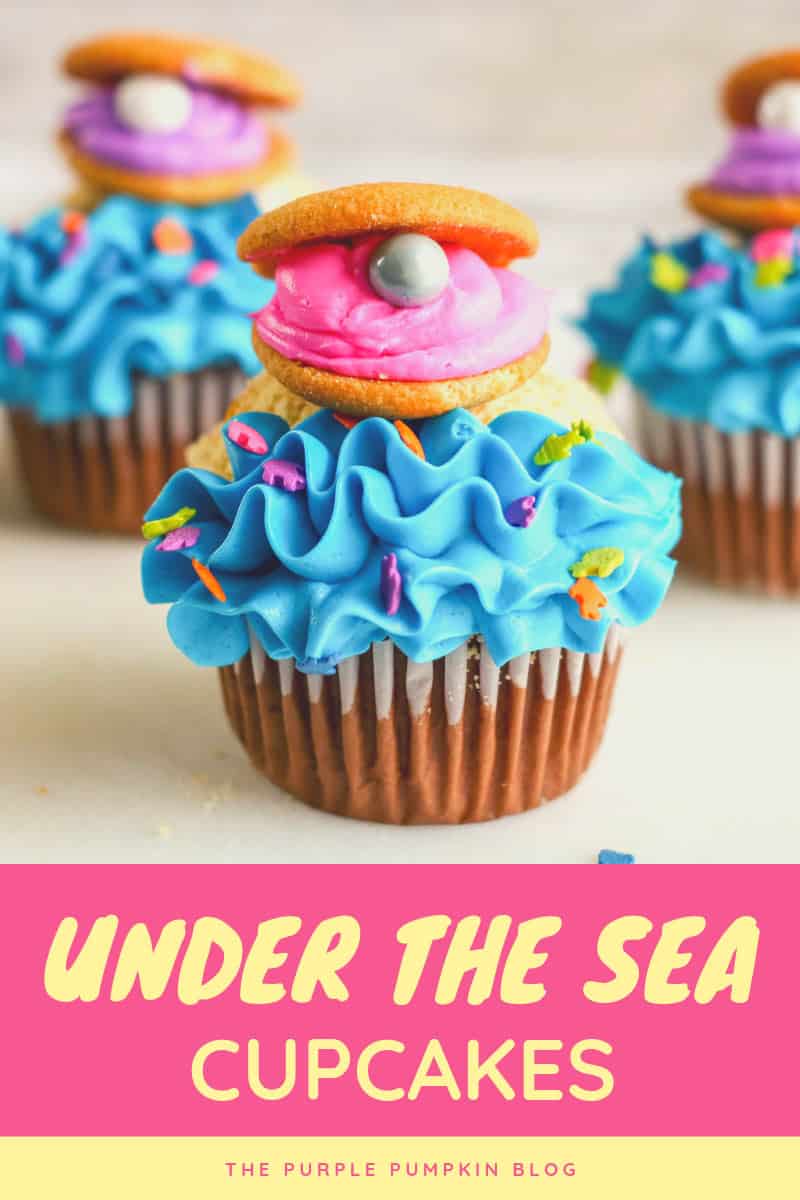
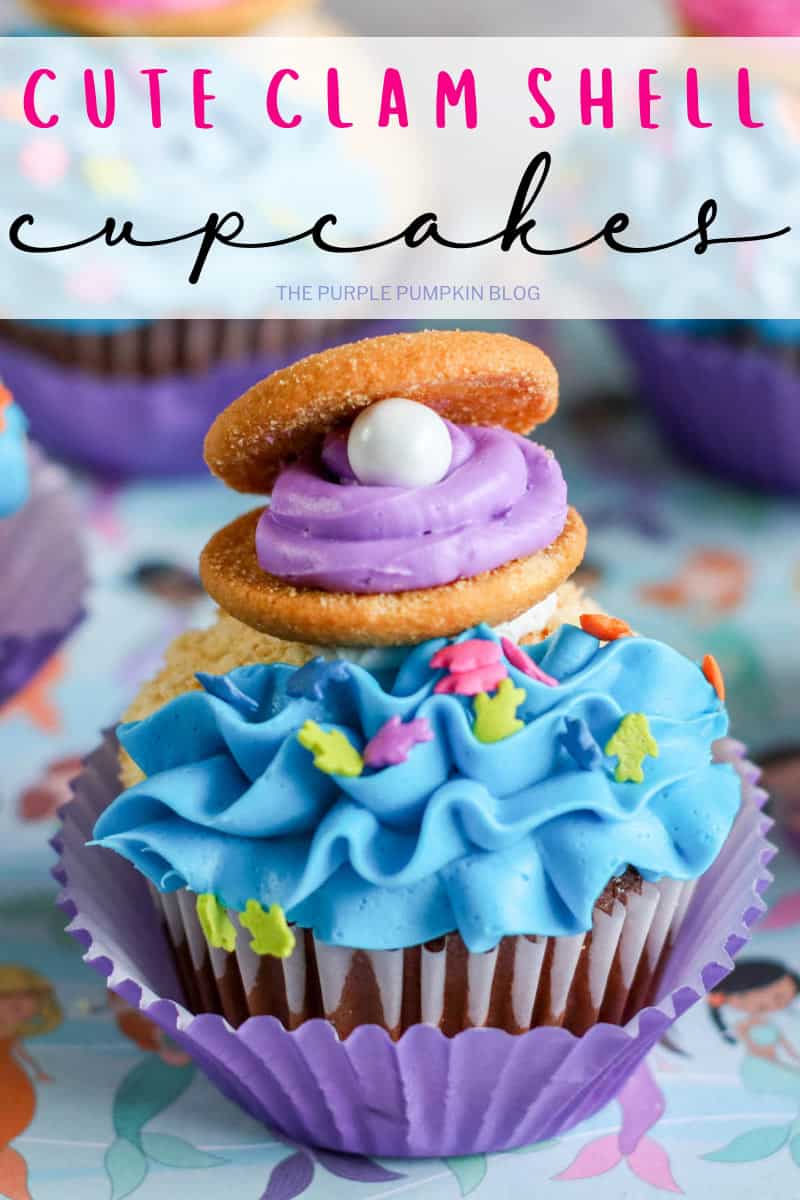
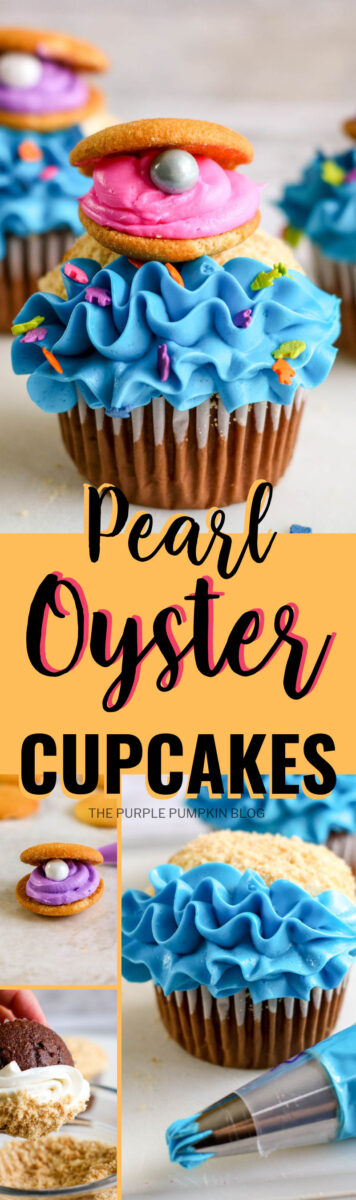
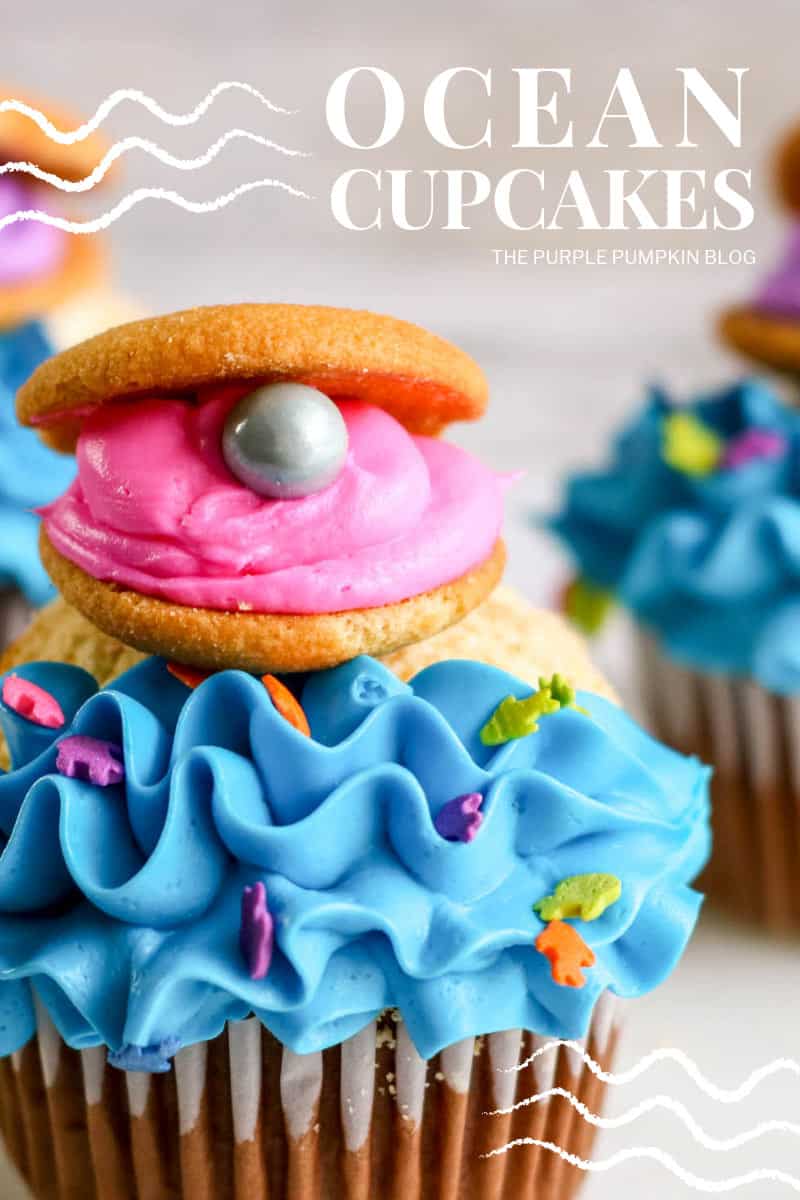
Themed cupcakes are awesome to make for parties and celebrations, and these cute ocean-themed cupcakes come complete with a wave (full of tiny fish sprinkles) crashing onto the beach, with a washed-up pearl oyster sitting on top.
Now, these could be called seashell cupcakes, or clam cupcakes (clams do produce pearls, but only a teeny tiny amount do!), or beach cupcakes, or seashore cupcakes, or ocean cupcakes… you are probably catching my drift(wood!)… that these adorable cupcakes are just what you need for any water-themed party or event!
I mean, you could even make them for a pool party, or a Baby Shark Party if you wanted to, or make a batch just because you love eating cupcakes!
RELATED READING: 50+ Recipes for a Hawaiian Tropical Party
Ingredients used in this recipe
For the pearl oyster shells:
For the pearl oyster shells you are going to need Nilla Wafers. Nilla are an American wafer cookie from a brand called Nabisco. We don’t have those in the UK, but you can buy Nilla Wafers on Amazon UK – although because they’re imported, they’re on the pricey side.
However, never fear as I’ve found a few British substitutes! They may not look exactly the same, but they will still work. I found these on Tesco’s website (as that is where we shop), so look for similar in your supermarket:
- Viennese Swirl Biscuits – not to be confused with the regular Viennese Swirls which are sandwiched together. These ones are single biscuits.
- Mini Shortbread Bites – on the thicker side, but would still work
- Polish Biskopty Homemade Sponge Biscuits – these look quite similar to Nilla, but maybe a bit thinner?
- Amaretti Biscuits – A completely different flavour (almond), and on the thicker side too, but I think they could work.
- Iced Gems – these are a bit of a stretch, but I saw them and thought they could work… at a push! Just pop off the icing gem part and use the biscuits. Although these are probably way too small for what we want, you could do a cluster of them instead?
For the oyster pearls, you will need chocolate pearls in white and silver.
For the cupcakes:
- Cupcakes – you can use store-bought cupcakes (get whatever flavour you like!), or you can bake your own from scratch. Here is The BEST Vanilla Cupcakes Recipe – which is my tried and trusted recipe that I’ve been using for-ev-er! (It also tells you how to make chocolate cupcakes too.)
- Frosting – again, you can make your own, or buy tubs of the ready-made stuff. I recently discovered Pilsbury Frosting which comes in a range of bright colours and perfect for this recipe!
In fact, the colours used in these cupcakes are all available from Pilsbury:
- Aquablue Frosting – and it even comes with the fish-shaped sprinkles that you also need
- Bold Purple Frosting – save those sprinkles for Halloween!
- Hot Pink Frosting
Or buy white vanilla frosting and use food colouring to tint it. (In fact, you also need plain white frosting for the sandy beach side of the cupcakes.)
Food coloring is available in various forms. You’re most likely to find liquid coloring in your grocery store, and other types of coloring like gels, pastes, and powders in more specialised cake decorating shops. The cheapest option is liquids, but they can alter the consistency of your frosting and cake batter, so I prefer to use pastes or gels which doesn’t. A little goes a long way with food coloring gels and you can usually get a much deeper shade than you would with liquids.
Equipment used in this recipe
This recipe uses American cup measurements. Since I use this type of measurement often, I find it handy to have a set of measuring cups in the kitchen.
If you’re making your cupcakes and frosting from scratch, then you’ll, of course, need the related equipment for that – mixer, bowls, spatula, cupcake pans, cupcake liners etc., in addition to the decorating equipment you will also need:
You will find the oyster cupcakes video on my YouTube Channel – save it to your Playlists for future reference (and don’t forget to subscribe while you are there!).
How do I make Pearl Oyster Cupcakes?
Let’s assume your cupcakes are ready to be decorated… the first thing you want to do is reserve 2 Nilla Wafers* per cupcake. So a batch of 12 cupcakes needs 24 Nillas. I would reserve a few extras as spares, just in case any break.
*or other substituted cookie.
Making the oyster shells:
You then want to crush up the remaining wafers into fine crumbs – this is going to be the sand for the beach portion of your cupcakes. Place the Nillas in a food bag, and using a mallet or rolling pin, bash away until you get the texture you need.
Now it’s time to make the oyster shells. Fill two piping bags – one with purple frosting, and the other with pink. Or you could just use one colour – your choice.
Pipe a small amount of frosting onto a Nilla, press a chocolate pearl onto the edge of the frosting and place another wafer on top to complete the oyster. Continue until you’ve made them all and set to one side.
Making the beach topping:
With the oyster decorations made, let’s move onto decorating the tops of the cupcakes.
Place some white frosting in a piping bag with the star tip attached, and pipe over about half of the cupcake. Don’t worry about being neat as it’s going to get covered in Nilla Wafer “sand” in a moment.
Dip the frosted side of the cupcakes into the crushed cookies/biscuits/wafers (whatever you call them!) to cover completely.
Making ocean waves topping:
With the beach side done, it’s time to add the waves breaking onto the shore.
Wash the star tip to remove the white frosting, place in a new piping bag, and fill with blue frosting. Pipe across the cupcake in a ripple motion to create a wave against the beach.
Then add a few fish-shaped sprinkles into the frosted ocean waves.
Finishing the cupcakes:
Pipe a little frosting to the base of the oyster shell to attach to the beach side of the cupcakes, and your Pearl Oyster Cupcakes are complete!
Make It A Meal!
Looking for some mealtime inspiration to go with these cupcakes? I’ve got you covered!
- Appetizer: Cornflake + Coconut Shrimp with Citrus Mustard Dressing
- Main Dish: Asian Salmon
- Salad: Crunchy Vegetable Noodle Salad with Peanut Dressing
- Beverage: Totally Tropical Blue Hawaiian Cocktail (Mocktail version included!)
Party Theme Ideas
I’ve suggested making these cupcakes for a Mermaid Party or an Under the Sea Party, but what if you’re looking for some other party theme ideas? Not to worry – here are some of the parties I’ve thrown
- Peppa Pig Party Printables + Fun Party Ideas
- My 40th [Un] Birthday Hawaiian Luau
- Nintendo Themed Birthday Party
More Cupcake Recipes
Once you’ve made these ocean-themed cupcakes I know you’ll be looking for more cupcakes to make – here are some for you to take a look at:
- Make these Scary-Cute Monster Cupcakes for Halloween, or a monster-themed party!
- These Fireworks Cupcakes can be made any time you need a festive cupcake – not just on the 4th of July!
- Throwing a musicals themed event? Make a batch of these Wizard of Oz Cupcakes
Pearl Oyster Cupcakes
Ingredients
- 12 Cupcakes
- 1 – 2 Cups. Vanilla white frosting
- 1 – 2 Cups. Blue frosting
- ½ Cup. Pink frosting
- ½ Cup. Purple frosting
- 1 x 11 oz. Box Nilla Wafers divided
- Chocolate pearls in white and silver
- Fish shaped sprinkles
SUGGESTED PRODUCTS
Instructions
- Remove 24 Nilla Wafers, and set aside to make oyster decorations.
- Place the remaining wafers in a food bag, and crush into fine crumbs. Transfer to a bowl and set aside.
- Fill two piping bags – one with pink frosting, the other with purple – snip off the tip of the bags.
- Pipe a small amount of frosting onto 12 of the reserved wafers in alternate colours. Gently press a chocolate pearl into the edge of the frosting, and add the other Nilla wafer on top to complete the oyster decorations. Set aside.
- Place an open star tip into a piping bag and fill with white frosting. Pipe over one half of each cupcake – you don't have to be precise.
- Dip each of the frosted cupcakes into the crushed Nilla Wafers to create the sandy beach.
- Place an open star tip into a piping bag and fill with blue frosting, and pipe in a ripple motion on the uncovered half of the cupcake to create a wave.
- Add a few fish shaped sprinkles.
- Pipe a little amount of frosting to the bottom of the oyster shells, and attached to the beach side of the cupcakes.
Video
Notes
- Large open star tip
- Piping bags
Nutrition
Nutritional information is always approximate and will depend on the quality of ingredients used and serving sizes. If you need exact calories and macros, please do your own calculations.