How To Knit A Caterpillar Draught Excluder
Home » CREATE » Crafts » Winter Crafts »As winter draws in, it’s time that we start thinking about making our homes as warm and toasty as possible.
So today I’m sharing a pattern so you can knit a draught excluder in the form of a cute colourful caterpillar!
The weather (at least where I live) has definitely taken a cold turn and is a sure sign that winter is on its way.
Whilst we don’t always have the warmest of summers in the UK, I know I notice a huge difference in the temperature of our house once November comes around.
Affiliate Disclosure
We have included affiliate links to products and services related to this post.
We may earn a commission if you purchase after clicking on those links.
As an Amazon Associate, I earn from qualifying purchases.
Read Our Full Disclosure Policy and Privacy Policy
Knit A Draught Excluder
Before I get onto the pattern (which First Utility has put together and I wanted to share with you), did you know that statistics reveal that draughts are responsible for 10% of heat loss in the average home and up to 25% in some households? That’s a lot of heat to lose, especially in the coldest weeks of the year.
By draught-proofing, households can save between £25 and £55 per person on the annual energy bill.
It can be expensive to get the pros in to sort out the draughts in your home, so why not knit a draught excluder, which will be a lot cheaper, and a really fun activity!
First Utility has provided an illustrated guide that details the steps of making your own caterpillar draught excluder.
And there is also a handy dandy PDF to download at the end of this post so that you can print out and follow the pattern.

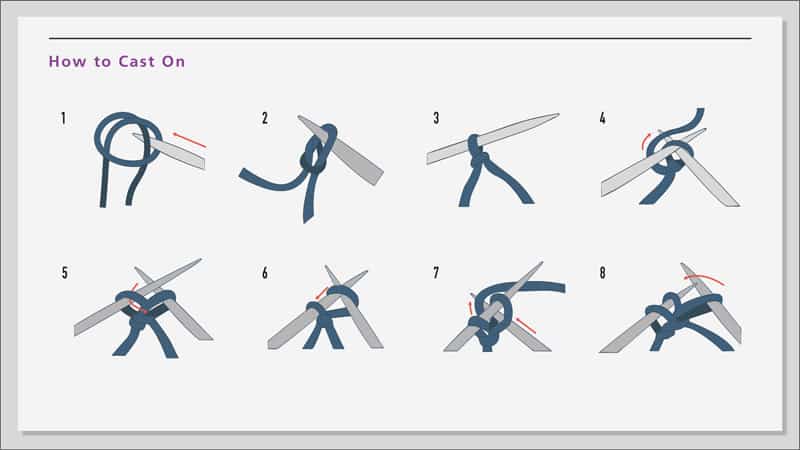
Illustrated Instructions
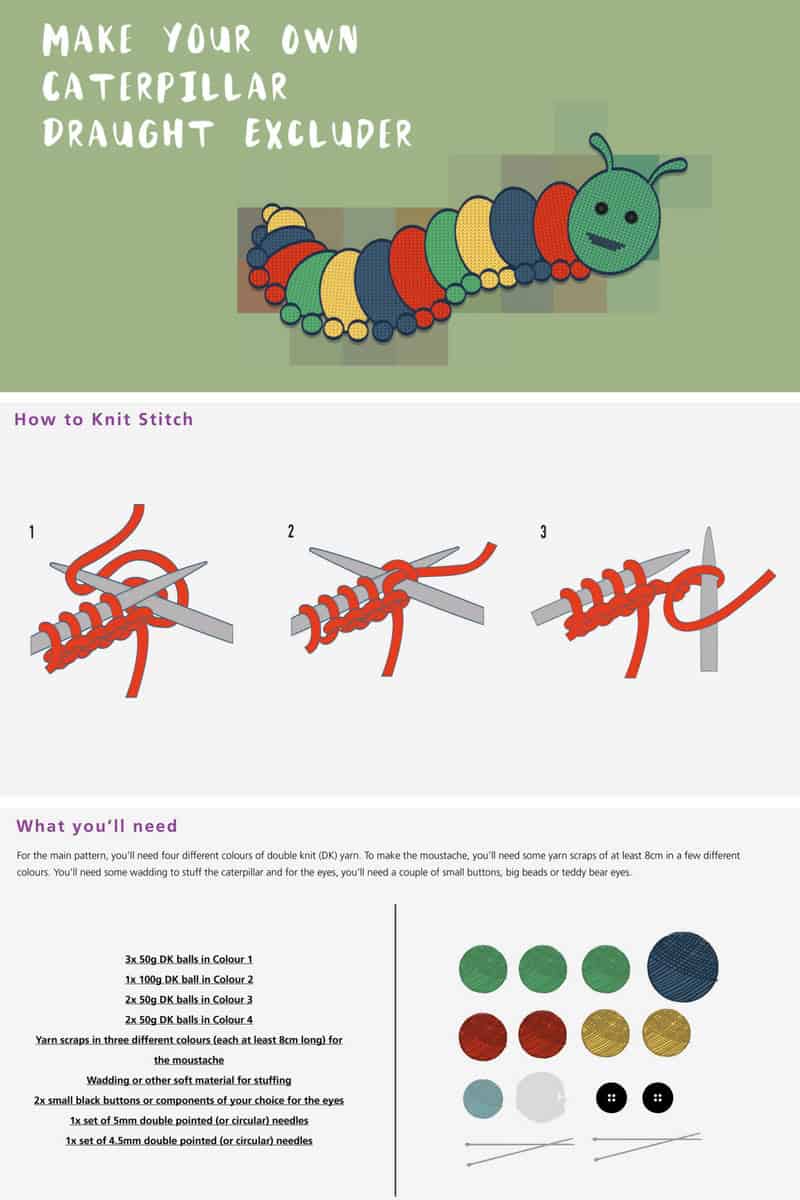
The instructions for how to knit a draught excluder do include illustrations of how to cast on, as well as how to knit stitch and purl stitch.
If you’re an accomplished knitter you can skip past those, but if you’re a beginner you might find the refresher handy.
If you can’t knit and find the picture demo hard to understand, maybe you know someone who can knit – a friend, or a relative, perhaps?
And if that isn’t possible, there are TONS of tutorials on YouTube that will show you how!
I always call upon my mother-in-law for help as she is a lifelong knitter.
I do know how to knit, but it’s one of those things I don’t do very often, so I end up having to learn all over again – but once I start knitting, it all floods back quite quickly.

Knitted Draught Excluder Supplies Needed
The guide tells you how much double knit (DK) yarn you need (in 4 different colours of your choice).
You will also need some scraps of yarn (at least 8cm) which the pattern says is for the caterpillar’s mustache!
And there are other items to finish off – including wadding to stuff the caterpillar with, and buttons for eyes.
- 3 (50g) DK Balls in colour 1
- 1 (100g) DK Ball in colour 2
- 2 (50g) DK Balls in colour 3
- 2 (50g) DK Balls in colour 4
- Wadding
- 2 Small Black Buttons
- 1 set (5mm) double-pointed needles – or you could use 5mm circular needles
- 1 set (4.5mm) double-pointed needles – or you could use 4.5mm circular needles
If you are a crafter you may well have all the supplies ready to get started right away!
Knitting Supplies on Amazon (UK)
Knitting Supplies on Amazon (US)
Caterpillar Color Combinations
There are some colour combination suggestions provided, but you can use any colour you like – depends on how thrifty you want to be.
I have got so much wool that would be perfect to use for this cute caterpillar draught excluder, so mine may well end up being multicolored!
Caterpillar Assembly
Once the head and body have been made and stuffed, it’s time to make the legs and antennae.
You can make the legs to match the body segments, or use a contrasting colour – it’s your caterpillar draught excluder – you customise him or her just as you wish!
With all the pieces made, it’s time to assemble!
Once complete, place your caterpillar along the draughty door and bask in the warmth that it’ll provide.
It really is amazing how much of a difference a draught excluder can make.