Cricut Explore – Out of the Box! #ExploreTheSeasons
Home » CREATE » Crafts »Following on from my posts about the UK launch of the Cricut Explore, I’m writing today to share my Out of the Box experience with my new Cricut Explore!
I wanted to show you just how easy this Cricut cutting machine is to use, and in the coming months I can’t wait to share lots of projects with you. My mind is already awash with lots of ideas – it’s just the finding the time to do them…although, with the Cricut Explore I know that it’s going to make jobs like cutting out cupcake wrappers and treat boxes a breeze, and saving me time (and my hands) on cutting things with scissors!
The first project you are prompted to make is a ‘Thank You’ card, using materials that come with your Cricut Explore. I can’t help but feel that it is thank you from Cricut for buying their machine, which I think is lovely, however, I made mine with a sincere thank you to Cricut for selecting me as one of their super bloggers!

Right, on with my out of the box experience which I’ll walk you through with photographs and since both hubs and I got quite geeked out at watching the Cricut Explore cut, I’ve also included a video of how it works!
When you receive your Cricut Explore, do not be put off by the huge box that it comes in! It’s a precious machine inside and is very well protected with packaging – hence the box size.

Everything inside is neatly packed into a tray with the instruction booklet and a package of materials so that you can start crafting straight out of the box! I’m sure a lot of crafters and DIYers out there will have their stash of stuff waiting to be cut, but if you don’t this is a really handy and thoughtful extra.
Using handy tabs at the side of the tray, you can easily lift it out – normally you really have to struggled with packaged goods don’t you? And don’t worry, those hairy arms belong to my husband!
You are then greeted by your new Cricut Explore…well, you’re greeted by it stored safely inside a tote bag – again, making it really easy to lift out of the box. Even better, the tote is designed to be used to carry your machine…making it really easy to bring along with you to any craft meetups you might have or when out to visit a friend for a crafting session. Just fabulous! It also, as I’ve discovered, makes a fantastic dust cover to protect your machine! I turn the bag upside down and voila – instant dust cover!

I took everything out of the box – the Cricut Explore machine, still in its tote bag, the power lead and the USB lead for connecting to a computer or laptop; the cutting mat, the pen (the Cricut Explore not only cuts, but writes too!), instructions and the materials pack. The blade is already installed for you.


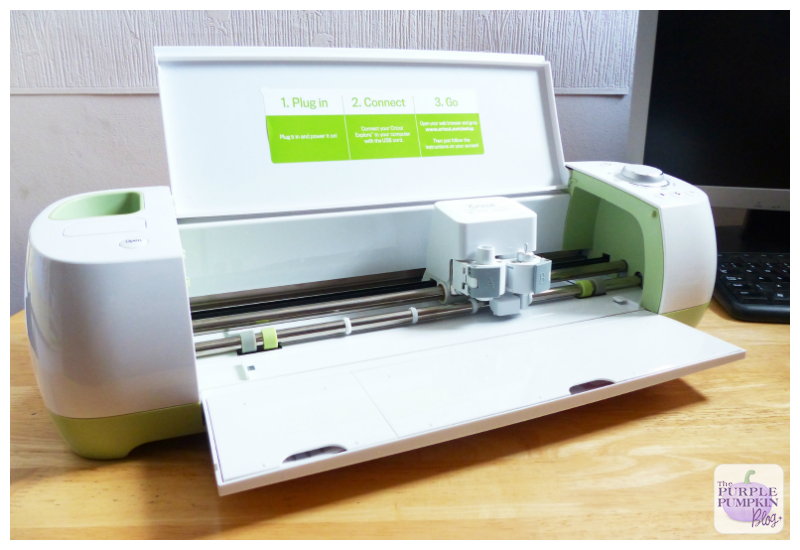
The first thing my husband said when he saw the Cricut Explore was how smart and stylish it looked. I completely agree. It looks great sitting on my work desk and doesn’t take up much room at all when it is all closed up. Pressing the open button, you are greeted with a Close Encounters of the First Kind style opening of the lid and tray, I half expected dry ice smoke to come flowing out!! The operation of this is so cool (I’m so easily pleased!!)
The instructions are simple to follow, so simple that the instruction booklet doesn’t even need to be looked at – they’re stuck onto the inside of the lid for you…
- Plug it in and power it on.
- Connect your Cricut Explore to your computer with the USB cord.
- Open up your web browser and go to www.cricut.com/setup. Then just follow the instructions on your screen!
There is a handy dial on the machine so that you can select which material you are going to cut. This then sets the appropriate position for the blade. You can even create your own custom settings, which no doubt I’ll explore as I get to know the machine better.
There is of course an on button, and three more buttons under the dial which flash in order to let you know what to do next. Very smart.
The housing for the cutting blade and pen are marked A and B – remember that B is for Blade and you can’t go wrong…although the machine comes set up for you, so you don’t have to worry!

Not in the box, but available separately, are tools that will help you in all your projects, including scissors to help you cut cleanly, a spatula to help lift your designs from the mat, a weeder so that you can lift the more intricate pieces, a scraper to help you clean the mat after use and tweezers to hold your cut items, handy for very small pieces of materials.
The Cricut Explore also has a tray at the bottom that you can store your tools and blades – super handy!


Using the Cricut Design Space I was able to open the first project designed to introduce you to the Cricut Explore – a Thank You Card.

I pressed the black card that came with inside the materials pack to the cutting mat, and now instead of me telling you what happens next, watch my video and see for yourself!
I don’t know about you, but both hubs and I were really impressed and sat in awe as we watched it go through the cutting and writing motions! I then assembled my card by slotting the turquoise coloured card into the slots which the Cricut Explore also cut as part of the design. Scored to fold over (there is a scoring tool also available to purchase)
Ta-da!!! My first project out of the box with the new Cricut Explore!

All that was left to do was to scrape the remaining bits of card from my cutting mat, so I used the scraper to easily lift them off.

Not wishing to stop there, I wanted to see what more the Cricut Explore could do, so I picked another project from the Cricut Design Space – Papel Picado – and dug out some cardstock from my stash. Since my machine is still new to me, again, I sat in awe as I watched it cut the pieces to form these pretty banner, and knew that I would never have been able to do this myself with just scissors and a craft knife!
Papel picado means perforated paper and is a considered to be a Mexican folk art. It was perfect as a decoration for our family BBQ which just so happened to fall on Cinco de Mayo! So I threaded some string through the holes and hung it out in the garden.
I can’t wait to craft and create even more with the Cricut Explore and will look forward to sharing with you over the course of the year!


Debbie Johnson
July 29, 2014 @ 8:25 pm
So… it’s nearly my birthday… I’m so tempted (and I know my mum really wants to share!) so… two/three months on, what are your thoughts? What additional stuff will I need to buy? (I see you reference the tools) and what are any downsides? (I read on a US blog you have to be online to use the designs?)…. any tips would be appreciated. x
Michelle Ordever
July 30, 2014 @ 7:43 am
I still think it is fabulous – it has the scope to create lots of different projects – I’ve got a long way to go before I’ve tried everything that this machine can do.
You get a matt and a pen as standard. the other tools are very handy, but you could get by without them if you didn’t want to fork out for them too, but the scraper tool especially is great for removing small pieces from the matt.
The only downside that I find is not being able to use it offline, which is something I hope that Cricut will address. Whilst so many of us are connected these days to the internet, it’s pretty frustrating when you can’t connect (downtime with your ISP for example) and can’t cut! This has happened to me a few times now and there has been some rage on my part!
Other than that, I can’t think of any other downsides at the moment! Hope this helps! x
Debbie Johnson
August 14, 2014 @ 8:35 pm
Thanks so much :) Hobbycraft have the toolkit thrown in at the moment, so 10 days to go! xx