Halloween Spider Web Cookies
Home » COOK » Recipes » Holiday Recipes » Halloween »Welcome to Day 23 of Crafty October – a month of Halloween ideas at The Purple Pumpkin Blog! Don’t forget to check out last year’s ideas if you need more inspiration.
Today I’ve been in the kitchen baking cookies! Trying to find my box of cookie cutters was a bit of a nightmare, I know I keep harping on about everything still being packed from our house move, but it’s true! So I had to settle for some plain round cutters that I did find. Whilst they were baking, it dawned on me that I could turn them into Halloween Spider Web Cookies, so that’s exactly what I did!

Baking Mad sent me some cake decorating goodies to try out at home, and this was an ideal project for me to try them out on. I was sent a couple of different food colours and flavours, so I picked out my favourite colour – purple (of course!) and decided to make my cookies almond flavoured. I was also sent some ready made piping icing tubes, but I didn’t need to use those today.

To decorate your cookies (you can use your favourite cookie recipe, or try out my recipe below) to look like spider webs you will need:
- royal icing sugar
- food colouring
- bug shaped sprinkles (optional)
- cocktail stick
I will be telling you how to do two different piping techniques today – one is piping and the other is flood filling. They both require royal icing that are different consistencies.
I’ve not given amounts in the ingredients list for the icing, as I make it up to the correct consistency with a little trial and error! Too runny? Add more icing sugar! Too stiff? Add more water!
For my Halloween spider web cookies, I made a batch of white icing first….
A couple of tablespoons of royal icing sugar and a splash of water – stir together to combine and then beat vigorously. Get it to stiff piping consistency first – when you pull up some of the icing with a spoon it should stand up and not flop back down.
Divide off some of the white icing to colour for your webs, I coloured mine purple. As you add the food colouring, the icing may loosen – add more icing sugar if it does. When ready, fill a small food bag with the icing, and put to one side – don’t snip off the end of the bag just yet.
Now you want to make the remaining icing to flooding consistency – water it down – a little at a time until it is not so stiff. When you pick up some of the icing with a spoon and let it fall back down, count to five, if the icing “disappears” back into the pile by the time you finish counting, then you’re ready. You don’t want it to be too runny though – it is a trial and error thing! Pour the white icing into another food bag and set to one side.

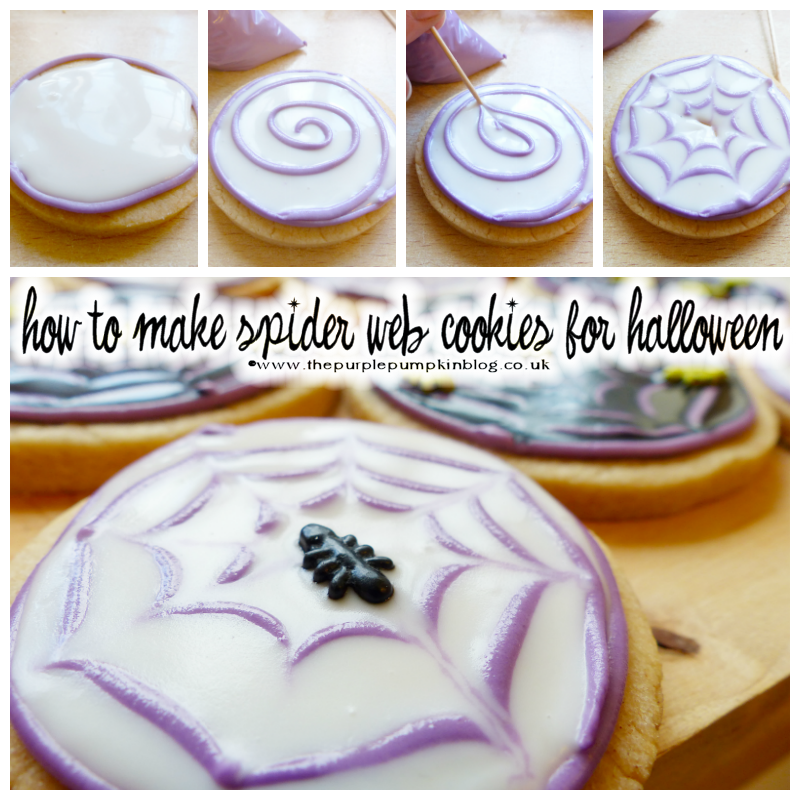
Snip a teeny tiny piece off the corner of your stiff icing bag, and pipe a continuous line around the edge of the cookie. Continue doing this to all the cookies. By the time you have finished doing the last cookie the first one will be dry.
Place a damp cloth over the end of the piping bad so that it doesn’t dry out whilst you work on the next stage of your spider web cookies.
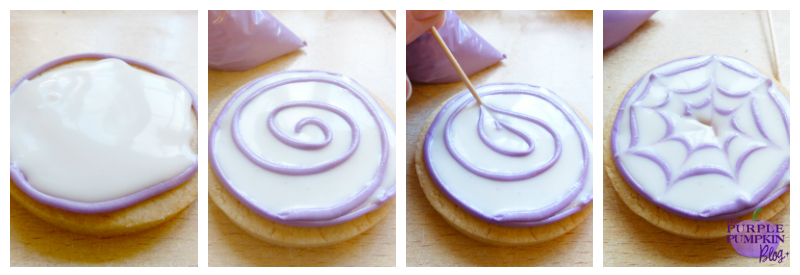
Snip a larger piece off the corner of your flood fill icing and start to fill inside of the outer line. You can use a cocktail stick to butt it up to the edges. Don’t add to much – you don’t want it to go over the sides!
For this stage, you’ll want to work on one cookie at a time. Cover the flooding piping bag and take your stiff icing again. Starting at the centre of the cookie, pipe a spiral working inside out. Then, use a cocktail stick to draw lines from the centre out to the edge, as shown above. Wipe the stick between each draw.
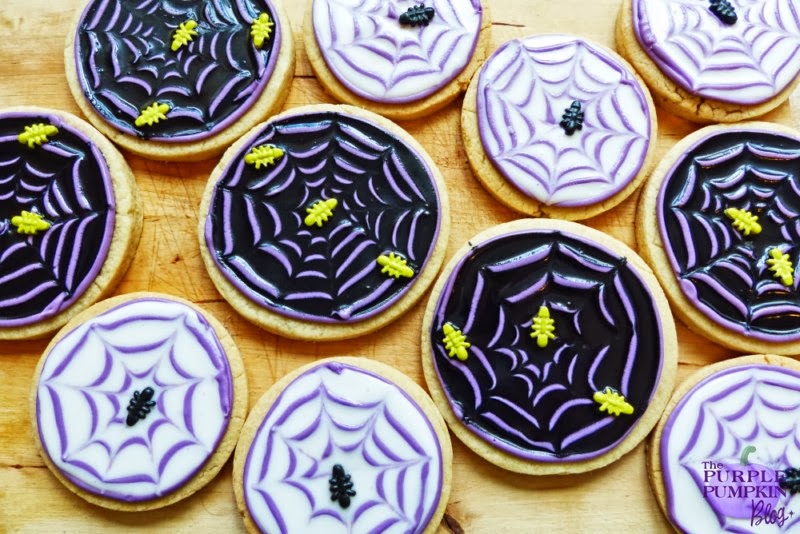
You can then leave the cookie to dry as it is, or add a bug shaped sprinkle to it! Continue flood filling and spiral piping your cookies until they’re all done!
I made mine in both black and white – I hope you give these a try! Once you get the hang of it, they’re really fun to make!


Halloween Spider Web Cookies
Ingredients
- 540g plain flour
- 2 tsp baking powder
- 220g sugar
- 220g butter, softenend
- 1 egg
- 1 tsp vanilla extract
- 1 tsp almond extract
Instructions
- Preheat the oven to 175C/Gas 4.
- Sift the flour and baking powder together in a bowl and set aside.
- Cream the butter and sugar together. Beat in the egg, vanilla and almond extracts.
- Add the flour and baking powder mixture a little at a time until all has been combined to form a rough dough.
- Tip out onto a floured surface and knead it together to form a smoother dough - it will be quite crumbly, but it will come together.
- Roll out to about 5mm thick and cut out your desired shapes.
- Place onto a greased baking sheet and pop into the fridge for 10 minutes before baking for 10-15 minutes until golden.
- Allow to cool for a few minutes on the baking sheet before transferring to a wire rack to cool completely.
- When the cookies are cold, decorate as you wish.
Nutrition Information:
Yield: 32 Serving Size: 1Amount Per Serving: Calories: 140Total Fat: 6gSaturated Fat: 4gTrans Fat: 0gUnsaturated Fat: 2gCholesterol: 21mgSodium: 77mgCarbohydrates: 20gFiber: 0gSugar: 7gProtein: 2g
This site uses Nutritionix to provide estimated nutrition. Nutritional information is always approximate and will depend on the quality of ingredients used and serving sizes. If you need exact calories and macros, please do your own calculations.

Emily
October 26, 2013 @ 10:41 pm
The look just perfect you clever lady! Pinned and Stumbled. Thanks very much for linking up with #recipeofthweek. There’s a new linky live now (www.amummytoo.co.uk/2013/10/extraordinary-recipeoftheweek/) would be brilliant to see you there again! :) x
Michelle Ordever
October 28, 2013 @ 8:37 pm
Thank you :) I love how these turned out! Will certainly link up again! x
Daniella
October 23, 2013 @ 6:44 pm
Amazing! They look too good to eat.
Michelle Ordever
October 23, 2013 @ 6:56 pm
lol – my husband will beg to differ! :D