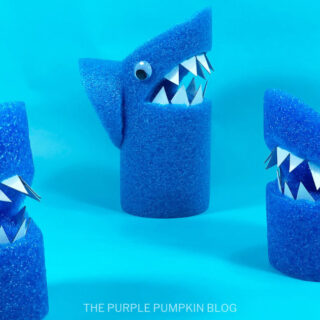
Pool Noodle Shark Craft
This pool noodle shark craft is an awesome activity for Shark Week, or for making as decorations for a Baby Shark Party!
Materials
- Blue Pool Noodle
- Googly Eyes
- Cardboard – scrap piece
- Acrylic Craft Paint – white
TOOLS
- Low Temp Glue Gun and Glue Sticks (Hot Glue will melt the Pool Noodles)
- Paint Brush
- Serrated Kitchen Knife
Instructions
- Have an adult cut the pool noodles into 4" to 6" sections with serrated kitchen knife to create the shark bodies.
- Cut the top off at an angle - this piece will become the shark fin.
- Part way down the body, make a horizontal cut - don't cut all the way through! This will be the bottom of the shark’s mouth.
- Make a diagonal cut to meet the horizontal cut. This will be the top of the shark's mouth.
- Cut a long sliver at the back from the back of the shark body.
- Attach the fin to the back of the shark body with glue gun. Hold in place until set.
- Attach one googly eye to either side of shark head, just above the jaw, with glue gun.
- Paint a scrap piece of cardboard with white acrylic craft paint on both sides. Let dry completely.
- Measure and cut 1” strips of cardboard. Then cut the strips into ½” rectangles. Cut all four corners off each rectangle creating diamond shapes. These will become the shark’s teeth.
- Insert shark’s teeth into the top and bottom of the shark’s mouth. Use the tip of an open pair of scissors to
make a slit in the pool noodle foam if you have any difficulty inserting the shark’s teeth. 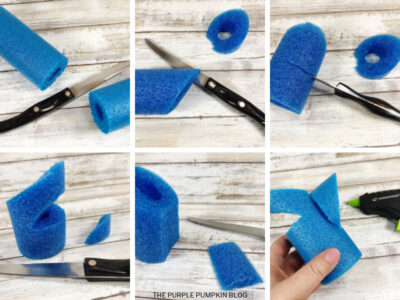

Handy Tips & More Ideas
If you are using pipe insulation/lagging to make your sharks, I recommend cutting them and attaching the fin first, and then painting them. Leave to dry completely before continuing with the rest of the steps.
Did you make this project? Share it!Tag @_ThePurplePumpkinBlog on Instagram with the hashtag #TPPBCreate!