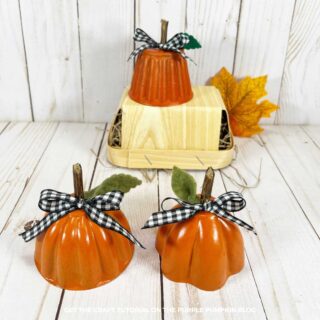
Mini Cake Pan Pumpkins
Mini Cake Pan Pumpkins are a must-try autumn craft! With cake tin and vibrant colors, you can create beautiful fall decor.
Materials
- Mini Cake Pan Molds
- Bright Orange Spray Paint
- Burnt Orange Spray Paint
- Black and White Gingham Ribbon
- Olive Green Felt Scraps
- Dark Green Felt Scraps
- Small twigs
- Leaf Pattern
TOOLS
- Pruning Sheers/Wire Cutters
Instructions
- Wash and dry the mini cake tins well. In a well-ventilated area (or outside), spray the outside of the mini tin molds with bright orange and burnt orange paint. Set aside to dry. Apply a second coat if required. TIP! Mix the colors slightly by lightly spraying one color on the other.
- Cut a twig into 1"/2.5cm sections with a pair of pruning shears. Use a hot glue gun and glue sticks to attach the twigs to the top center of the cake tins.
- Cut small leaf shapes from green felt freehand or by using the printable leaf pattern. To create dimension, apply a glue dot at the base of each leaf and fold it in half. Attach leaves to the top of the mini tin mold pumpkins with a glue gun and glue sticks.
- Measure and cut 8"/20cm lengths of ribbon. Tie the ribbon into a bow and secure it to the stalk with hot glue. Display where desired.

Did you make this project? Share it!Tag @_ThePurplePumpkinBlog on Instagram with the hashtag #TPPBCreate!