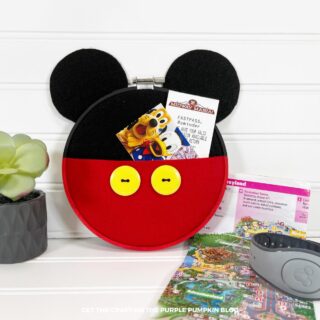
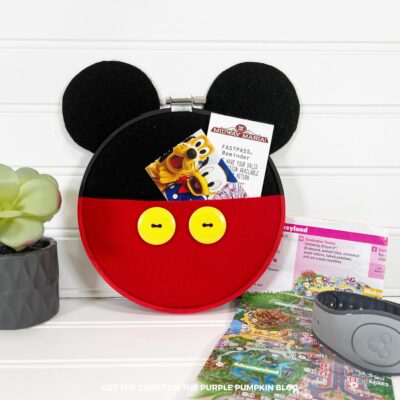
Mickey Mouse Pocket Organizer
Bring Disney magic to your home with this Mickey Mouse Pocket Organizer Craft. A fun project for all ages, it's perfect for adding a touch of whimsy to your DIY home decor.
Materials
- 6- inch Wooden Embroidery Hoop
- Felt Fabric 9" by 12" – Black, Red
- Acrylic Craft Paint – Black Red
- 2 Yellow Buttons
- Black Embroidery Floss
TOOLS
- White Chalk Pencil
- Circle Template
- Paint Brush
Instructions
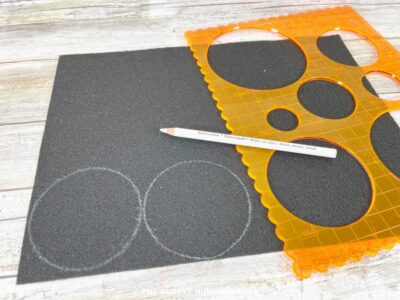
- Trace two (3-inch) circles onto black felt with a white chalk pencil. Cut out the two circles with scissors inside the lines for a clean finished project.
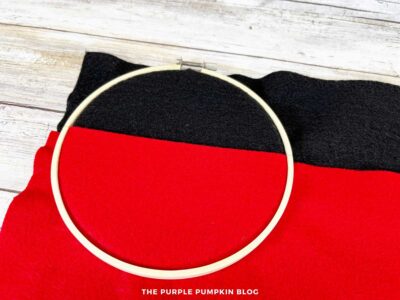
- Loosen the screw at the top of the wooden embroidery hoop and separate the inner and outer rings. Layer the red felt on top of the black felt so that 4″ (10cm) of the green is at the top and 3″ (7.5cm) of the red is at the bottom. Place the inner hoop underneath the layered felt. Fit the felt loosely into the outer embroidery hoops. Pull the felt gently from the back to ensure the felt is taught, and then tighten the screw at the top of the hoop.
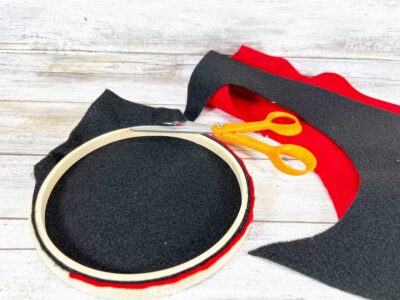
- Use scissors to trim the excess felt from the back of the hoop. Apply a thin line of hot glue to the cut raw edge of the felt to secure it.
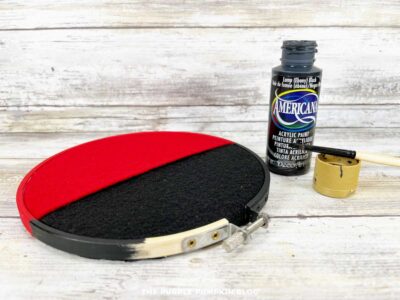
- Paint the top of the outside and front edge of the wooden hoop with black acrylic craft paint, lining it up with the black felt. Set aside to dry. Apply a second coat if necessary. Paint the bottom of the outside and front edge of the hoop with red acrylic craft paint, lining it up with the red felt. Set aside to dry. Apply a second coat if necessary.
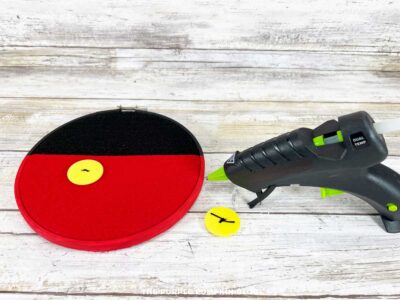
- Thread black embroidery floss into the holes of a large yellow button. Secure in the back with a knot and trim the tails. Repeat with the second button. Attach the buttons to the top edge of the red felt pocket with a glue gun and glue sticks. TIP! Slide scrap paper into the pocket so the glue doesn’t seep through.
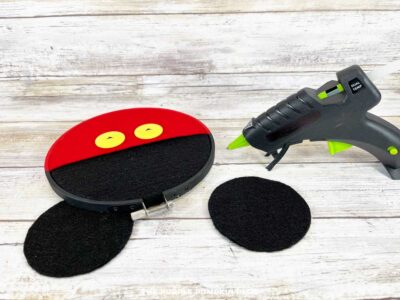
- Using the metal screw as your center point, attach Mickey's ears to the hoop's top right and top left. with a glue gun and glue sticks. Flip the hoop over and secure the ears to the back of the embroidery hoop with a glue gun and glue sticks. Finish the back with a circle of red or black craft felt if giving as a gift.
- This is an optional extra step. Create a hanging loop with some ribbon and tie it to the metal screw to hang your Mickey Mouse organizer on the wall. Slide your paper mementos and tickets into the pocket and display your organizer where desired!
Did you make this project? Share it!Tag @_ThePurplePumpkinBlog on Instagram with the hashtag #TPPBCreate!