
Mayor Christmas Ornament Craft
This Mayor Christmas Ornament Craft is made with construction paper and is so easy to assemble using a free printable template!
Materials
- Construction Paper or Cardstock in the following colors: Gray Black, White, Peach
- Silver Fine Glitter optional
- Black String or Ribbon
- Crayons
TOOLS
- White School Glue (PVA Glue)
- Glue Stick
- Laminator & Laminating Sheets (optional)
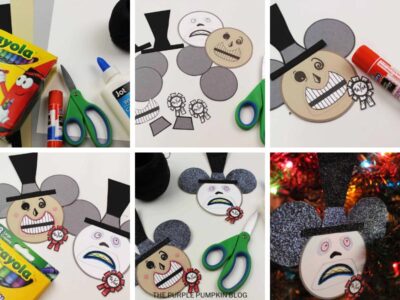
Instructions
- Download and print out the Mayor ornament template onto corresponding colored papers or cardstock (Link in the blog post). Cut out and set aside.
- Space the ears evenly apart and stick behind the top of each head with a glue stick.
- Stick the gray band to the black hat, then stick between the ears.
- Sick the white teeth to the happy face.
- Add color to each face with crayons: color the Mayor rosettes in red, add rosy cheeks to the happy face and outline the smile with red. Color the teeth of the sad face yellow, and outline the mouth in blue. Add blue to the outer eyes, and red to the inner eyes.
- Stick the rosette in place.
- If you are adding glitter, apply white school glue to the ears and gray band and sprinkle silver glitter over. Shake off the excess and leave to dry.
- Finally, form a hanging loop with a piece of string or ribbon and stick to the back of the ornament.
- If you want, you can laminate the ornaments so that they last longer. Before attaching the loop, run it through a laminator and cut away the excess. Make sure you leave a slight edge as you cut it out so that the laminating sheets don't fall away! Attach the loop to back.
- Hang your Mayor Christmas ornament on your tree!
Video
Did you make this project? Share it!Tag @_ThePurplePumpkinBlog on Instagram with the hashtag #TPPBCreate!