
Dreamcatcher Craft
If you have ever wondered how to make a dreamcatcher, wonder no more, as this tutorial shows you how easy it can be to make one. This is an awesome craft for tweens and teens!
Materials
- Crochet doily
- Yarn – to match the colour of your doily
- Round dreamcatcher base made from cardstock
- Craft feathers x 5 in your choice of colors
- Wooden beads x 19 in your choice of colors
- Craft glue
TOOLS
- Tapestry needle (optional)
Instructions
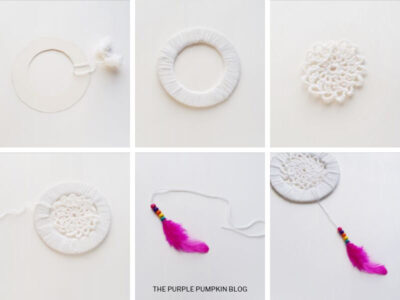
- Make your dreamcatcher ring base from a piece of cardstock. The size of it will depend on the size of your crochet doily. Make it about 1 inches bigger than your doily, and cut the the inner circle just a tiny bit bigger than your doily.
- Wrap yarn all around the base to cover completely. Tie knot at the end, and cut off excess yarn. You can add a dab of glue to keep in place.
- Place doily in center of base and use yarn to attach each point. Snip off excess yarn.
- Cut 5 long strands of yarn. Tie a tight knot to a craft feather. repeat for each feather.
- Thread a wooden bead onto on the yarn attached to a feather, push all the way down to the feather base. You can use a needle to make it easier if you wish.
- Thread on more beads – you can use whichever colours, and as many as you like. This dreamcatcher use 1 x 5 beads, 2 x 4 beads, and 2 x 3 beads.
- Attach the feather and bead hangers to the bottom of the base. And tie a loop to the top of the dreamcatcher to hang up.
Video
Did you make this project? Share it!Tag @_ThePurplePumpkinBlog on Instagram with the hashtag #TPPBCreate!