Chocolate Explosion Cake
I made my chocolate bar cake using a store-bought chocolate cake. However, this basic chocolate cake recipe is ideal for making a chocolate explosion cake! If you have bought a cake to decorate, just to step 12 in the recipe below.
Servings 12
Calories 488kcal
Equipment
Ingredients
For the Cake
- 1 cup unsalted butter softened to room temperature
- 2½ cups granulated sugar
- 4 large eggs room temperature
- 2 tsp real vanilla extract
- 3 cups all-purpose flour
- 2 tsp baking soda
- 1 tsp baking powder
- ½ tsp salt
- 1 cup unsweetened cocoa powder
- 2¼ cup boiling water
For the Frosting
- 2 cup 16oz/4505g unsalted butter, room temperature
- 1 cup 8oz/200g cocoa powder
- 7 cups 32oz/900g powdered sugar
- 2-4 Tbsp whole milk or heavy cream
- 2 tsp real vanilla extract
To Decorate
- KitKat bars 10-12, 4-finger packs
- 40 Maltesers 2-3 regular bags (US candy: Whoppers)
- 40 Cadbury Chocolate Buttons 3-4 treat size bags (US candy: Candy Wafers/Melts)
- Kinder Egg 2 – just in case one breaks, if they both do… oh well, hide it with M&Ms!
- M&M’s – your favourite kind I used Crispy and Peanut (2-3 bags of each)
- Reese’s Peanut Butter Cups 2 x 3 cup packs
- Kinder Bueno 2 bars
- Cadbury Dairy Milk 2 bars (US candy: Hershey’s Bar or Milk Chocolate Lindt bar)
- Snickers 2 bars
- Cadbury Flake 2 bars
- Milky Bar 2 bars (US candy: white chocolate Lindt bar)
- Ultimately you can use whatever chocolate bars/candy bars that you like! You could focus on just 2 or 3 types or go nuts and use ALL the chocolate!
Instructions
- Preheat oven to 180C/350F/Gas 4. Grease and flour 3 (8-inch) round cake pans, then lthe ine bottom with round parchment paper. Set aside.
- Using an electric handheld or stand mixer, cream the butter and sugars in a large mixing bowl. Add in the eggs and vanilla and mix until well blended.
- In a separate large mixing bowl, sift or whisk the flour, baking soda, baking powder, and salt.
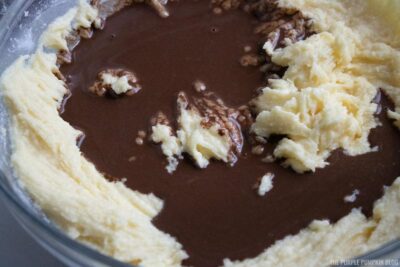
- Mix the cocoa powder and boiling water in a medium bowl until well combined and no lumps remain.
- Alternating between the two, slowly add the dry ingredients and chocolate mixture to the bowl with the butter and sugar. Mix on low speed to incorporate ingredients.
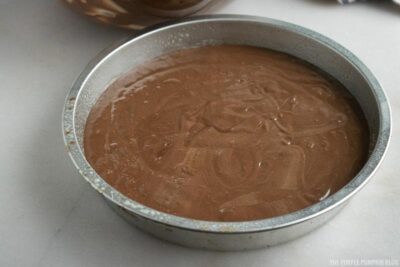
- Divide the cake batter evenly between the three cake pans and place in the preheated oven. Bake for 22-28 minutes, or until a toothpick inserted in the center of the cake comes out clean.
- Remove from the oven and set aside to cool for 10 minutes before transferring the cakes from the pans to a wire rack to cool completely. (Cakes should be cool to the touch before frosting).
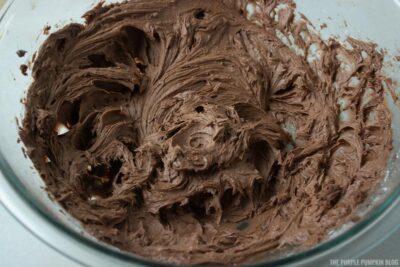
- To make the frosting, use an electric mixer to mix the butter and cocoa powder in a large bowl until well blended. Add the powdered sugar to the bowl and mix at low speed until all of the sugar is combined. Stir in milk and vanilla extract, if used, to reach desired consistency.
- To assemble the cake, place the first layer top-side down on a cake plate. Add one-third of the frosting to the top of the cake layer and spread it out evenly.
- Take the second layer and level off the rounded top with a knife or cake leveler. Place the second layer on top of the first layer, top-side down. Add another one-third of the frosting to this layer and spread it out evenly.
- Repeat this with the 3rd layer, and spread the remaining frosting over the top and sides of the cake.

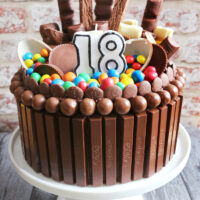
- To decorate the cake break the KitKats into two-finger pieces. I used 11 full-size (4-finger) KitKats, plus one finger!
- Spread some frosting on the back of each KitKat and start to stick it around the sides of the cake. Make sure that all of the embossings are facing the same way, and that the bottoms are touching the cake stand. I added the Maltesers and Buttons around the cake because it was a bit higher than the KitKats and I wanted to hide the cake. So, if you’re going to do the same, you will need to stick them on with some frosting. If you don’t have a piping bag, use a plastic food bag instead – just add a big spoonful of frosting, and squeeze it down into one corner. Snip off the tip and away you go!
- Squeeze a blob of icing onto each of the Maltesers, and stick to the cake on top of the KitKats.
- Squeeze a blob of icing just behind and between each of the Maltesers and gently press in the Buttons.

- I found it easier to work from a focal point. In my case, it was the 18 candle that I placed about a third of the way from the front of the cake, and in the center. If you’re not using a big candle like this, another focal point could be a shaped piece of chocolate like a chocolate bear or chocolate egg.
- I started towards the back of the cake, gently poking the chocolate bars into the cake, deep enough so that they would stay standing. For added support, I added blobs of frosting with the piping bag.
- Some bars I broke up into pieces, and the Snickers bar I cut in half on the diagonal. Basically, just add chocolate bars until you are happy with the way it looks! Use my photos as a guide.

- Place taller pieces of chocolate at the back center, and graduate out in height.
- I then split open the Kinder Eggs – one shattered completely, the other one was a lot better, and I hid the broken bottom bit with some M&M’s and added some more to sit inside the egg halves.
- I tucked in the Reese’s Peanut Butter Cups and halved one to make it look like it was stuck inside the cake. I then filled in the front of the cake with loads of M&Ms.
- And that is IT. Literally, stick chocolate bars into a chocolate cake – ta-dah! I told you it was easy, didn’t I?
Nutrition
Serving: 1 | Calories: 488kcal | Carbohydrates: 71g | Protein: 7g | Fat: 20g | Saturated Fat: 11g | Polyunsaturated Fat: 7g | Cholesterol: 108mg | Sodium: 385mg | Fiber: 2g | Sugar: 43g