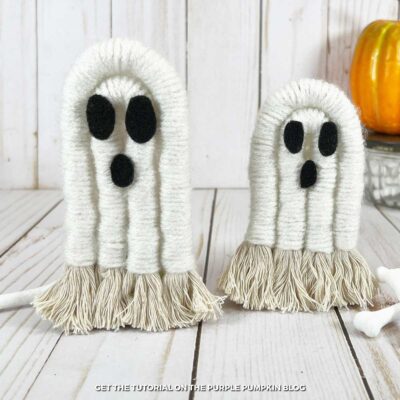
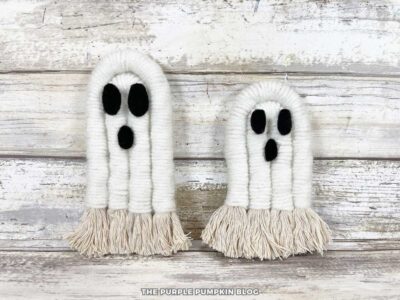
Rope Ghost Craft
Create this cute Rope Ghost Craft with simple materials—it’s an easy DIY project that’s perfect for spooky season decorating!
Materials
- White Yarn
- Thick Cotton Rope
- Black Craft Felt
Instructions
- Measure and cut the cotton rope into lengths—8″ (20 cm) and 10″ (25 cm) for the tall ghost, and 6″ (15 cm) and 8″ (20 cm) for the small one. Wrap painter’s tape around each cut mark before cutting to prevent fraying.
- Lay out all the rope sections on your work surface to plan each ghost. Use a permanent marker to number or label the pieces so you can keep track of their order when assembling later.
- Apply a small dab of hot glue to one end of a rope section. Press the end of the white yarn into the glue and let it cool. Wrap the yarn tightly and evenly around the rope until it’s fully covered, keeping the rows close together so none of the rope shows through. Secure the end with another dot of glue. Repeat for all rope pieces.
- For each ghost, take the two wrapped rope sections and fold them in half. Apply a thin line of hot glue along the fold of the shorter piece and press it against the fold of the longer piece so the two halves sit side by side. Hold them together until the glue sets—this forms the ghost’s body. Repeat for the second ghost.
- Carefully remove the painter’s tape from both ends of each ghost. Use a comb or brush to gently separate the cotton rope fibers, creating a soft fringe that looks like flowing ghost tails. Trim the ends evenly with scissors.
- Cut two oval eyes and a small mouth from black craft felt for each ghost. Glue them onto the front of the ghost bodies to give them their expressions.
- Display rope ghosts where desired—Happy Halloween!
Handy Tips & More Ideas
Handy Tips & More Ideas
- Wrap Tightly for Best Results—Keep the yarn snug and close together as you wrap the rope so none of the base shows through.
- Tame the Fringe—After removing the tape, use a fine-tooth comb or pet brush to separate the rope strands for a soft, wispy finish.
- No Hot Glue?—Liquid craft glue works too—it just takes longer to dry but is safer for kids.
- Add a Pop of Color—Use pastel or metallic yarns for a whimsical twist, or to match your seasonal decor.
- Get Creative with Faces—Cut different expressions from black felt—surprised, happy, or even winking ghosts!
- Make a Mini Ghost Garland—Attach several smaller ghosts to twine for an adorable hanging decoration.
Did you make this project? Share it!Tag @_ThePurplePumpkinBlog on Instagram with the hashtag #TPPBCreate!