
Felt Snowman Ornament Craft
Grab some felt and thread and get creative with this cute Felt Snowman Ornament Craft, ideal to add fun and love to your Christmas tree!
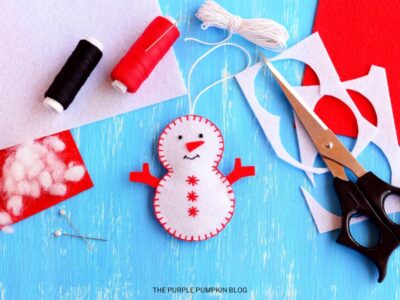
Materials
- Snowman Pattern - download in blog post above
- White Craft Felt
- Red Craft Felt
- Black Embroidery Thread
- Red Embroidery Thread
- Black Seed Beads optional
- White String
- Toy Stuffing
TOOLS
- Pins
- Embroidery Needle
Instructions
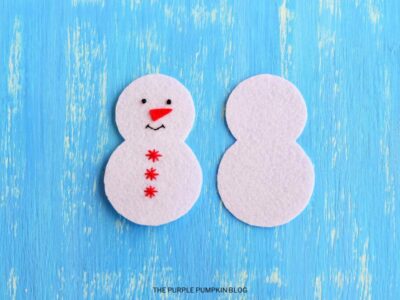
- Print and cut the snowman pattern.
- Using pins, attach the body to white felt, and the arms and nose to red felt.
- Carefully cut out using sharp scissors.

- Using red thread, sew the carrot nose into the center of the head with a couple of stitches.
- Using black thread there are a few ways to stitch on the eyes above the carrot nose. You can attach black seed beads with a few stitches, or sew French knots, or just make a few small stitches to create round eyes.
- Using black thread, sew a smile below the carrot nose.
- Sew 3 stars vertically in the middle of the snowman body to create the buttons. To do this, make two long stitches in a cross (+) and then go over the cross with an X.
- Cut a length of white string, fold over and make a small knot to create a loop to hang your ornament.
- The loop and the arms are stitched into the inside of the snowman. If you are confident with sewing you can hold them in place, but if you are not, use pins to keep everything together while you sew.
Place the loop at the top middle of the snowman's head, and the arms at an angle on either side of the body onto the back piece of the felt. Place the front of the snowman on top, and line the edges together.
Using red thread, and starting at the right arm to secure it in place, stitch the front and back together with a blanket stitch. Continue to sew round to secure the hanging loop and the left arm until you reach the bottom middle of the snowman. DO NOT cut thread!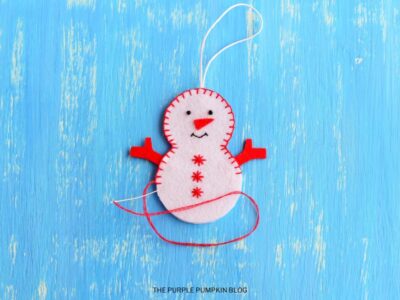
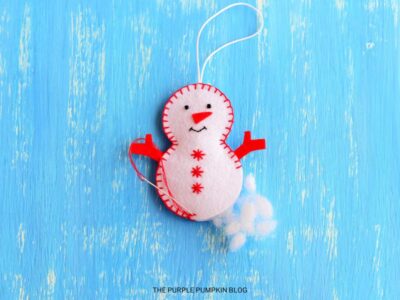
- Insert a little toy stuffing into the gap you have created, until you get a nice rounded snowman. Do not overfill! Then continue the blanket stitch around to close the gap and finish off sewing the snowman together.
- Hang your completed snowman on your Christmas tree!
Did you make this project? Share it!Tag @_ThePurplePumpkinBlog on Instagram with the hashtag #TPPBCreate!